fbpx

Archive for “Flexibility Training” Category

Complete Achilles Tendon Treatment for the Sports Performance Coach – Greg Schaible

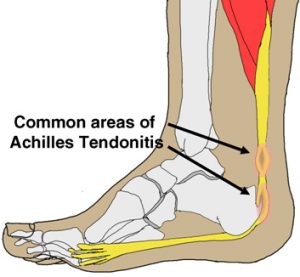
When working in an outpatient orthopedic rehab or sports performance facility you will commonly be treating Achilles Tendon injuries.

That could be an Achilles Tendon Rupture, Achilles Tendinitis, or Achilles Tendinopathy. All are slightly different in their mechanism of injuries but all have the same milestones and goals to progress through in order to experience a full recovery. Obviously a rupture will take a longer time frame to recover than a tendinitis or tendinopathy scenario (but that’s probably a topic for a completely separate post).

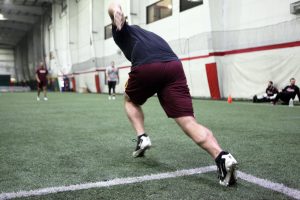
***Be sure to pay special attention to step #3 as this is often missed by many rehab clinicians and strength coaches

The first step into the process is understanding the influence of pain on the problem as well as anatomy and biomechanics influence on the problem. These are two separate issues, as often pain does not correlate directly with the amount of tissue damage present. This makes it important to understand the guidelines of pain (what is okay to work through and what is not okay to exercise through).

We discuss this in the below video:

The other important consideration we pointed out in the video above is the anatomy of the calcaneus. The shape of the heel creates a compression force on the Achilles tendon when stretched which is important to consider if the pain or location of the injury is at the base of the tendon or if the tendon is highly sensitive. For these reasons, it is often NOT a good idea to stretch your Achilles tendon (especially when you are experiencing pain).

Once you understand the pain and irritating factors it is important to understand how to re-establish capacity back into the tendon without aggravating the tissue.

We do this through strengthening in a NON stretched position FIRST. Then start gradually working our way back into STRENGTHENING THROUGH a stretched position. Not hanging out for 30 seconds in a sustained stretched position.

In Part 2: the video below we discuss our two favorite exercises to start accomplishing this:

Step #1 and #2 are the easy parts of the rehab gameplan. However, this will probably only solve about 70% of cases. In the other 30% of cases, you need to consider other factors that may be influencing pain, as well as return to play scenarios for those involved with higher levels of activity!

To understand this further we need to consider the two main archetypes of feet you will see…

A pronated (flat) foot, and a supinated (high arch) foot.

Depending on what media and other healthcare providers have led you to believe, you probably feel that both flat feet and arched feet are undesirable. However, that couldn’t be further from the truth!

Both types of feet are necessary for everyday tasks. It’s no different than the ability to rotate your head right and left. Flat feet and arched feet are two extremes that the body should be capable of experiencing both. If the foot is not adaptable at creating both, and experiencing both at the correct moment, then you limit the foot’s capabilities.

During gait or walking our foot SHOULD experience supination, to pronation, to re-supination. That is normal and necessary mechanics of walking, gait, running, etc.

Pronation is needed to absorb force (store potential energy) or absorb/attenuate forces. Supination is necessary to produce force by creating a rigid foot.

The body’s ability to re-supinate the foot is accomplished through the windlass mechanism. Which is only created by getting great toe extension. The only way to get great toe extension during gait is by allowing the foot to pronate and weight bear over the great toe as your center of mass moves forward (horizontally) during gait, walking, running, etc.

If you cannot pronate effectively, you will not create an effective windlass mechanism and thus not experience re-supination. So all those towel scrunches or tripod foot exercises you are doing with the knee straight have little carry-over to life as during walking, running, etc we are moving forward! The tibia is moving forward, the knee is moving forward, the hips and body are moving forward…

So we must pronate effectively to allow our body, knee, and tibia to move forward. Load the foot and the kinetic chain. Experience pronation effectively and let the body get over the great toe to effectively utilize the windlass mechanism to re-supinate the foot and prepare for propulsion. The video below will hopefully give you a better understanding:

This above step #3 is often the most overlooked problem to Achilles injuries as well as many foot/ankle/knee problems. Understand it, and you can make a world of difference for people who seem to be constantly stuck in a state of injury or rehab purgatory.

Finally, the last step in the process is exposing the tendon back to a situation similar to sport.

Sure eccentric loading is great for the tendon histology development, and the athlete will certainly experience eccentric loading of the tendon in sport. However, a concept often overlooked is the ability to create co-contraction of the kinetic chain to distribute or absorb force more effectively. When running or jumping, the body needs relative stiffness in the ankle (as well as all the other joints) to not crumble when applying a force into the ground. Then store the potential energy to propel themselves forward. Look at any sprinter at top-end speed or dunker taking off from a one-foot jump approach.

Those who do it effectively create a lot of stiffness around their joints at ground contact. Meaning you will not see a large counter movement occur during a one-foot jump approach (or really even someone who is more of an elastic two-foot jumper). A sprinter you will notice a very stiff an rigid foot and even knee at ground contact. This is because the body is co-contracting the calf, hamstring, quad, and glute to quickly apply force and absorb force through the kinetic chain.

In video 4 we discuss some of my favorite dynamic exercises that take into account teaching co-contraction at ground contact.

If you found this article helpful, you will probably love the newly revamped Youth Athletic Assessment Specialist 2.0 course that I helped create for the IYCA.  I hope this gives you a better understanding of the Achilles tendon and how to address it in your training programs.


Dr. Greg Schaible is a physical therapist and strength coach specializing in athletic performance and a regular contributor the the IYCA. Greg is the owner of On Track Physiotherapy and owner of the popular online education resource Sports Rehab Expert. Greg works with athletes and active individuals of all ages. As a former athlete himself, he attended The University of Findlay and competed in both Indoor and Outdoor Track & Field where he earned honors as a 5x Division II All-American and a 6x Division II Academic All-American.


Dr. Schaible was instrumental in putting together the completely updated version of the Youth Athletic Assessment Specialist 2.0 course that covers a wide range of screens, performance assessments, and advanced assessment techniques.  Learn more about the YAAS 2.0 by clicking the image below.

T-Spine Mobility – Jordan Tingman

Incorporating a small amount of mobility each day will eventually turn into great gains over time.

Mobility can be easily thrown into a complete warm-up, within the workout or at the end of a workout. It is much more important to do a little of something, than doing nothing at all.

The upper back/thoracic spine is made up of a lot of different musculature. The muscles surrounding the thoracic spine tend to tighten up, and often get neglected when working on mobility. When ignoring working on mobilizing these areas, the upper back can get tight, limiting overhead exercises and movements.

When thoracic spine mobility is compromised, athletes will unconsciously compensate by creating excess movement in other joints.  This typically means that the lower back has to create excess movement or stability because the T-spine is not functioning adequately.  It’s not uncommon for low back pain to be the result of issues in the T-spine/scapula, so taking a pro-active approach by spending a little time on this area can pay dividends you may never even know about because the athlete will be healthy.  While we’ll never get credit for it, that should ultimately be the goal of all performance coaches.

t-spine mobility

There are various reasons why we need to work on t-spine mobility:

-Overhead and throwing movements can be limited due to tightness

-Tightness can affect posture in the various squat patterns

-Mobilizing any especially tight areas can lead to injury reduction

To warm up for t-spine mobilization, foam rolling the entire upper body can be very helpful in warming up and stretching the muscle belly.

:30 seconds of each area

  • UPPER BACK-Starting with an upper back roll, crossing the arms in front of the chest
  • LATS-Roll out the lats, by keeping the hand palm up, arm by the ear, rolling all the way from the armpit to the mid rib cage area
  • PEC/SHOULDER- roll out the pec/shoulder area using either a foam roller or even better a lacrosse ball to really dig into the troubled areas
  • T-SPINE PEANUT- utilizing a mobility peanut, roll out the erectors or focus on t-spine extension using the peanut.

There are a variety of exercises that can be used to mobilize the t-spine in extension and rotation. You can use everything from foam rollers and kettlebells to bars and bodyweight exercises.

Here are a variety of exercises that can be used for t-spine extension:

Here are some exercises that can be used for t-spine rotation:

These exercises can also be used as an assessment. When you find an athlete who struggles with these exercises, you can spend additional time with them to address the issue.  If you never perform these exercises, you may never know it’s an issue.

Hopefully, this gives you several options to include in your programming.  It’s not necessary to perform all of these exercises in every session, but inserting them into an overall plan will help you address these issues in a pro-active way.

Jordan Tingman – CSCS*, USAW L1, ACE CPT, CFL1 is a graduate of Washington State University with a B.S. in Sports Science with a Minor in Strength and Conditioning. She completed internships with the strength & conditioning programs at both Washington State University and Ohio State University, and is currently a Graduate Assistant S & C Coach at Eastern Washington University.


The IYCA High School Strength & Conditioning Specialist is the only certification created specifically for coaches training high school athletes.  The course includes several hours of video instruction (including a complete Olympic lifting instructor course) and two textbooks with contributions from some of the top strength and conditioning coaches in America.  Click on the image below to learn more about how to become a certified high school strength & conditioning coach.

PNF Stretching – Joe Powell

PNF Stretching is one of the most effective, yet often overlooked, training techniques that coaches can employ to enhance flexibility.

For being recognized as an essential pillar of strength and conditioning, flexibility seems to lack the same attention and interest generated by other physical qualities that are developed through training. For example, look no further than the world PNF Stretchingof strength and conditioning on social media. You’ll be much more inclined to find strength coaches showcasing impressive feats of strength, power, speed or even balance.  How often do you see coaches talking about amazing flexibility routines?

It isn’t the fact that coaches don’t see value in increasing an athlete’s flexibility, it’s more to the effect that there are so many other athletic qualities that garner the spotlight, and thus have a higher emphasis within a training program. Luckily for us there are ways to improve flexibility that happen almost organically. Static stretching is universally known by athletes of all ages, and is typically found in some regard in any warm-up or cool down. A well-rounded strength training program featuring exercises performed throughout a full range of motion will even increase joint flexibility. However with flexibility, as well as other training effects like strength, power, speed, etc, in order to improve and display lasting effects, there needs to be a direct training stimulus occurring regularly.

So how can a coach utilize their allotted time with an athlete effectively and work to improve flexibility beyond simply static stretching at the end of a workout? Three letters: PNF.

What is PNF and how does it work?
Proprioceptive Neuromuscular Facilitation, or PNF, is a stretching technique that is used to improve muscle elasticity, and thus increase flexibility. For years PNF primarily existed in clinical settings, utilized by therapists to restore or increase joint range of motion in patients who were going through rehabilitation. Currently it has gained a lot of traction and is practiced within athletic and even therapeutic settings. The reason why it has gained popularity and should be included in a coach’s repertoire? It works. Research supports its effectiveness in increasing joint ROM.

While research has been conducted on PNF and its possible effectiveness for decades, it is still ongoing to determine what the exact mechanisms behind this form of stretching are. Four theoretical physiological mechanisms for increasing range of motion exist. They are: autogenic inhibition, reciprocal inhibition, stress relaxation, and the gate control theory. These four mechanisms are reflexes that occur when the golgi tendon organs in the tendons of the agonist or antagonist muscle detect harmful stimuli. Between them, these four theoretical mechanisms likely define why increases in joint range of motion are seen when using PNF.

There are two methods of PNF that are typically the focal points of any research on the topic. These two methods are also most commonly practiced in the athletic, clinical and therapeutic realms. They are known as the “contract-relax method” (CR) and the “contract-relax-agonist-contract method” (CRAC).

Contract-Relax Method (CR):
1. The target muscle is stretched and held passively
2. An isometric contraction of the target muscle is subsequently held for an allotted time
3. The target muscle relaxes and is re-stretched passively.

Contract-Relax-Antagonist-Contract Method (CRAC):
1. The target muscle is stretched and held passively
2. An isometric contraction of the target muscle is subsequently held for an allotted time
3. The antagonist of the target muscle is subsequently contracted while the target muscle is passively stretched

When performed regularly, PNF has been shown to have a positive effect on active and passive range of motions. This occurs by increasing the length of the muscle while also increasing neuromuscular efficiency. These results can be seen in healthy individuals, but also in those going through a rehab program to regain strength and ROM after sustaining soft tissue damage.

PNF Guidelines
The manner in which PNF is performed greatly dictates the results yielded. Just like any training program or exercise prescription, there are guidelines to follow that will enhance results and prevent any decrements in performance.

When to Perform PNF
Studies have shown that in order to increase muscular performance, PNF needs to be performed after exercise, or without exercise. However, when completed prior to exercise, doing a bout of PNF stretching will actually decrease performance in maximal effort exercises. Therefore, PNF is best utilized when placed directly after a lifting/conditioning session, post practice, during an athlete’s downtime (ie. Before bed) or on a true rest day. The research states that it is in the athlete and coach’s best interest to avoid using PNF in any capacity before a game, practice, lift, or conditioning session. When performed before any of these events, there is evidence of decreased performance in anything where maximal muscular effort is required, such as during sprinting, plyometrics, weight lifting, etc.

How to Perform PNF
Just like resistance training, results from PNF stretching can differ depending upon how it’s administered. While the passive stretch will differ depending upon the flexibility levels of each individual, it is important to give guidance on how much of an isometric contraction is given, as well as the duration of each stretch and contraction. The isometric contraction given by the individual being stretched can be 100% maximal, however if this is the case the athlete must be aware that muscles soreness and a potential contraction induced injury is possible. Giving a high, yet sub-maximal effort is recommended. In a healthy individual around 80-90% effort will suffice, and with an injured individual the contraction needs to be more individualized based upon nature of the injury as well as pain tolerance.

The typical time spent passively stretching an athlete when using PNF will range from about 6-10 seconds, where as the muscle contraction can produce effects when held anywhere from 3-10 seconds. The literature states that 6 seconds is preferred and will yield the appropriate response. Consistency and simplicity with athletes is crucial, so whatever time frame parameters are chosen need to be kept and utilized. As far as how many repetitions or bouts of PNF per muscle group are recommended will depend upon the individual, yet three seems to be an effective and appropriate number. After three repetitions, the ROM that is “unlocked” decreases significantly and the athlete has reached their so called finish. This ROM can improve but each rep seems to access around 15-20% increases in ROM and those increases just simply cannot keep occurring after each rep.

There will be varied affects when performing PNF, and while many stem from controllable variables such as the intensity and timing of the contractions and stretches, some changes in ROM will also depend on biological age, training age, and gender. The best results will come from a properly administered protocol that occurs several times a week.

Where to Perform PNF
PNF can be used on many muscle groups, however some remain easier to administer than others. As mentioned simplicity is key and it’s crucial to remember that majority of strength and conditioning professionals are not therapists. Majority of the following don’t require additional set-up, however if access to a massage/therapy table or anything to elevate the athlete off of the ground may make some muscle groups, like the hip flexors, more accessible.

Common Muscle Groups
• Hamstrings
• Quadriceps
• Hip Flexors
• Hip External Rotators
• Hip Internal Rotators
• Calf muscles
• Shoulder External Rotators
• Shoulder Internal Rotators
• Lat/Upper Back
• Chest Muscles

Joe Powell is an Assistant Strength & Conditioning Coach at Utah State University.  He formerly held a similar position at Central Michigan University where he also taught classes in the Department of Health and Human Performance.  Joe is a regular contributor to the IYCA Insiders program and has been a huge part of bringing the Behind the Science series to the IYCA.  He is also the author of the IYCA Guide to Manual Resistance Strength Training.  Get more of Joe’s contributions in the IYCA Insiders membership.

Hip Stretches for Lower Back Pain – Jordan Tingman

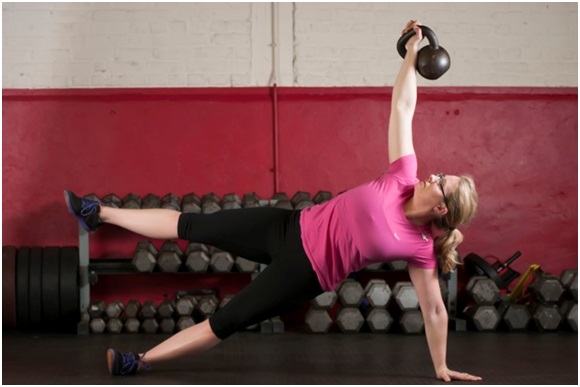
It is very common for athletes to experience lower back pain, especially when they begin a new training program or train harder than they have in the past.  As muscles get sore and/or stiff from training, they will “hold onto” certain positions as a way to maintain different positions.  Often, tightness in the internal hip/back muscles throws postural alignment off, which can lead to even more pain.  This pain can be felt in various parts of the spine, but in this article, I will mostly focus on stretching muscle groups in the hips and lower back.

When stretching tight areas, it is not necessary to stretch to the point of great pain.  Of course, many people feel a little uncomfortable while stretching, especially when they are tight, but it shouldn’t be extremely painful.  There is absolutely no evidence to show that stretching “harder” will elicit better results.  In many cases, stretching too hard can cause muscles to contract as a protective mechanism and may even lead to acute injuries.

Slowly ease into a stretch, and gradually increase the range of motion.  There is evidence that suggests stretches of up to one minute will increase flexibility faster than very short times.  It is also recommended to stretch often in addition to working through full range of motion movements.  Correcting imbalances and/or alignment issues is also crucial to the process of alleviating tight muscles so be sure to assess and address these issues if tightness persists.

This diagram shows many of the internal muscles around the hip and lower back than often get tight or sore and contribute to lower back pain:

Lower back pain in athletes is often an indication that something in the core isn’t functioning properly.  A variety of reasons that lower back pain may occur include:

  • Imbalance of the hips
  • Tightness of the structure around the hips
  • Weakness of the core muscles- putting pressure on joints to attempt to stabilize external load
  • Soreness of the lower back musculature when exposed to lower body pulling exercises

Of course, there is always the possibility of disk derangement, fracture/spondy, or other serious issues.  If the injury is extremely painful, do not allow the client/athlete to stretch too aggressively or continue normal training, especially if the area is still very inflamed. Make sure to consult with a doctor or physical therapist before getting cleared to train them again.

It is recommended to train “around” lower back injuries with modifications rather than train “through” them without altering your program.  An example would be replacing squatting movements (or any movement where weight is placed on the back) with exercises like lunges, leg press, or resistance-band work.

If the pain is less acute and more of an “achy” feeling, try working on these stretches to aid in releasing the hip structure around the lower back.

These exercises can be paired with movements like squats, deadlifts, or Olympic lifts to use rest time between sets more productively.  This rest time can be very useful in mobilizing various aspects of the lower body in an effort to get more out of the training program.  They can be used as a part of a comprehensive warm-up or cool down, and they can even be given as “homework” for specific athletes who need additional work.

In addition to these stretches, make sure you are strengthening the core alongside them. Until the core structure around the back is strong enough, loading the spine may continue to cause discomfort.

These mobility exercises should help keep athletes functioning properly and feel less stiffness or pain in their hips and lower back.  Once you teach them and place them into a routine, your athletes will thank you for helping them stay healthy.

Jordan Tingman – CSCS*, USAW L1, ACE CPT, CFL1 is a graduate of Washington State University with a B.S. in Sports Science with a Minor in Strength and Conditioning. She completed internships with the strength & conditioning programs at both Washington State University and Ohio State University, and is currently a Graduate Assistant S & C Coach at Eastern Washington University.


The IYCA High School Strength & Conditioning Specialist is the only certification created specifically for coaches training high school athletes.  The course includes several hours of video instruction (including the Olympic lifts) and two textbooks with contributions from some of the top strength and conditioning coaches in America.  Click on the image below to learn more about how to become a certified high school strength & conditioning coach.

Top 10 Posts of 2018

The IYCA would like to thank you for another incredible year.  We have several amazing things coming in 2019, but before we get there, let’s take a look back at the Top 10 posts from 2018.  

Find a nice place to read (or watch videos) and spend a few minutes during the holidays to go through anything you’ve missed.  There is a TON of great information from some of the best in the profession (These are NOT necessarily in order of “importance”):

#10 Power Clean Progression – Tobias Jacobi – Tobias was named the High School S & C Coach of the year, and his exercise progression series was a great addition to our Free Content area.

#9 Early Sports Specialization: Getting Them to Listen – Brett Klika – Brett is clearly one of the best youth trainers in the world, and this article gave advice on how to educate parents/coaches.

#8 Rethinking Long-Term Athlete Development – Jim Kielbaso – Sometimes the status quo needs to be challenged so that we can move forward.

#7 Bodyweight Training Progressions – Jordan Tingman – College S & C Coach, Jordan Tingman, joined the IYCA community with some awesome content that incorporates written and video material.

#6 A Strength Coach Career Path: A Winding Road – Joe Powell – A long-time contributor, and another college S & C coach, Joe uses his personal experiences as a backdrop to developing a career in sports performance.

#5 You Can’t Microwave an Athlete – Jim Kielbaso – One of the most “shared” articles of the year, this piece is very helpful for educating parents/coaches about why our approach works.

#4 The Stretching Conundrum – Dr. Greg Schaible – A talented and well-respected Physical Therapist, Greg has been another great addition to the IYCA community this year.  This article gets you thinking about how to best utilize stretching/flexibility work.

#3 Strength Coach’s Guide to Achilles Tendinopathy – Dr. Greg Schaible – One of Greg’s most popular pieces, probably because we all work with athletes who experience Achilles pain at some point.

#2 Plyometrics: 3 Ways They May Be Hurting Your Athletes – Phil Hueston – IYCA Advisory Council member and long-time member of the community, Phil is one of the most entertaining writers in the industry.  This article explains how many coaches mis-use plyometrics.

#1 The #1 Predictor of Coaching Success – Karsten Jensen – International S & C expert Karsten Jensen created this post after a conversation about surface learning began.  It turned out to be one of the most important pieces of the year because it creates a framework for expanding your knowledge.

If you just can’t get enough, here’s one more for you:

Bonus Practical is the New Functional – Jim Kielbaso – Most of us don’t coach in a vacuum.  Athletes are doing a million things, and we usually don’t get to control all of it.  This article discusses how important it is to create programs that are practical instead of “perfect.”

Strength Coach’s Guide to Achilles Tendinopathy – Greg Schaible

When working with athletes who are pushing their bodies to the limit, inevitability you will end up having a client who starts developing a tendinopathy. One of the most common tendinopathies that can develop is in the Achilles tendon.

This type of tendinopathy can be a frustrating area for a lot of people because it tends to linger on longer than most other tendinopathies. Before diving into what actions you can take, it’s important to have a general understanding of what a tendinopathy is.

Simply put, a tendinopathy occurs when either an acute or chronic overload to a tendon happens which exceeds its current capacity to withstand. While it’s important to remove the provocative factors to allow for healing to occur, its generally not a good idea to completely deload and just rest the tendon either. Complete rest does nothing to improve tissue resiliency and capacity. In fact, it generally worsens it!

It’s important to understand that you can load a tendon in a variety of different ways based on how sensitive the location of injury. For the Achilles tendon, symptoms tend to be present at the insertion to calcaneus or mid tendon portion of Achilles tendon. How you will work with the athlete will differ depending on this location.

Distal Achilles symptoms at the calcaneus can be more difficult to manage. It’s important to avoid high amounts of dorsiflexion in times the tendon is highly sensitive. This is due to the biomechanics and structure of the foot and tibia and how it influences compression to a tendon.

This position of closed chain ankle dorsiflexion may irritate an area which is already symptomatic. For this reason, it is generally not a good idea to be performing any stretches in this case. With strengthening exercises such as eccentrics, you also need to limit range of motion that they are performed in. More on this later….

For a mid-tendon Achilles tendinopathy, compression against the calcaneus is less of a concern.

Some light stretches may be warranted, and often you can strengthen the Achilles through a larger range of motion.

Below are 3 of my favorite ways to start loading the Achilles tendon again:

Isometric barbell

Eccentrics Gastroc Heel Raise

Eccentric Soleus Heel Raise

All 3 of these exercises can be performed in the weight room. For the isometrics I will usually perform longer duration holds 20-30 seconds depending on tolerance. Then if able perform a couple with ramping up intensity to 90-100% effort for 5-6 seconds.

The eccentrics can be performed on a step or on flat ground depending on location of symptoms. With the gastric heel raises generally being more tolerable than the soleus heel raise.

Dr. Greg Schaible is a physical therapist and strength coach specializing in athletic performance. Greg is the owner of On Track Physiotherapy and owner of the popular online education resource Sports Rehab Expert. Greg works with athletes and active individuals of all ages. As a former athlete himself, he attended The University of Findlay and competed in both Indoor and Outdoor Track & Field where he earned honors as a 5x Division II All-American and a 6x Division II Academic All-American.

What’s Really Limiting Thoracic Spine Rotation? – Dr. Greg Schaible

It’s no secret that rotational power in sport is imperative to a successful athlete. Much emphasis has been placed on making sure an athlete has adequate thoracic rotation to complete the task.

Many coaches have probably noticed that a decent number of athletes have poor thoracic rotation. Or they achieve thoracic rotation in a compensatory way. The purpose of this article is to show you how many athletes compensate and what to consider biomechanically when someone does rotate through the T-spine.

The most common way people will look at T-spine rotation (aside from directly watching a sport or lifting movement), is through a quadruped rock back position shown below to try and limit lumbar and pelvis contribution. In general you are shooting for around 60 degrees give or take.

I like the hips rock back to butt position because they are less likely to compensate. However, you will see a lot of athletes cheat the test by simply side bending or shifting their body weight to the side. As you watch the athlete perform this, the two most common compensations I see are:

1) The shoulders shift laterally outside base of support. In the case of the picture above, you would see the left shoulder shift laterally toward the left and move outside the knee and hip.
2) The hips/butt shift laterally outside base of support.
3) In general, you want to see a uniform motion as opposed to a large hinge point that is noticeable through the spine.

When considering rotation, we need to appreciate what is happening at the ribcage as well. When someone rotates to the right the contralateral ribs will IR and the ipsilateral ribs will ER.

Another way to look at it is that the ribs that ER should be moving in the direction an individual is rotating.
Realize as well that during normal respiration, expansion and recoil of the ribcage should happen. On inhalation the ribs will ER and on exhalation the ribs with IR. Respiration will have an impact on one’s ability to rotate or lack rotation.

A simple way of addressing this is through a rotation-based activity and utilize isometric holds at end range with respiration. See video below:

The purpose of this would be giving the athlete some assist to achieve their capable ROM. Then demanding control at the end range by including respiration. On inhale you breathe into the top side ribcage (ribs that are ER’ing). On exhale you should feel more down side ribcage activity happening (ribs that are IR’ing). This would help facilitate the IR/ER relationship of the ribcage we are striving for.

To see examples of other positional based isometric exercises that demand control, coordination, and variability check out my previous articles the stretching conundrum part 1 and 2.

Dr. Greg Schaible is a physical therapist and strength coach specializing in athletic performance. Greg is the owner of On Track Physiotherapy and owner of the popular online education resource Sports Rehab Expert. Greg works with athletes and active individuals of all ages. As a former athlete himself, he attended The University of Findlay and competed in both Indoor and Outdoor Track & Field where he earned honors as a 5x Division II All-American and a 6x Division II Academic All-American.

The Stretching Conundrum, Part 2 – Dr. Greg Schaible

In part 2 of the “Stretching Conundrum” we are going to cover how to start best implementing these alternatives to stretching.

Inevitably, Part 1 of this series opened Pandora’s Box for a plethora of questions…

If you are not stretching, then what are you doing?

We do dynamic warm-ups, so why would I need to do these active positional breathing exercises?

How would you place these into a client’s programs?

Don’t worry….We have you covered!

The purpose of a warm-up is to simply prepare the body for whatever task or event is at hand. The cooldown is a time to kick-start the recovery process. At both of these times, it can be beneficial to work on other injury reduction strategies.

Your goals as a trainer or clinician are usually to help improve an athlete’s performance and reduce the likelihood of injury.  With this in mind, it’s important to do everything you can for the athlete in the time allotted.  Because time is limited, you must prioritize and determine the best use of that time.  That is often the biggest challenge for coaches, so we need to consider what is even possible.  

The trainable qualities that accomplish the goals outlined above are as follows:

  1. Strength/Power
  2. Work Capacity
  3. Motor learning/coordination

The first two are accomplished through solid training programs. The third is often forgotten, or it gets prioritized so heavily that there’s not enough time to adequately address #1 & #2.

It’s no secret that dynamic warm-ups are an excellent way to prime the nervous system while also getting the tissue “warm and ready” for high-level activity. Continue performing these dynamic routines as you typically would, and think of this as an excellent time to introduce motor learning/coordination.

The most frequently missed component of a dynamic warm-up, in my opinion, is positional integrity. I tend to see a lot of athletes in rehab who are excellent at utilizing momentum to their advantage. They rely on external forces such as momentum and excessive or accessory joint compression to create stability as opposed to utilizing their active muscular support system to its fullest capacity.

Teaching joint control in space via utilization of muscles to create positional integrity, while taking momentum out of the equation, is very challenging for a lot of athletes.

That’s what these “stretching replacement” activities are intended for, and they often reduce the sensational need for continuous stretching.

Another downside of stretching is that it takes a long time to incorporate and hit all the muscle groups. Done properly, including a couple of these exercises can address many things all at once. This saves you time to get to bigger and better things like actual practice and training!

To keep it simple, I usually pick 1 or 2 of the following activities to include in someone’s program before the dynamic warmup. There certainly are others depending on the situation, but this is a good place to start! Exercises are listed from easiest to hardest:

The Lazy Bear

Hamstring Crossovers

The Bear

Wall Press Abs Bilateral Lowering

Hamstring Hooklying Bridge

Modified Side Bridge with Glute

I usually give my athletes the option of light “stretching” or foam rolling for 2 minutes hitting their “needy” areas.  Again, I’m not against stretching, but I don’t think it’s a long-term solution worth spending a lot of time doing.  Next, we move onto 1 or 2 of the above exercises, performing each 2 x 5 long breath cycles (this should take a maximum of 4 minutes). You then move right into your dynamic warmup and into your training session.

The end of each session would include the same 2 exercises from the above list as part of a cool down. The emphasis is still on positional control, but the long cycle breathing also works to help shift into a parasympathetic state after high-level activity.  So, not only will this help improve positional control, but it aids in the recovery process.  

Tip: This is why these activities are included prior to the dynamic warmup. Because of the breathing component that can shift the body toward a parasympathetic state, we need some neural activation before high-level activity.  These exercises improve positional stability, while the dynamic warm-up activates the nervous system.  

Because these exercises can be done anywhere, the athlete now has activities that are easy to do and can help them continue to recover between training sessions.

All in all, the addition of these activities should not take any longer than 8 minutes to include your programs. If you are really hard-pressed for time, I would consider adding them only at the end of the session and perform your typical dynamic routine as a warm-up.  These exercises are an excellent way to promote controlled mobility and positional integrity, and they truly challenge body sensory/motor awareness without letting the client utilize external stabilization methods.  Give this approach a try for a few weeks and see how your athletes feel. 


Dr. Greg Schaible is a physical therapist and strength coach specializing in athletic performance. Greg is the owner of On Track Physiotherapy and owner of the popular online education resource Sports Rehab Expert. Greg works with athletes and active individuals of all ages. As a former athlete himself, he attended The University of Findlay and competed in both Indoor and Outdoor Track & Field where he earned honors as a 5x Division II All-American and a 6x Division II Academic All-American.

The Stretching Conundrum, Part 1 – Dr. Greg Schaible

Stretching for athletes can often be a polarizing topic among rehab and performance specialists. 

On one end of the spectrum you have people who seemingly hand out stretches for every injury, and think it’s the solution to every problem. On the other hand, you have people who believe that you should never stretch, and that there are no benefits to stretching whatsoever.

Before we start talking about what is right and wrong, we first need to appreciate what stretching really is, so we can discuss the potential reasons why one may choose to stretch or not to stretch.

Ultimately, people feel the need for stretching because they feel “tightness.”

The problem here is that “tightness” is felt for a variety of reasons. There are really three reasons someone would feel “tight:”

1) A muscle is concentrically oriented, or in a state of chronically sustained contraction at low levels for a prolonged time period.

2) You just performed an intense workout, and as a result, there some eccentric microtrauma to the musculature which occurred. Your intent is that the stimulus hopefully results in recovery and a net gain of strength/hypertrophy in the long run when programmed correctly. 

3) As a protective mechanism to create rigidity or control depending on the environment, task, and situation. Example: when driving in a snowstorm, the external environment can create uncertainty or lack of control. As a means of creating a more internal perception of control, the body starts to grip the steering wheel tightly.

In all three scenarios, stretching may not be the most advantageous thing to be doing.

Perhaps the biggest issue is that many people’s current understanding is that muscles either get “long” or they get “short.” While this is a simplistic way of viewing things, it does not do the body justice, and it leads to confusion when we talk about the proper application of stretching.

Muscles are either concentrically oriented or eccentrically oriented, not necessarily long or short. 

We already knew this intuitively, with the various types of muscle contractions, but this knowledge is usually not applied properly. 

This concept makes logical sense, though.  If muscles truly got longer, then we would develop a lot of “slack” in muscle tissue because the distance between origin and insertion of the muscle does not change with static stretching. 

You certainly would not want the guidewires in a bridge to develop “slack,” as the integrity of the structural support system would be lost.


So the ability to stretch further is just building an increased tolerance to an eccentrically oriented position.  The Golgi Tendon Organs learn to accept a new position.

This happens through graded and repeated exposure to stretching. However, I see two problems with this:

1) Changes in sensation are momentary – If you are stretching to provide relief to the sensation of tightness, without addressing the cause of the tightness, you are operating at the effect level instead of addressing the cause. That’s why sensation of tightness does not always go away when gradually exposed to a stretch. Maybe it does in the very immediate short term, but you have to keep applying that stimulus in order to maintain or improve. Furthermore, because you are gradually exposing the muscle to greater and greater eccentric orientation, the muscle eventually becomes exposed to prolonged low load, long duration. This can change the passive integrity of structures responsible for stability over an extended period of time. 

2) If the sensation of tightness came from a workout and eccentric damage, it does not make much sense to aggressively eccentrically elongate the muscle as means of recovery.  Eccentric activity is what caused the soreness in the first place, so additional elongation is not the answer. Simple active movement would suffice.

3) Stretching does not take into account the orientation of axial skeletal system (origin and insertion). For example, an anterior rotation of an innominate and anterior rib flare would indicate the paraspinals and quads to be in a concentric orientation of muscle via the position of axial skeletal system. The hamstrings and abdominals would be eccentrically oriented. Note: This also happens in the frontal and transverse planes not just sagittal. 

The length-tension relationships of musculature is also important to consider. The reason for differences in length-tension relationship differences is the axial skeletal positioning. Stretching does not change the position of origin and insertion. Active contraction of the eccentrically oriented musculature does, as it provides reciprocal inhibition to concentrically oriented muscles to start experiencing eccentric control. 

So this begs the question – is stretching a complete waste of time?

No, absolutely not.

Many people simply do not understand why and when to utilize stretching, and as a result, it’s performed in a meaningless or potentially even harmful way.

Stretching does not need to be overly aggressive for most people. Before ever stretching, the position of the axial skeletal system must be taken into consideration. Establishing conscious and active exercises which force individuals to display control and competency over movement within normal ranges of movement is generally the first order of business.

If the individual still wants to lightly stretch because they find it helpful to provide “looseness” or “ease of movement” in the short term, it’s certainly fine. However, there are usually other factors to consider that will more effectively and efficiently create lasting changes within someone’s movement quality such as controlled variability, strength (eccentric, concentric, isometric), force output, and capacity.

Here are a couple examples:

Hamstring Hooklying Bridge

This activity works on controlling and improving hip extension without lumbar extension. Someone who has limited hip extension may present with the quads, paraspinals, lats in a concentrically oriented position which means that the hamstrings, glutes, and abs are eccentrically positioned. This exercise reverses that equation by concentrically utilizing the hamstrings, glutes, and abs. The purpose of the pause and breathing is to work motor control in that position with different demands placed on the musculature.

Likewise, if we wanted to work on more dissociation of the femur from the pelvis. We can try and secure the pelvis with the abdominals by performing a posterior pelvic tilt (concentric activity of the abs). Then try to hold that position as the athlete performs a leg lowering activity (eccentric activity of quads). The longer the lever arm, the more demand it places on the abdominals to secure the starting position.

Wall Press Abs Bilateral Leg Lowering

There are many different examples of the two exercises listed here. Depending on the presentation and skill level of your client, you will need to know how to alter the activity and give progressions or regressions based on motor skill level. However the concepts remain the same, and you can certainly get creative with these exercises.

In part 2 of this series, we will cover more about how you can program these concepts as well as some of your more typical methods into athletes training cycles.


Dr. Greg Schaible is a physical therapist and strength coach specializing in athletic performance. Greg is the owner of On Track Physiotherapy and owner of the popular online education resource Sports Rehab Expert. Greg works with athletes and active individuals of all ages. As a former athlete himself, he attended The University of Findlay and competed in both Indoor and Outdoor Track & Field where he earned honors as a 5x Division II All-American and a 6x Division II Academic All-American.

How to Build a Year Round Band Flexibility Program

How and Why to Build in a Year Round Band Flexibility Program

Athletes young and old do not like to stretch and, as a result, create unnecessary trauma to their joints and muscles by not being optimally ready to perform high intensity ballistic type movements.

Why Athletes Don’t Stretch

Young athletes are not taught why it is important to optimally lengthen out the body prior to performing high intensity ballistic type movements.

Teaching a young athlete at a middle school level why lengthening out their muscles and mobilizing their joints will enhance performance, eliminate unnecessary muscle soreness and help eliminate injury will set a standard that will stay with them as their athletic career advances.

Coaches need to stay consistent and demand that dynamic flexibility training be part of all training workouts. For most athletes, stretching before a big game is well followed.

However, to make a long-term impact on flexibility, athletes need to do it consistently before workouts. Programming this into the workout is the coach’s responsibility.

Research contradicts the importance of stretching before workouts. This contradiction of importance makes it a difficult sell to older athletes and many sport coaches.

The fact is, muscles will not lengthen out and create permanent plastic changes unless they are routinely challenged to do so. Regardless of what research says, muscles that are short will stay short unless they are both lengthened and neuromuscularly taught how to control length.

Traditional body weight stretching is boring. As a result of the prior 3 reasons, a consistent emphasis on making sure muscles are frequently lengthened out prior to working out using a body weight approach has been less than successful over time—especially if athletes are not part of a large team structure.

Why is Resistance Band Stretching Effective?

Elasticity

Being elastic, bands provide for an accommodating resistance so muscles can gradually release into the band tension. This ability to slowly release into the stretch eliminates the inhibition that comes with most body weight stretches.

Ability to Contract

Bands allow the muscles to contract into an accommodating resistance. This ability to contract allows the opposing or antagonistic muscles to relax more effectively which, in turn, allows for better stretching of the targeted muscles.

Lightweight Construction

The band’s lightweight construction allows the stretching extremity to be unweighted. This, in turn, eliminates the influences of gravity which often creates stretch inhibition when doing traditional body weight stretching.

These are more of the physiological reasons why bands are a great flexibility tool. However, there are also some practical reasons that play a significant role in band stretching.

Physicality

The band is an actual tool and for many athletes they need some type of device, ball or equipment to exercise with. The band is a physical tool that provides them with a means for which they can improve their joint mobility.

Simple body weight stretching does not provide a tool that the athletes can use to challenge themselves and, as a result, these types of stretches become boring over a short period of time.

Portability

Bands are very portable so, like body weight stretching, band training can be performed anywhere. This high level of portability allows band flexibility training to be performed on the court, field or weight room as well as on the road during competition.

Varying Resistance Levels

Bands come in various resistance levels so as with strength training, athletes can gradually challenge themselves with greater passive over pressure stretching as their muscle flexibility and joint mobility improves. For a competitive athlete the ability to measure and visually see progress is highly motivating.

How to Implement a Year Round Resistance Band Stretching Program

The most successful way to incorporate a band flexibility program is by starting to implement it prior to every off-season workout regardless if it is a strength-based workout or speed and conditioning-based workout. The initial band stretches should focus on improving the hip complex since this is the true power center of the body.

Over the years of implementing the band flexibility program into numerous athletic teams, the following sequence of band stretches should be followed to make the learning curve as short and efficient as possible.

Stretch 1 – Hamstring Series


Stretch 2 – Hip Rotation


Stretch 3 – Hip Flexor Quadricep


Stretch 4 – Ankle Mobilization

Allow athletes to master the position and integration of an active rhythmical-based stretching approach before progressing onto the next stretch.

A complete band hip flexibility program will require about 4 or 5 training sessions to fully implement. It will require approximately 10 training sessions before sport coaches will see a consistent flow from one stretch to the next.

Another key tip to creating early success with band stretching is allowing athletes to stretch with a band that they can easily control. Stretching with a high resistance band will quickly create muscle inhibition to the stretch and not allow it to optimally lengthen.

Once band stretching has been mastered for the hip and ankle, this sequence of stretches should be used prior to any practice, workout or competitive event.


Best Band Package for Band Flexibility Training

The best band package for band flexibility training is now 15% off using code “rbtiyca15”.

The Medium Single Band Package provides athletes with 4 levels of band resistance. This will allow them to progressively improve their hip and shoulder flexibility by gradually increasing band resistance as their flexibility improves.

Medium Single Band Package

Medium Single Band Package
 

Kettlebell Shoulder Stabilization Exercises for Athletes: Part 2

 Kettlebell Exercises for Athletes: Heavier Isn’t Always Better

By Pamela MacElree, MS

I hope you were able to test out the arm bar and the high windmill that I went over with you in the previous post on kettlebell shoulder stabilization exercises for athletes. If you were new to these exercises, did you notice the drastic difference in the amount of weight you initially thought you might be able to do the exercise with and the weight you could comfortably control? Don’t worry! After some serious practice, you should be able to start moving up in weights.

Kettlebell Shoulder Stabilization Exercises for Athletes #3: The Turkish Get-Up

The next exercise in the series is the all-famous Turkish get-up, one of the most challenging full-body exercises. The Turkish get-up is one of the most challenging shoulder stabilization exercises for athletes as the body moves through multiple planes of motion, requiring coordination and strength between the core and lower body.

For this example, let’s assume you will be doing 1 repetition with the kettlebell in your right hand. To start the Turkish get-up, lay on your right side for the safety of your shoulder. Grip the kettlebell handle underhand with your right hand and overhand with your left, hug it close to your chest, and roll back to your back.

Kettlebell exercises for athletes: Starting Position of the Turkish Get-Up

Once you are laying flat on your back, press the kettlebell up from the floor on one side. It is OK to use both hands to press the kettlebell if needed. Flex your right leg as well. Throughout the remainder of the exercise, your right arm should remain vertical and perpendicular to the floor.

Shoulder Stabilization 2

Keeping the right shin vertical, drive through the right heel and sit up at an angle onto the elbow. Keep the kettlebell directly over the shoulder throughout the exercise.

Shoulder Stabilization 3

Progress to resting your weight on your left hand with a straight arm. Remember to keep the kettlebell directly over the right shoulder.

Shoulder Stabilization 4

Keeping your weight mainly on your right foot and your left hand, pick your hips up from the floor into a bridge.

Shoulder Stabilization 5

Retract the left leg underneath the body and bring the left knee to the ground, close to your left hand. Notice the hips will go from facing the ceiling to facing forward.

Shoulder Stabilization 6

At this point, the kettlebell should sit directly over the right shoulder, the left shoulder, and the left hand, while both shoulders are active. Bring the torso to an upright kneeling position.

Kettlebell exercises for athletes: TGU lunge

Position the body so that it is safe and comfortable to stand from the kneeling position. You can move the right foot and the angle of the left lower leg to be able to stand up with good mechanics.

Kettlebell exercises for athletes: Turkish Get-Up halfway mark

Once you reach the standing position, you have completed half of the exercise. Now, reverse each step. You can watch the video to see the reverse part of the Turkish get-up.

Just as with the arm bar and the high windmill, it is extremely important to keep the arm that is holding the kettlebell vertical and perpendicular to the floor as the body moves underneath it.

There are several ways to do the Turkish get-up, and while all are valid, each must be executed with proper form in order to be both safe and effective. The above explanation is just one variation.

Kettlebell Shoulder Stabilization Exercises for Athletes #4: The Gladiator Press

Our last in the series of kettlebell shoulder stabilization exercises for athletes is the gladiator press. You’ll notice in the video and in the photos that the gladiator press starts out very similarly to both the arm bar and the Turkish get-up; in fact, the gladiator press can be done as part of a Turkish get-up.

In the gladiator press, you will perform all of the steps of the Turkish get up exactly as listed above until you get to the hip bridge position. Once you get to the hip bridge position, you will shift your bodyweight to be on the straight leg.

Kettlebell exercises for athletes: Crucial move of the Gladiator Press

Take your time here. Be sure the left hand is sitting directly under the left shoulder to support your torso and the weight of the kettlebell overhead. Gradually move the right (top) leg to rest directly on top of the left (bottom) leg.

Shoulder Stabilization 10

From here, if you can maintain the position, slowly lift the top leg into the air.

Kettlebell exercises for athletes: Gladiator Press extended

Once you have reached this position, you can return to the starting point by simply reversing the steps to get here. You can also return the top leg to the floor to create the hip bridge position and continue on with the Turkish get-up.

For all four of these exercises, it is recommended to start out with a slightly lighter weight or even bodyweight to get comfortable with the complexity of the movement as well as to determine if you have any imbalances in shoulder stabilization from one side to the other.

Keep the repetitions low on these kettlebell exercises for athletes and place them in the beginning of workouts when the mind and body are both fresh. As you progress to heavier weights, it is always safe to use a spotter.

Want to learn more about training with kettlebells?

Learn More Today

Kettlebell Shoulder Stabilization Exercises for Athletes: Part 1

Heavier Isn’t Always Better with Shoulder Stabilization Exercises for Athletes

By Pamela MacElree, MS

With certain exercises for athletes, heavier isn’t always better.

EEK! Did I really just write that for everyone to see? Coming from someone who constantly talks about picking up more weight, this might seem like a partial shock to you. The truth of it is that some kettlebell exercises are better served with lighter to moderate weight, especially while learning them.

There are 4 really awesome kettlebell exercises for athletes that will help increase shoulder stabilization. The unique thing about these kettlebell exercises is that we’re working on shoulder stabilization while the body is moving through multiple planes of motion. I’ll go over two now and two in another blog post.

Typically, we could put more weight overhead and stabilize it than we could actually press overhead. In the four kettlebell shoulder stabilization exercises I’m going to go over with you, you will likely find that you need to back off the weight and use something a little lighter than you might initially expect as I mentioned earlier. This is why we choose to do several shoulder stabilization exercises that are more complex than just overhead holds or walks.

Kettlebell Shoulder Stabilization Exercises for Athletes #1: The Arm Bar

Let’s first take a look at the arm bar.

Always start the arm bar by rolling onto your side. Once on your side, grip the handle of the kettlebell with both hands and hold it close to your chest. Next, roll onto your back and press it overhead.

Beginning of arm bar: Shoulder stabilization exercises for athletes

Once you are lying on your back with the kettlebell pressed overhead, raise the opposite side arm overhead on the floor and flex the hip and knee that are on the same side of the body as the kettlebell.

Shoulder Stabilization Exercises for Athletes: Arm Bar 2

Keep the knee above the hip and begin to rotate to the side that is opposite of the kettlebell. Keep your focus on the kettlebell.

Shoulder Stabilization Exercises for Athletes: Arm Bar 3

Once you have rotated enough to touch your knee to the ground, begin to straighten that leg and aim to get the front of the hips close to the floor. When you are stable, you can direct your nose toward the floor.

Shoulder Stabilization Exercises for Athletes: Arm Bar 4

You’ll notice in the arm bar that the shoulder must be very stable as the body moves around the tall pillar that is created by the arm. The kettlebell sits nicely in the hand as the weight sits closer to the shoulder than it would with a dumbbell.

Kettlebell Shoulder Stabilization Exercises for Athletes #2: The High Windmill

The next excellent shoulder stabilization exercise for athletes is the high windmill. Again, the shoulder is forced to stabilize as the body moves. This particular exercise is also great for strengthening the entire core.

Starting with the kettlebell in the overhead position from standing, shift about 70-80% of your bodyweight onto the same side leg that has the kettlebell overhead. Maintain a vertical line with the arm that holds the kettlebell and the same side leg.

Shoulder Stabilization Exercises for Athletes: High Windmill 1

While maintaining the weight shift, fold at the hips (similar to the feel of a good morning) and guide your free hand along the inseam of your leg. You can keep a soft bend in the other leg or keep it straight depending on your flexibility.

Shoulder Stabilization Exercises for Athletes: High Windmill 2

In these 4 shoulder stabilization kettlebell exercises for athletes (remember, I’ll be sharing 2 more in a second post), the arm always maintains a vertical position to the floor above the shoulder, regardless of where the body is. It is important to keep the shoulder retracted and not elevated, or in layman’s terms, always keep the shoulder down and back. If at any point the arm starts to sway and you are unable to hold the weight of the kettlebell directly over the shoulder, you should decrease the weight you are working with.

Think about the shoulder being the base or foundation and the arm being the structure. The arm must stay vertical and perpendicular to the floor. There should be no bend in the elbow or the wrist as you progress through these kettlebell exercises. Think of it like a leaning building: at some point, the foundation will start to give and the structure will begin to fall.

Check back for the other two kettlebell exercises for athletes on increasing shoulder stabilization.

Can’t wait and want to learn more about kettlebell training?

Learn More Today

Flexibility and Mobility for Young Athletes

Flexibility vs. Mobility in Youth Fitness Programs

By Mike Robertson

Mike-Robertson-headshot

What is the difference between Flexibility and Mobility?

I’ve always used the Bill Hartman definitions; they go something like this:

Mobility – Range of motion under specific circumstances (specific)

Flexibility – Range of motion about a joint (non-specific)

As you can see, mobility is specific to a certain movement-i.e., you need a certain amount of hip mobility to squat, lunge, etc.

In contrast, flexibility is non-specific-i.e. you lay someone on their back and stretch their hamstrings. This gives you an idea of their flexibility, but it’s not specific. Just because they have great hamstring length doesn’t mean they’ll be able to perform functional movements properly or without compensation.

Are both important to young athletes or is one more important than the other?

I feel that both are important, but flexibility is merely a component of mobility. I think of mobility as an equation, something like this:

Tissue length + neural control/stability + joint architecture = Mobility

Youth Fitness Programs

So my goal with youth fitness programs is to improve their mobility and allow them to perform those specific movements (squatting, lunging, etc.) without compensation from other areas (generally the lumbar spine).

Youth Fitness Programs: When should young athletes train flexibility?

There are several times throughout the day when I would incorporate specific flexibility drills into youth fitness programs:

Pre/peri-workout – I would only use this as part of an acute-corrective strategy; in other words, I don’t believe that static stretching has much of a place pre-workout. The goal here, for example, would be to statically stretch the hip flexors and pair that stretch with an activation drill for the gluteals. This will enhance motor control and function by helping restore proper length/tension relationships.

Post-workout – Here I’d use more active flexibility techniques like eccentric quasi-isometrics (EQI’s).

Before bed – I’ve always been a proponent of static stretching before bed. I think not only does it allow you to unwind and relax, but if you hop right into bed afterwards, you’re less likely to lose any flexibility gains you just worked for.

Youth Fitness Programs: When should they train Mobility?

Whenever they can! Quite simply, most people need more mobility in the appropriate areas (ankles, hips, t-spine, etc.). Especially in the beginning or foundational period of their training, more is generally better.

Getting more specific, pre-workout mobility training is a slam dunk. But if someone is really restricted in their movement patterns or movement quality, I’ll have them perform mobility drills several times throughout the day to reinforce good movement. Unlike strength training, you’re not going to over train your body by doing some simple mobility drills throughout the day.

Youth Fitness Programs 1

Youth Fitness Programs: Are there different kinds of flexibility, or is “bending over to touch my toes and stretch my hammy” all young athletes should be doing?

With the athletes I work with, we include several different kinds of mobility throughout their day.

Pre-workout, we always do a dynamic warm-up. Always. They’ve been sitting in school or class all day, so my first goal is to get them warmed up and moving through a nice range of motion.

EQI’s are a little more advanced, but they’re still working to promote optimal length/tension relationships and develop active flexibility. Once someone has been training for a few months, I like to get them doing this at the end of every workout.

Finally, we discussed static flexibility above, and I think it’s an integral component as well. Kids are a lot different now from how they were 10, 12, or 15 years ago when I was a kid! They sit more. They play more games. They have more homework. Static stretching can help get them back in tune with their bodies and keep themselves healthy.

I think all these methods are important; what’s more important is using the right flexibility method at the appropriate time.

Youth Fitness Programs: What is the single greatest mistake or myth people make when it comes to Flexibility training?

Not doing it!

Seriously, most people are so focused on their training and/or diet, they put no value or stock into recovery methods. Using the methods I outlined above in your youth fitness programs can go a long way to improving the flexibility and mobility of your body.

Flexibility and mobility are part of a complete program for athletes and in youth fitness programs. Check out the IYCA’s Complete Athletic Development 2.0 program to get the most comprehensive resource ever assembled for developing young athletes.

cad2_total_mockup850

http://completeathletedevelopment.com/


Understanding Low Back Pain in Adolescents


Low Back Pain in Adolescents


By Jake Moore


Every one of us has worked with a young athlete with low back pain. In fact, we have all likely have worked with and missed the signs of serious low back pain in our athletes. Looking back at my career so far, I’m sure I have. Of those young athletes with lower back pain, up to 47% have spondylolysis or spondylolisthesis (1). Spondylolysis and spondylolisthesis are injuries to the posterior vertebrae and result from excessive spinal extension loading. Unfortunately too many young athletes are over-trained and exposed to poor training, leaving them at risk for these injuries. On the positive side, these injuries are preventable with good movement training and knowledgeable coaches. As IYCA professionals we expect to be held to a higher standard than youth fitness professionals when working with young athletes. If we can recognize the signs of serious back pain, and how to train to prevent such injuries, it will go a long ways in diminishing low back pain amongst your youth fitness athletes, help those with low back pain get timely treatment and decrease the impact of low back pain into adulthood.


Young athletes are at a vulnerable time to develop low back pain from excessive trunk extension. In late middle school and early high school they may be participating in multiple sports throughout the year. It is not uncommon to be in-season for one sport and still participate in off-season training for their club teams. (It would be worth another article to discuss how these athletes would benefit more from developing fundamental movement skills instead of being in-season all year.) In addition these athletes will be asked to begin a youth fitness or strength and conditioning program in their school as part of their athletic participation. Meanwhile this athlete is at a time in their development where:
1. The rate of bone growth is often outpacing the lengthening of muscle and fascia, leading to tight hips and poor posture.
2. Growth plates are still open and bone density is not yet fully developed.
3. Core strength is not developed as the body adapts to having longer limbs.
4. Motor control and posture are continuing to be shaped.
If these athletes are asked to perform fully loaded strength movements with poor form with an immature and ill-prepared body, the body has but one choice to accomplish this task. That is to hang onto ligaments and bony restraints instead of utilizing muscular control.


youth fitness


Pelvic influence on spinal curves


The spine has three curves. A lordosis, or slight backward bend at the cervical and lumbar spine, and a slight kyphosis or forward bend at the thoracic spine. This helps the spine absorb shock and increases stability versus a completely vertically stacked spine. The lumbar spine position is controlled largely by the pelvis. The pelvis is able to anteriorly and posteriorly rotate based on the muscle pull on the front and back side of the body. The images below demonstrate the muscles involved in creating rotation of the pelvis. The line of action of the hip flexors and spinal erectors pull on the pelvis to create anterior rotation. This anterior rotation results in increased lumbar lordosis. On the other hand, the glutes, hamstrings and abdominals create posterior rotation and a decrease in lumbar lordosis. It’s common to see individuals with inhibited glute and abdominal musculature and tight hip flexors and spinal erectors. The result is a tendency to position the pelvis in anterior tilt and increase compression of the lumbar vertebrae. When this occurs repeatedly over time, the posterior structures of the lumbar vertebrae are at risk for injury.


youth fitness


Spondylolysis and Spondylolisthesis


Some of the most significant injuries affecting adolescents are spondylolysis and spondylolisthesis. We all have likely trained athletes with this injury, whether we knew it or not. Spondylolysis refers to a stress reaction of overload to part of the vertebrae. In the lumbar spine this is often the pedicle or pars interarticularis. Spondylolisthesis is an advancement of spondylolysis with an identifiable fracture to the vertebrae and possible forward slippage.


youth fitness


The pedicles and pars interarticularis are located on the back side of the vertebrae and are placed under compressive and shear load when the spine moves into extension. Injuries to these structures often occur gradually over time. As an athlete is asked to do exercises that are beyond their ability for the core musculature to control, the lower back will drift towards extension to find stability. Think about trying to bend a copper wire. As you initially bend the wire a hinge point develops. As you do this over and over again the wire will bend more easily and eventually break. This is exactly what is happening to young athletes with spondylolysis. It’s critical that these individuals get treatment before it is too late (spondylolisthesis).


youth fitness


Recognizing serious low back injury


To recognize the signs of spondylolysis or athletes at risk, look at posture, core strength, hip mobility and activities. Posture is often excessively lordotic when doing squats, overhead presses, deadlifts, back extensions, push-ups and planks. These athletes may be some of your more capable squatters and deadlifters because they understand how to keep the spine from rounding forward. The problem is they can’t control spine extension. Athletes with poor core strength are more apt to use this type of strategy to make-up for inadequate active lumbar stabilization.


youth fitness


An athlete with limited hip mobility is also at risk. Without flexibility in the hamstrings, glutes and hip flexors, the athlete will have to bend more through the spine on order to perform sport specific or weight room movements. Tight hip flexors will pull the spine into excess extension and poor glute and hamstring mobility will force the athlete to contract more through spinal erectors. The end result either way is increased posterior spinal loading. Any athlete who has made recent large increases in loading in the weight room should be monitored closely for low back pain. Football players and gymnasts seem to be most at risk as well as athletes participating in multiple sports at the same time.


Initial symptoms of spondylolysis may be a dull ache in the back with no initial onset. These athletes often have the most pain with running and jumping due to large ground contact forces. Squats, cleans, deadlifts, overhead presses, planks and leg lifts are also exercises that can increase symptoms. These athletes may be able to do every exercise in your program but have pain doing it. These symptoms may go on for months before they bring it to your attention. It may even recur every year, increasing during track season for example, going away during the summer only to return during football season. Once diagnosed, these athletes may be held out of sports and put in a brace for up to 6 weeks with another 4-6 weeks of rehab before full sport participation. An athlete who develops spondylolisthesis may battle low back pain on and off for the rest of their lives.


Keys to prevention of Low Back Pain in Adolescents Through Youth Fitness Programs


Low Back Pain Youth Fitness Solution #1
Teach pelvic tilt. Understanding how to pelvic tilt is fundamental to developing awareness of the position of the spine and pelvis. An athlete who does not know how to posteriorly pelvic tilt will have difficulty controlling trunk extension and rest on boney structures during exercise. The athlete who cannot anterioly tilt the pelvis will have a hard time learning how to hip hinge and keep neutral spine with squats and deadlifts. Teaching pelvic tilt is easily done if doing and floor based core exercise. Have your athletes start with knees bent, feet flat. Have athletes practice arching the lower back up off the floor, keeping the glutes and shoulders down, then have them smash the lower back down into the floor. This can be progressed to quadruped, tall kneeling and athletic stance positions. Once your athletes understand pelvic tilt, many of your strength exercises will be easier to teach.

 
Low Back Pain Youth Fitness Solution #2
Train in neutral spine. Have your athlete’s pelvic tilt both ways and then find a happy medium. That’s roughly what we would call neutral lumbar spine. To find neutral spine a stick placed along the lower back works well. The athlete should be able to contact the stick at the sacrum, thoracic spine and back of the head.


youth fitness


Floor based core exercise should use neutral spine as well. Dead bug progressions work very well here. Have your athletes lift one leg or extend one leg and opposite arm, keeping neutral spine. Check under their back to be sure there isn’t an increase in the gap between the spine and the floor. Exercises such as double leg straight leg lifts will be too challenging for most athletes without a progression. This is why kids put their hands under their butt if asked to do excessive leg lifts with a weak core.


Look at how your athletes perform planks. Ideally the glutes should be tight and spine neutral. The pelvis position should not change when doing planks or push-ups. If it does, then the abdominals are fatigued or the athlete has poor core control and the lower back passive restraints will bear the load. Discontinue the set. This means push-ups may be limited more by core strength than by upper body strength.


youth fitness


Neutral spine applies for other strength exercises as well. Athletes should be able to use the force couples around the pelvis, engaging the glutes and abdominals to help control pelvic position. Exercises should maintain lumbar lordosis without forcing end range lumbar extension. Back extensions for example should be taken to full hip extension without hyper-extending the low back. For strength exercises, the cues to squeeze the glutes and tighten the abs will often help create balanced forces around the pelvis to control excessive pelvic tilt.


youth fitness


Low Back Pain Youth Fitness Solution #3
Improve hip mobility. As mentioned earlier, the hip flexors can create a force pulling the pelvis into anterior rotation, increasing lumbar lordosis. Keeping the hip flexors mobility is essential to allowing for neutral spine positioning when strength training and running. For younger athletes a specific static hip flexor stretch is not necessary. You can adequately train the hip flexors with lunges and split squats to develop mobility and neuromuscular control. Again use a dowel held along the spine and cue abs tight to improve pelvic control during the movement. On the other end of the spectrum, the athlete with tight hamstrings may not be able to utilize their glutes well when doing deadlifts, squats or getting into athletic stance. Getting the hamstrings more mobile will help young athletes access their glute strength and decrease demands on the lumbar extensors. Again, an isolated static hamstring stretch is not needed. Get your athletes to hip hinge with a stick and RDL with a neutral spine and you will develop functional hamstring mobility and trunk stability. These types of exercises along with many of the hip mobility exercises from your IYCA certification will help your athletes develop great hip mobility and allow for decreased demands on the lumbar spine during training and sport participation.


If you encounter Low Back Pain in Adolescents or an athlete who complains of LBP, take it seriously. Suggest that they see a therapist or physician for further evaluation. If their back pain is still there, suggest they see an orthopedic specialist. To help diminish the risk of spondylolysis, teach pelvic control through fundamental movement patterns and core exercise. Correct excessive spine extension just as much as you would the athlete who tends to round over. Teaching athletes how to move well and stay injury free is the essence of an IYCA professional and avoiding Low Back Pain in Adolescents. Being aware of the risk of spondylolysis in adolescent athletes will help direct those who need it to medical attention while improving the quality of training for all our athletes.


1. Motley G, Nyland J, Jacobs J, Caborn D. The pars interarticularis stress reaction, spondylolysis, and spondylolisthesis progression. Journal of Athletic Training 1998; 33 (4): 351-358


If you are interested in learning more about proper programming for youth fitness programs check out the IYCA Program Design System.

youth fitness


Stretching Young Athletes with Bands


Young Athletes and Resistance Band Stretching


By Dave Schmitz
 

What age is good to start band stretching?
 

Is it appropriate to stretch young athlete ages 10 to 13 with Bands?
 

Are there precautions when stretching young athletes with bands?
 

As a band expert I have never felt doing band stretching with athletes younger than 14 was an effective way to improve passive mobility because of the hypersensitivity of the nervous system to passive over pressure stretching. Anytime I attempted to introduce band stretching to this age group, I met with a great deal inhibition and compensation. Passive overpressure stretching of young athletes for years seemed to be very noxious to the neuromuscular system which resulted in kids just putting their body through unproductive stress that the body was not mature enough to handle. The key word in this sentence was mature or from a functional standpoint integrated.
 

Band stretching is like any other movement skill, it must be integrated progressively which means eliminating inhibition by introducing the movement skill in a progressive manner. With band stretching that means:
 

  1. Using the correct band strength that provides the young athlete with enough resistance to initiate a contraction but does not put their muscle under inhibitory causing stress
     

  2. Providing a manual training stimulus using your hands and verbal cueing to guide them through the movement patterns
     

  3. Stressing the importance of opposite side stabilization and manually assisting with this so they can feel the impact of locking out the opposite arm and maintaining a solid foot contact against the wall
     

  4. Not overwhelming them by showing all stretching positions in one training session. Start with hamstring stretching first and then gradually introduce hip rotation, hip flexor/quad and ankle on subsequent sessions
     

    Other important keys to remember are that many of these young athletes are going through abrupt growth spurts which disrupt their neuromuscular control and coordination instantly. Lever arms are lengthened which in turn challenges dynamic stabilization. Also with this added length neural tissues become shortened leading to neurotension restrictions which are best addressed with rhythmical dynamic stretching versus using a static stretching approach.
     

    A Case Study
     

    My son Carter was 13 years old, 135 pounds and 5 feet 1 inch tall going into 8th grade school year. Carter moved very well for his age but had recently gone through a 3 inch growth spurt over a 2 month time frame which dramatically increased his hamstring and hip rotation tightness. Carter played soccer as well as football. He had become very interested in becoming the kicker for his 8th grade club football team. In watching Carter kick during the summer prior to his 8th Grade year, he was not able to get effective hip flexion with knee extension during the follow through of his kicks which had decreased both his power as well as accuracy. In accessing his Straight leg Raise (SLR) Test, Carter demonstrated only about 30 degrees of hip flexion with full knee extension.
     

    Up until this time, I had never implemented band stretching with Carter but decided to do a 3 week trial. For the first three 15 minute stretching sessions, I manually worked with Carter to insure proper movement and stability during the movement. I did not apply any overpressure but rather allowed Carter to create that with the band. My role was simply to guide the movements and assist with stabilization. After the first 2 sessions Carter started demonstrating very good neuromuscular control using a Red Small band and was able to perform all hamstring and hip rotation stretches effectively without my assistance. He stretched a total of 15 times over a 21 day period with each session lasting about 12 to 15 minutes. Many of the sessions were done prior to practice or before going out to play with his friends.
     

    After 3 weeks of band stretching, Carter’s SLR Test increased to 75 degrees and his kicking accuracy from 30 yards was 90%. After 6 weeks his SLR Test was 90 degrees and his accuracy was now 90% at 35 yards.
     

    Obviously after seeing this incredible change in Carter’s hip flexibility, I quickly started to adjust my opinion on band stretching for younger athletes. One of the other factors that I realized while going through this experiment with Carter, was level of muscle stiffness maturity he was experiencing. Carter’s tissues were stiff but not to the degree of an individual in his 20’s or 30’s Therefore by applying the correct stretching stimulus Carter’s tissues quickly adapted and lengthen which explained the dramatic improvement but also provided a stronger support towards instituting band stretching sooner than later in young athletes.
     

    Recommendations for stretching young athletes with bands


    Here are a few recommendations for starting a band stretching program for ages 11 to 14.
     

    1. Begin by using a red band before considering any stronger level band. Very important to not over tension their muscle tissue and make them struggle getting into the correct positions.
     

    2. As their coach or parent, you need to help them learn the movements and positions. They will need manual guidance and verbal cueing for at least 2-3 sessions before they can be allowed to stretch on their own.
     

    3. Start with 1 or 2 stretches and gradually implement the others as they master the initial stretches. Again keep in mind, this is not fun stuff and the motivation to train flexibility will probably not be there initially. Until they begin to feel functional improvement, getting young athletes to stretch effectively will require coaching patience.
     

    4. Stretch slowly but actively. 2-3 second progressive holds while performing at least 90 seconds of rhythmical movement in each position is important. Progressive holds are defined as maintaining increased tension for 2 to 3 seconds while still attempting to push further into the range.
     

    The video below will take you through what stretches I feel you should start using with young athletes.

    It should be noted the hip flexor- quad stretch is not performed but should be added into the routine once hamstrings and hip rotation stretches are mastered.


Damage Control: Reversing the effects of early specialization


Damage Control: Reversing the effects of early specialization


Early Specialization with young athletes can lead to many issues


By Mike Mejia CSCS


In last month’s newsletter, which you can access here, I wrote about why young athletes shouldn’t necessarily engage in sports specific training and instead, focus on developing more in the way of global athleticism. While certainly sound advice, for some it may come a bit too late. The unfortunate reality is that far too many kids have not only been specializing in a single sport from an early age, but many have also geared any fitness efforts solely towards enhancing their performance in said sport. As a result, there are legions of young athletes who’ve already developed significant movement restrictions and musculoskeletal imbalances that often serve as precursors to injury. Whether it’s a teenage swimmer with chronic shoulder pain, or a high school aged basketball player with “bad knees”, the message to be as diversified as possible when it comes to early sports participation and exercise habits is lost on some. So, what do you do when the ship seems to have sailed in terms of developing a well-rounded athlete and are instead, forced to deal with a young body in an obvious state of disrepair?


Not that there aren’t things you can do to help correct any existing problems. Changing the training focus to include more in the way of flexibility work and strengthening those areas that often go neglected to promote more balanced physical development is always a good idea. There are however certain “sensitive periods” where the acquisition of specific bio-motor skills is going to be much easier to attain. During the ages of 9-12 for instance, kids are developmentally ready to make the most rapid improvements in things like balance, agility and coordination. Or in other words, the kind of physical attributes that are the cornerstone of athletic success. Again, not that these types of skills can’t be attained to a certain degree later in an athlete’s development. It’s just that spending so much time specializing puts them at a distinct disadvantage when it comes to overall athleticism and in turn, runs the risk of imposing serious limitations of their ability to perform at a high level as they get older.


So, if you do have a fourteen, fifteen year old (or older) young athlete who is just now trying to undo some of the damage caused by what’s been a decidedly one-sided approach to sports participation and physical conditioning, he or she is going to have to go about things a bit differently.


One of the main things that will entail is forgoing a lot of the more popular forms of training aimed at enhancing performance (i.e. plyometrics, Olympic lifting and advanced speed and agility work) and instead, concentrating on some less glamorous but ultimately more necessary aspects of maintaining a fit, healthy body. These include things like:


Paying constant attention to posture: No kid wants to hear it, but employing good postural habits is one of the best ways to help guard against injury. Even if a young athlete were to completely revamp his, or her training approach to target all the areas the young athlete needs to work most, that’s still only on average about two to four hours per week where they’d be working towards correcting the problem. Compare this to the hours of repetitive motion involved in practicing and competing in their sport, as well as all of the time spent slumped over in class, in front of computers and texting and you can see where it’s hard to make any kind of lasting improvements. However, being aware of their posture as often as possible throughout the day is one of the best and easiest ways of helping them restore more structural balance.


Treating conditioning like a job: If a young athlete is going to spend that much time practicing and competing, they’d better find a way to put some serious effort into helping their body withstand the rigors of all that abuse. This involves a lot more than just hitting the weight room with reckless abandon. Improving soft tissue quality with things like foam rolling, doing a sound dynamic warm-up prior to all forms of physical activity and post workout stretching aimed at those areas where they’re especially tight, are all vital components of a well-rounded program. Gone are the days where kids could just enjoy sports for hours on end without giving any thought to what they were doing to their bodies. This age of early specialization has drastically altered the landscape; essentially forcing kids to approach conditioning in a whole new light- especially if they want to have any kind of staying power in their chosen sport.


Allowing more time for recovery and regeneration: Recovery is without question, one of the most overlooked aspects of athletic performance. Yet time and time again I see young athletes pushing themselves to their absolute limits, only to come right back the next day and do it all over again. True, kids do have the resiliency of youth on their side, but that doesn’t mean that the “more is better” mindset should always prevail. I’ve got nothing against seeing kids work hard, but there are limits. Allowing athletes more recovery time between practices, competitions and workouts will ultimately yield better results in terms of both performance and injury prevention.


Besides not scheduling their practices and workouts too closely together, encourage your athletes to employ other types of recovery aids during those periods of the season that are most physically demanding. In addition to the aforementioned stretching and foam rolling, things like epsom salt baths, contrast showers and even dietary changes like adding in more alkaline foods (leafy greens, sweet potatoes, almonds, green tea etc.) are all effective ways of helping to reduce inflammation and facilitate better muscle recovery.


While you obviously can’t go back in time and do anything about your child having succumbed to early specialization at an early age, there’s plenty you can do right now to help manage the situation and get them started on a healthier path. Encourage them to focus on posture, stretching and strengthening exercises that are going to promote more physical balance and create good lifelong habits. Because let’s face it; the vast majority of kids will never go on to compete at any sort of high level.


So, make it your business to help them avoid early specialization and having to experience any long-term effects from participating in the sport they love.


Recovery for Athletes


[wpfblike]


by Wil Fleming


(more…)

High School Certification: Sample Chapter

[wpfblike]

High School Certification Taster

* * * * * * * * * * * * * * * * * * * * * * * * * * * * * *


Did you miss last night’s recording?


No worries!


The complete recording AND PDF transcript of every word that was said is yours… For no charge!


Just click here —> https://iyca.org/highschool/


* * * * * * * * * * * * * * * * * * * * * * * * * * * * * *


High School Certification (more…)

Speed and Agility for Athletes Coping with Growing Pains

When it comes to speed and agility for athletes, customization is key. Having a cookie-cutter program or a “one size fits all” approach can lead to frustrated athletes who see little progress—and might even get injured.


In this video, Dave Gleason, IYCA Expert and owner and head coach of Athletic Revolution Pembroke, shares a reminder to customize speed and agility for athletes who are still growing.


He talks about the potential risks of static stretching, the need to help young athletes succeed while their bodies are maturing, and the many benefits of skipping for speed and agility for athletes.


You can be your local “go-to” expert, just like Dave Gleason, by becoming IYCA Youth Speed and Agility Certified. Check out the IYCA’s at home course and the best Youth Speed and Agility certification on the market!


Speed Training for Athletes

http://youthspeedspecialist.com/


Flexibility Training for Young Athletes


[wpfblike]


Chris Blake gives answer some common questions about flexibility training for young athletes


What is the difference between Flexibility and Mobility?
Flexibility can have two definitions:

1.) The ability of muscle to lengthen during passive movements.

2.) Range of motion about a joint and surrounding musculature during passive movements.


Mobility can also have two ways of being defined. The main definition is the state of being in motion. But this state of motion can be looked at within certain joints (subtalar mobility) or as a physical whole (moving from one position into the next during a run).


Are both important to young athletes or is one more important than the other?
This is a great question. Both are important for the older athlete (ages 14-18+) as athletes within this age group tend to show more restrictions with both flexibility and mobility, often times once you take care of the flexibility then you improve mobility. But with the younger athlete (ages 13 and under) I wouldn’t place much importance on either one unless there has been a certain injury that limits each.


Are there different kinds of Flexibility, or is ‘bending over to touch my toes and stretch my hammy’ what all young athletes should be doing?
There are seven different ways of going about flexibility:


(more…)