In Part 1 of Karsten Jensen’s article on Cluster Training, he explained many of the elements that lay the foundation for cluster training. In Part 2, he goes into more depth on the 5 steps to effective use of cluster training so that you can immediately begin to utilize this concept in your training programs. Be sure to go back and read Part 1 before your begin reading Part 2.
SECTION 5
Tactic #3: Auto-regulated Training
The definition of the word auto includes self and spontaneous, used in the formation of compound-words. (24)
Thus, auto-regulated training is self-regulated – or athlete/client regulated training, which could take two basic forms.
- The training is regulated based on the immediate performance of the athlete-client (but the decisions are made by the coach)
- The athlete-client is given guidelines for how to adjust specific aspects of the training based on their perception and/or performance.
Self-regulated training has also been termed Cybernetic Periodization where
“the original preplanned Periodization scheme is regularly modified by subjective and objective feedback obtained from the lifter’s current performance state. The feedback from the output of the system is used to modify the input to the system. “(25)
The subjective and objective feedback from the athlete-client may include components such as
- Rate of Perceived Exertion
- Exercise form
- Lifting Velocity
Choice is considered an inherent biological necessity and may (28)
- Enhance motivation and adherence to training sessions.
- Increase motor learning and performance.
- Increase velocity and force production.
- Postpone fatigue.
Thus, self-regulated, the training is fundamentally important to achieve the optimal training load —and thus, the optimal stimulus of the stress-response—because the moment-to-moment state of the athlete-client is fundamentally unpredictable.
Self-regulated training is an important aspect of the application of progressive overload of Periodization systems. (26)
The last section of this article integrates the three described tactics: cluster training, drop sets and auto-regulation into a powerful approach to resistance training.
SECTION 6
5 Steps to Effective Cluster Training
Section 6 describes a 5-step process for effective cluster training.
Step 1 – Program Objective
Determine the strength quality you wish to develop with the program: stabilizer endurance, structural strength (including hypertrophy), maximal strength, power or muscular endurance.
Associated with each quality is an approximate level of optimal fatigue:

At Step 4, intra-set rest criteria is chosen with the purpose of performing the program with the optimal level of fatigue.
Step 2 – Intensity Zone and Total Repetition Volume
Choose the intensity zone and total repetition volume corresponding to the chosen strength quality.
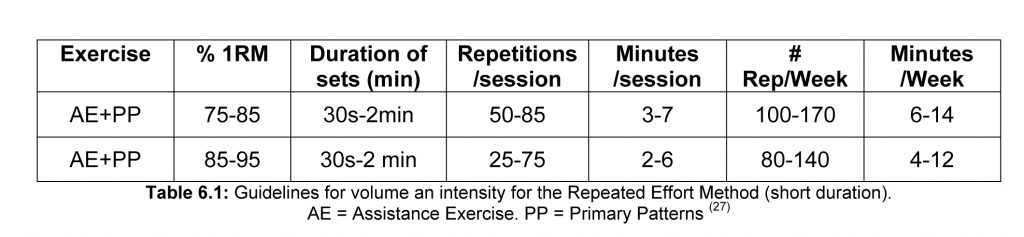
Below is an overview of the guidelines for the Repeated Effort Method (short duration) that are used with the Flexible Periodization Method. The Repeated Effort Method (short duration) is the primary method used when the objective is hypertrophy.
Example (Combination Exercise) =
Powerlifting Style Back Squat + Olympic Style Front Squat + Zercher Squat, 2 x 10+10+10
Step 3 – Start Load
Choose the start load based the training background of the athlete-client and the specific emphasis on mechanical stress or metabolic stress within in the program.
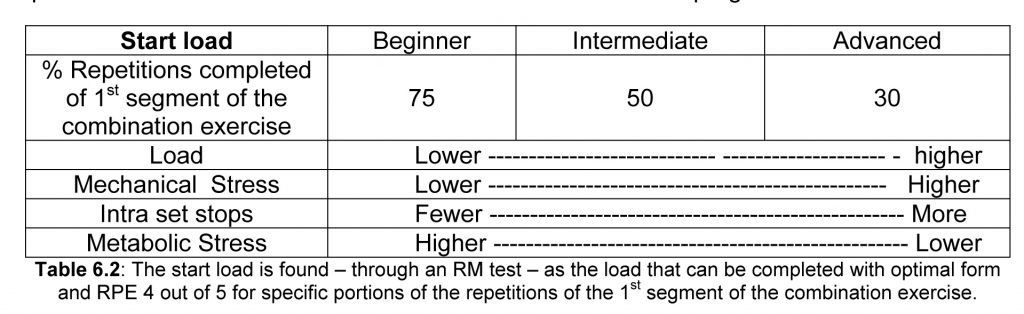
The start load will be within or slightly above the primary intensity zone for the specific type of training. As the load is dropped throughout the set, it approaches the lower end of the primary intensity zone for the type of training.
Example: Powerlifting Style Back Squat + Olympic Style Front Squat + Zercher Squat, 2 x 10+10+10
Start load (beginner) = 7RM
Start load (intermediate) = 5 RM
Start load (advanced) = 3 RM
The Flexible Periodization Method incorporates the advanced option as a way for advanced athlete-clients to maintain maximal strength in phases where the primary load is lower. (28)
Step 4 – Choose Intra-set Rest Criteria
John Brookfield can’t count…And that makes him one smart coach. John’s primary focus is work capacity, task management, and technical efficiency. He uses fundamental patterns and simple equipment to create loads. Sets and reps don’t really apply to the exercise equation. Persistence, patience, and safety are hallmarks of John’s work. Don’t just watch – do what John does. You will learn from both ends – his coaching and your movement experience.
Gray Cook, MSPT, CSCS http://powerropes.com/brtestimonials.html
Most Cluster Training research uses a short, pre-determined cluster length. However, a pre-determined cluster length could make the training too easy. A performance based threshold might be a better solution. (4) A performance-based threshold makes the cluster length auto-regulated (See Section 4).
Performance-based objective and/or subjective criteria for:
- taking intra-set rest
- the length of the intra-set rest
are chosen with the purpose of achieving an optimal level of fatigue in relation to the program objective (See Step 1).
Objective Criteria
If the goal is to minimize fatigue, the cluster length should be 4 repetitions or less, to be able to complete each cluster within the phosphor – creatine stores. (1)
As mentioned above, force, power and velocity drop from the 2nd repetition of a continuous set. Different targets (for example, 10, 20 or 30% velocity loss) can be used to achieve specific levels of neuro-muscular fatigue. (30)
Velocity loss can be measured through a variety of technologies. For example, the PUSH Armband. See Table 6.3 below.
Subjective Criteria
Velocity loss is associated with an increase in rate of perceived exertion. (1)
Rate of perceived exertion (RPE) is a classic and valid way of self-estimating the training load. However, utilizing the RPE to evaluate the training load may divide attentional focus between
- Optimally executing the movement.
- Evaluating the perceived exertion.
- Counting the number of repetitions.
credit renee.jones@startribune.com
A divided focus may have detrimental effects on the performance of the athlete-client. Thus – even if it is not always possible, the Flexible Periodization Method aims to create a set up around each exercise that allows the athlete-client to focus their attention on one element.
From a mental standpoint, strength is moving awareness. (31) As long as awareness moves, you move. Thus, the primary instruction is to.
Focus on executing one repetition at a time, with perfect form and the awareness of being strong throughout the body.
If your awareness wanders from the awareness of being strong, bring it back on target. At some point, the sensory experience of fatigue will start to become stronger and overshadow the experience of strength. Will power is applied to maintain an awareness of strength despite the evidence of the senses. Even further into the set, the body stops without a conscious decision to do so. This approach aligns results in moderate to high fatigue during a set.
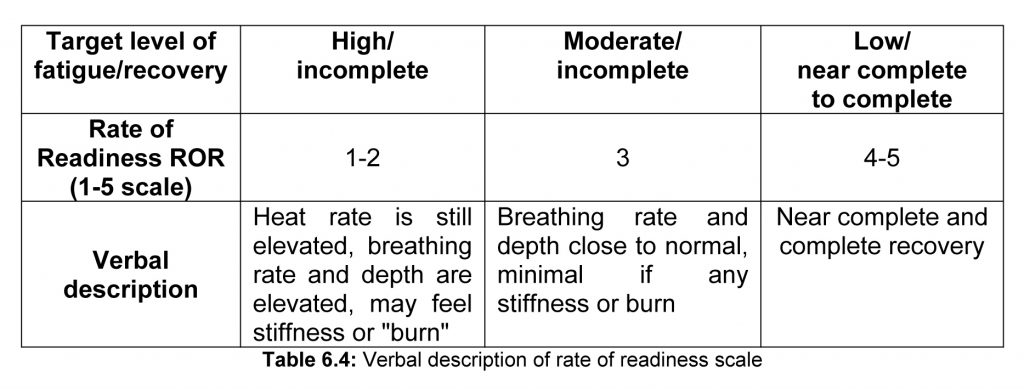
Table 6.3 describes objective and subjective criteria for taking intra-set rest and intra-set rest duration.
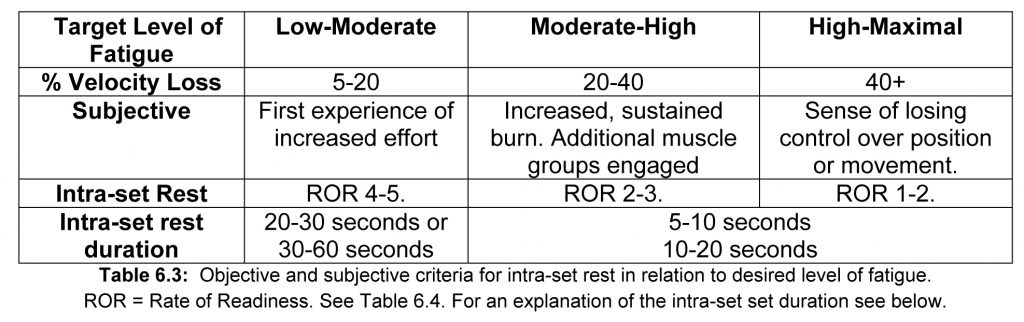
Don’t have the athlete-client look at the clock during the intra-set rest. Give absolutely minimal corrections. Focus on recovery and getting ready for the next cluster. Gauge the time in number of deep breaths.
Below is an overview of different rest durations that appear in the Cluster training literature.
Minimal, but does have effect = 5-10 sec (let go of weight, stand up, lower again, set up and repeat)
Incomplete = 10-20 sec (let go of weight, stand up + 1-3 deep breaths, lower again, set up and repeat)
(Close to) Complete (for singles) = 20-30 sec (let go of weight, stand up + 1-5 deep breaths, lower again, set up and repeat)
Close to complete (for doubles, triples, etc.) = 30-60 sec (let go of weight, stand up + 1-10 deep breaths, lower again, set up and repeat)
As the coach or trainer, check your watch to ensure that the rest periods stays within approximate time frames.
Step 5 – Decide On any Load Reduction
As long as the athlete-client can start the next cluster and the awareness of being strong, the load is kept the same.
If the client cannot start the next cluster with perfect form or the awareness of being strong then
-
- The load is reduced by 5-10% (intra-set rest stays the same).
- Intra-set rest is increased (See above).
SUMMARY
This article outlined a suggested 1st Principle of Physical Training and Strategies to Achieve it. Additionally, three program design tactics were discussed: cluster training, drop sets and auto-regulation were described. Last, a 5-step approach to cluster training was detailed.
Take advantage of this incredible concept to achieve excellent results with athlete in need of improving their strength. Be sure to understand why cluster training is being utilized and follow the 5-step approach to optimally utilize each approach.

Karsten Jensen has helped world class and Olympic athletes from 26 sports disciplines since 1993. Many of his athletes have won Olympic medals, European Championships, World Championships and ATP Tournaments.
Karsten is the first strength coach to create a complete system of periodization, The Flexible Periodization Method – the first complete method of periodization dedicated to holistic, individualized and periodized (H.I.P) training programs.
Karsten shares all aspects of The Flexible Periodization Method (FPM) with his fellow strength coaches and personal trainers through The Flexible Periodization Method workshop series (Levels I-VIII). Find more information at www.yestostrength.com.
REFERENCES
1.Jukic I, Tuffano JJ. Shorter but more frequent Rest Periods: No Effect on Velocity and Power Compared to Traditional Sets, not to Failure. Journal of Human Kinetics, 66:257-268. 2019.
2.Río-Rodríguez D, Iglesias-Soler E, Fernández del Olmo M (2016). Set Configuration in Resistance Exercise: Muscle Fatigue and Cardiovascular Effects. PLoSONE11(3):e0151163. doi:10.1371/journal.pone.0151163
3.Tufano JJ, Conlon JA, Nimphius S, Brown LE. Banyard HG, Williamson BD, Bishop LG, Hopper AJ, Haff GG. Cluster Sets: Permitting Greater Mechanical Stress Without Decreasing Relative Velocity. International Journal of Sports Physiology and Performance. 12: 463-369. 2017.
4.Tufano JJ, Halaj M, Kampmiller T, Novosad A, Buzgo G (2018) Cluster sets vs. traditional sets: Leveling out the playing field using a power-based threshold. PLoS ONE 13(11): e0208035.https://doi.org/10.1371/journal. pone.0208035
5.Rader P. Breathing Methods. The Master Bodybuilding and Weight Gaining System. p. 19. www.superstrengthbooks.com . Wm F. Hinbern. 1999 (Republished from 1946).
6.Miller, C. The Sport of Olympic-Style Weightlifting, Training for the Connoisseur. Sunstone Press. 2011
7.https://www.youtube.com/watch?v=EdveLFrh9U8
8.Zatsiorsky Z. Timing in Strength Training. Science and Practice of Strength Training. Chapter 5, p 93. Human Kinetics. 2006.
9.Oliver JM, Jagim AR, Sanchez AC, Mardock MA, Kelly KA, Meredith HJ, Smith GL, Greenwood M, Parker JL, Riechman SE, Fluckey JD, Crouse SF, Kreider RB. Greater gains in strength and power with intra set rest intervals in hypertrophic training. J Strength Cond Res. 27(11):3116-3131. 2013.
10.Iglesias E, Boullosa DA, Dopico X, Carballeira E. Analysis of Factors That Influence The Maximum Number of Repetitions In Two Upper Body Resistance Exercises: Curl Biceps and Bench Press. J Strength Cond Res. 24(6):1566-1572. 2010.
11.Haff GG, Whitley A, McCoy LB, O’Bryant HS, Kilgore JL, Haff EE, Pierce K, Stone MH. Effects of Different Set Configurations on Barbell Velocity and Displacement during a Clean Pull. J Strength Cond Res. 17(1):95-103. 2003.
12.Iglesias E, Boullosa DA, Dopico X, Carballeira E. Analysis of Factors That Influence The Maximum Number of Repetitions In Two Upper Body Resistance Exercises: Curl Biceps and Bench Press. J Strength Cond Res. 24(6):1566-1572. 2010.
13.Hardee JP, Triplett NT, Utter AC, Zwetsloot KA, McBride JM. Effect of Inter-repetition Rest on Power output in the Power Clean. J Strength Cond Res. 26(4):883-889. 2012.
14.Lawton TW, Cronin JB, Lindsell RP. Effect of Inter-repetition Rest Intervals on Weight Training Repetition Power Output. J Strength Cond Res. 20(1):172-176. 2006.
15.Tufano JJ, Brown LE, Haff GG. Theoretical and Practical Aspects of different Cluster Set Structures: A Systematic Review. J Strength Cond Res. 31(3): 848-867. 2017.
16.Lima BM, Amancio RS, Goncalves RS, Koch AJ, Curty VM, Machodo M. Planned Load reduction vs Fixed Load: a strategy to reduce the perception of effort with similar improvements in hypertrophy and strength. International Journal of Sports Physiology and Performance. 2018 Published ahead of print.
17.Anglieri V, Ugrinowitsch C, Libardi CA. Crescent pyramid and drop-set systems do not promote greater strength gains, muscle hypertrophy and changes on muscle architecture compared with traditional resistance training in well-trained men. European Journal of Applied Physiology. DOI 10.1007/s00421-016-3529-1. 2017.
18.Leistner K. Fifty Rep Sets. The Steel Tip. Vol 1. Number 3. 1985. The Steel Tip Collection. Newsletters For Strength and Fitness.
19.Bentes CM, Simao R, Bunker T, Rhea MR, Miranda H, Gomes TM, Novaes JDS. Acute Effects of Drop Sets Among Different Resistance Training Methods in Upper Body Performance. Journal of Human Kinetics. 34: 105-11. 2012.
20.Goto M, Nirengi S, Kurosawa Y, Nagano A, Hamaoka T. Effects of Drop-set and Reverse Drop-Set Methods on the Muscle Activity and Intramuscular Oxygenation of the Triceps Brachii among Trained and Un-trained Individuals. Journal of Sports Science and Medicine. 15:562-568. 2016.
21.Fink J, Schonfeld BJ, Kikuchi N, Nakazato K. Effects of drop set resistance training on acute stress indicators and long-term muscle hypertrophy and strength. The Journal of Sports Medicine and Physical Fitness. 2017. DOI: 10.23736/S0022-4707.17.06838-4
22.Fleck SJ, Kraemer WJ. Resistance Training Systems and Techniques. Designing Resistance Training Programs 3rd Ed. Chapter 6, 187-206. Human Kinetics. 2004.
23.Poliquin C. Poliquin’s Top 10 Set Rep Schemes for Maximal Strength Development. Modern Trends In Strength Training. Chapter 3, page 36-51.Poliquin Performance Centers. 2006.
24.https://www.dictionary.com/browse/auto, 2019.
25.Siff M. Organisation of Training. Supertraining. Chapter 6, p 331. Supertraining Institute. Denver, USA. 2004.
26.Jensen K. Performance Optimization with Periodization. (in Danish) https://www.dif.dk/da/forening/uddannelse/udgivelser/traening/bog_traeningsplanlaegning
27.Jensen K. Periodization of Program Variables For The Development of. Maximal Strength: How To Manifest Untapped Potential For Strength Using The Flexible Periodization Method. Chapter 3, page 21-90. www.yestostrength.com. 2015.
28.Suchomel TJ, Nimphius S, Stone MH. The Importance of Muscular Strength In Athletic Performance. Sports Medicine, 46(10) Feb. 2016 DOI 10.1007/s40279-016-0486-
29. Halperin I, Wulf G, Vigotsky AD, Schoenfeld BJ, Behm DG. Autonomy: a missing ingredient of a successful program? Strength and Conditioning Journal, Published Ahead of Print. DOI: 10.1519/SSC.0000000000000383
30. Weakley J, Ramirez-Lopez C, McLaren S, Dalton-Barron N. The Effects of 10%, 20%, and 30% Velocity Loss Thresholds on Kinetic, Kinematic, and Repetition Characteristics During the Barbell Back Squat. International Journal of Sports Physiology and Performance. DOI: 10.1123/ijspp.2018-1008. 2019.
31.Jensen K. At the most fundamental level, everything that appears solid is pure energy, vibration and mostly empty space. I AM Strong: How To Align Thought beliefs and emotion to reach fitness goals faster than ever before. Section 1.b, page 7-10. Yes To Strength. 2016.
 It is no secret that the development of the young athlete is multifaceted and it is the responsibility of the coach and/or trainer to take into consideration developmental, physical, and psychological aspects of training.
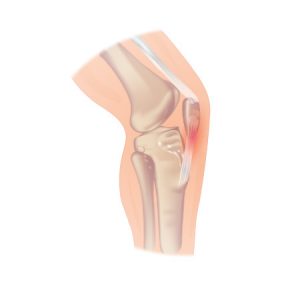
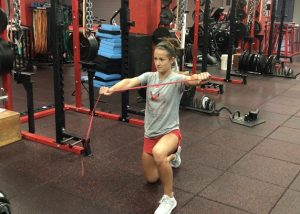
  Unilateral exercises, or single-leg squat variations, are beneficial for a variety of reasons including that they require stability, they have the potential to eliminate imbalances, and they can help create awareness of weaknesses. The single-leg squat has been utilized commonly in knee rehabilitation settings such as with individuals experiencing patellar tendinitis or going through a return-to-play protocol with knee surgeries. Considering the stress that sport has upon the knees themselves, implementing exercises that stress the knee joint is imperative when preparing the body for these demands. The single-leg squat is a great way to strengthen not only the larger muscles of the leg but also all of the stabilizing muscles of the hips due to the nature of the unilateral exercise.
 Jordan Tingman – CSCS*, USAW L1, ACE CPT, CFL1 is a graduate of Washington State University with a B.S. in Sports Science with a Minor in Strength and Conditioning. She completed internships with the strength & conditioning programs at both Washington State University and Ohio State University, as well as a Graduate Assistantship in S & C at


 can be done anywhere. Many coaches also look for ways to help athletes get better at push ups, but simply doing them more often isn’t a great way for many people to improve, especially those who aren’t capable of performing many good push ups.
 Jim Kielbaso is the President of the IYCA and owner of
  way we consume information about strength and conditioning, and it’s probably not the best way for us to make decisions.
 We see something on Instagram from someone with a bunch of followers, and we instantly think it must be the truth instead of digging deeper, doing our own research and getting the whole story. So, whether it’s politics or strength & conditioning, it’s important to get the whole story before you make a decision.
 sources of information. Of course, I use social media, but I also go to scientific journals, I take courses, I have multiple degrees, I read lots of books, I attend conferences, and I go to people who have many years of experience in the industry who put out quality information and who are in the trenches daily. These people have been doing it for years, documenting the results, analyzing their experiences and their programs, and then making decisions based on those analytics.
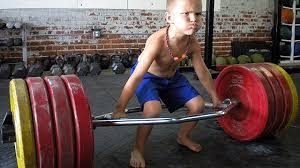
 Along with the effectiveness of a training stimulus, you have to weigh the risk vs. benefit to help determine whether it’s the right choice to include in a program. For example, when I see kids standing on stability balls or doing circus tricks, I feel like the training benefit is incredibly small while the risk is fairly high. Or, I’ll see kids stacking a bunch of plates up on top of boxes to see how high they can jump. Again, the training benefit of jumping onto a box is no greater than jumping in the air as high as you can and landing on the ground, but the risk is MUCH greater. So, I personally don’t feel like the risk outweighs the benefit.


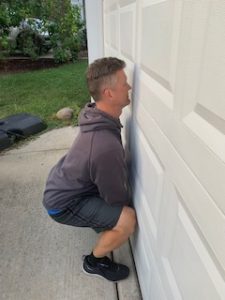 When it comes to the squat, the deficits are typically the knees moving forward excessively as well as moving inward.

 Continuing our Top 3 series from Jordan Tingman, these are her Top 3 Core Exercise Variations.
 Brett Klika is a youth performance expert and a regular contributor to the IYCA who is passionate about coaching young athletes. He is the creator of the
  understand that some of these may be done by other coaches, and while I respect other coaches opinions, this article outlines how I personally like to coach these exercises.
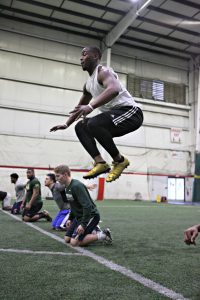
 conditioning coaches to receive push-back from people trying to vilify exercises in their program, with the squat being the target of the attacks. Whether it be sport coaches, athletic trainers, administrators, parents, or even athletes themselves, the squat is always surrounded by questions and opinions. It has been blamed for unrelated issues it hasn’t caused and even termed “dangerous” for reasons that many don’t know nor care to find out. To learn where all of this came from, it’s important to understand the history of the squat in America and how one particular researcher sparked a debate that continues today.
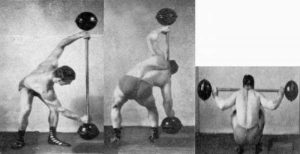 were quite impressive, even by today’s standards. While Steinborn is notable for many reasons, it’s the way in which he performed the squat that will still shock many lifters today. Steinborn performed squat sets, as heavy as 550 pounds for 5 repetitions, without having any supports, wraps and most remarkably, no access to a squat rack. He simply stood the barbell up tall on one end, leaned under it and hoisted it across his shoulders. This style of squatting is aptly known as the “Steinborn Squat”.
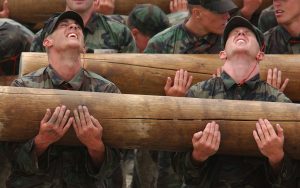 squatting. A letter sent to Klein from the US Marine Corps stated: “Our consultants agree that the type of exercise you condemn should probably be eliminated from physical conditioning programs.” The Army physical fitness test omitted anything that resembled a squat, and until recently, stayed the same for decades. While Klein had convinced many communities that the squat did more harm than good, there was still a strong contingency of professionals that saw Klein’s study as more subjective than objective.

 Many high school and college-level athletes feel like they either need to get as big and strong as possible or they don’t value it at all. Some of that depends on the sport they play, and some depends on their environment or what their coaches value. We need to help athletes put strength/size into perspective, and teach them that these qualities should be developed as a PART of their overall development. In some cases, it’s a small part, and in other cases, it’s more important. But, concentrating ALL of your effort on lifting weights if usually not what athletes need.


 Instead of looking at what the pros are doing NOW, look at what they did when they were your kid’s age. This will give you insight into what helped them develop the foundation of athleticism they have today.
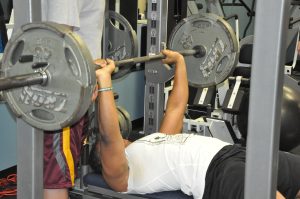
 A final and often overlooked aspect of a push up is a slight forward lean when dropping down toward the ground so the chest is in line with the hands. Then pushing slightly backwards while pressing back up to the top position so the hands are directly underneath the shoulders. This angle of pressing is very similar to the bar path you should use while doing a bench press.