fbpx

Archive for “Variations” Tag

Selecting the Right Starting Position for Olympic Lifts (Part 2)


Olympic Lifts and Foundatations

Young Athlete hang position olympic lifts


By Wil Fleming


Coaches everywhere, and a great percentage of coaches at that, choose to use some type of Olympic lifts in their training of athletes. Typically this Olympic lift is a power clean, starting from the floor. While this is appropriate for plenty of athletes, there are multiple variations in the starting position, that it can be hard to determine which is the right place to start.


In Part 1 I discussed the advantages and disadvantages of the floor start position and the block start position. In Part 2 you will learn about 2 of the more popular hang start positions.


So lets take a look at the advantages and disadvantages of some of the Olympic lifts variations in start position.


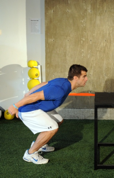
Hang Start Position (High Thigh)


The hang position with the bar on the high thigh is a very popular way to start for both athletes and in training for competition weightlifters. This position is actually the one that is taught in many certification courses as a great way to train beginners on the lifts.


The start position is usually ½ way or more up to the top of the thigh but below the hip crease. The start position is nearly at the finish of the 2nd pull and will lead to a very quick and explosive lift.


Pros: This start position is excellent for training athletes to become more proficient at the Olympic lifts. The start position is relatively easy to attain because the counter movement is short which makes it hard to miss. Due to the high nature of the start position the speed of the lift is very quick making coaching cues simple, (“explode”, “Drive” etc,). As a technique tool it reinforces the 2nd pull and even assists in making the athlete more efficient at the 3rd pull, more so than any other start position for the Olympic lifts.


Cons: This is a great place to start. In my experience though many athletes have a difficult time generating much power from this start position early on. Technical difficulties for novice athletes from this position are usually things like, jerking their head back from the start, or over scooping the knees forward to initiate the movement. The correct start position is fairly quad dominant and doesn’t rely as much on the athlete’s ability to extend the hips as other hang start positions. As with other hang start positions multiple reps are difficult on the grip (not that big of a con, but still needs to be mentioned).


Hang Start Position (Above Knee)


This is a common position to see athletes do cleans and snatches. In fact, this is the primary position from which I teach my athletes how to clean or snatch. The start position is directly above the knee cap (or 3-4 inches above in the snatch).


Pros: This start position is easy to attain for most athletes, it mimics the pattern that they will go through when you ask them to jump as high as possible. The easy to attain start position and similarity to other athletic movement means that athletes will have early success with the lift. In terms of training this usually means that the athlete will be able to lift more weight, correctly, and sooner than with other positions. One big positive with this lift is that athletes are made to assume a more hip dominant position to start, training the posterior chain more effectively than hang start positions higher on the thigh.


Cons: Because the position is lower on the thigh, athletes that are extremely quad dominant in their movements have difficulty getting to the start position. Often times they will try to squat, or knee bend their way to the start. Athletes that lack lumbar and core stability will try to achieve the start position through a back bend. The longer counter movement actually makes grip even more of an issue than some shorter hang start positions.


Many pros and cons lists end up with a verdict, but with the Olympic lifts I cannot form one. All of the lifts have benefits and drawbacks, and some more so than others. Take the considerations in the last two articles to mind when training with the lifts and test each of them out for yourself and those athletes that are ready.


olymic lifts young athletes


The IYCA Olympic Lift Instructor Course gives you everything you need to better understand, teach, progress and implement Olympic Lift training with your young athletes. You will gain complete technical instruction and learn necessary skill sets & essential coaching cues.


click here


Missed part 1? Click here

Selecting the Right Starting Position for Olympic Lifts (Part 1)


Athletes Options For Olympic Lifts


By Wil Fleming


Coaches everywhere, and a great percentage of coaches at that, choose to use some type of Olympic lift in their training of athletes. Typically this Olympic lift is a power clean, starting from the floor. While this is appropriate for plenty of athletes, there are multiple variations in the starting position, that it can be hard to determine which is the right place to start.


So lets take a look at the advantages and disadvantages of some of the variations in start position.


Floor Start Position


This is the typical start position and the one used in weightlifting competitions. This position is the one that as coaches we see high school athletes using most often in their high school training program.


In this position the athlete starts with the bar at rest on the floor, and the bar should be close (~1-2 inches) from the shins. Athletes starting in this position should slowly, and under control lift the from the floor, ultimately passing the knees.


Pros: This position is the position from which the most weight has ever been cleaned or snatched, has been lifted. This is due to the momentum gained from the correct pull off the floor. Using the floor start position requires the athlete to increase hip range of motion due to the low starting position.


Cons: This position requires great hip mobility, and therefore, if an athlete is lacking in hip mobility they will typically gain this lower start position through an increase in lumbar flexion. Lumbar flexion with loads in front of the spine have been attributed to greater shear forces on the spine and a corresponding higher incidence of back injury. The typical floor start position also requires athletes to move the bar by the knees. This area of movement is one that requires great technique and for many athletes means that their technical problems occur in this area. More lifts are missed due to the first pull moving around the knee than in any other area of the lift. Poor lifts will have an S pull where the bar will move forward to travel pass the knee.


Block Start Position


The block start position is used often in the technical training of competition weightlifters.


The actual start position can be adjusted in height to meet the goals of the training session, but typically the athlete will start from a static stance somewhere above the knee.


Pros: Block starts are a great teaching tool. Coaches can specify the exact starting position that the athlete must achieve. This position is usually close to the 2nd pull (the rapid acceleration of the bar), and requires very little thought from the athlete once the bar is in place. Cueing the pull from a block position is fairly easy for the coach, typically aggressiveness and explosiveness are the only thing needed. The block start position is great for starting strength, no momentum is used and the stretch shortening cycle is eliminated. Starting strength is great quality to develop for nearly any athlete.


Cons: Situating the athlete in the correct start position can be hard for the uninitiated coach, differing starting heights require differing positions that are sometimes very dissimilar. Blocks can also be expensive to purchase or difficult to assemble, and therefore many weight rooms or facilities do not allow for the possibility of coaching athletes from a block starting position.


There are even more possibilities for Olympic lift start positions stay tuned for Part 2 to learn about 2 of my favorite start positions for young athletes.


olymic lifts young athletes
Learn More the Olympic Lift Instructor Course Today!


olympic-lifts


Teaching Young Athletes the Kettlebell Snatch


Kettlebell Snatch For Young Athletes


by Jason C Brown (more…)

How to Teach young athletes the Olympic Snatch

[wpfblike]

by Wil Fleming – www.beforcefit.com

Young Athletes Snatch Lesson

On my first day with one of the dozens of high school athletic programs I work with, I rarely walk in and see a bunch of athletes snatching incorrectly. I also don’t have many athletes who come in to my facility for the first time and show technical issues with the snatch.


"Great," you say. "A bunch of kids doing a highly technical lift really well."


Well… this isn’t exactly the case. I rarely see issues with the snatch on Day 1 because most athletes don’t have any experience at all doing it since many coaches just don’t teach their athletes to snatch.


This will not be an article imploring you to teach your young athletes to perform a snatch or one of its variations.  Despite being one of the single best indicators of an athlete’s power output and a great indicator of future performance in power sports, even I keep it out of the programs of some athletes.


I am not here to be the pied piper of the snatch. In this article I am simply going to teach you an effective and simple way to teach the snatch to your athletes so that you will never have to exclude it because you aren’t comfortable teaching it. 


The Cursory Stuff


The grip on the bar during the snatch can vary to a tremendous degree between individual athletes. A helpful rule of thumb is to have the athlete put their arms in a reverse scarecrow position: upper arms straight out from the shoulder, parallel to the ground, and the forearms straight down.   I think that it is important to have the athletes grip the bar using a hook grip (with their thumbs inside of their fist around the bar).


With that out of the way let’s get on to the meat of teaching the snatch to young athletes.


A Starting Point

To begin with, we will need to select a starting point for the snatch. Floor? Hang? To a further extent, above the knee, or below the knee?  Well I think all are great at certain times in training, but for a starting point lets choose the above the knee, hang position.  I select that position for starting our teaching progression because it is highly applicable to nearly all sports. It is a position that most athletes can find fairly quickly and it also puts the athletes in a position to succeed quickly at this sometimes difficult lift. 


So let’s get the athlete to this position! First, take the bar out of the athlete’s hands and just ask them to prepare themselves to jump as high as possible from a parallel, two-foot stance. Starting with the bar in hand the athletes will many times discover themselves in an unnatural position with their knees forward and their chest behind the bar. Without the bar in hand, I would be willing to bet that the athlete assumes a stance that is about shoulder width apart, or narrower, and automatically their head is up. This is contrary to the stance many athletes will take when you put the bar in their hand prior to this exercise. 


As the athlete makes their counter-movement, they will most likely take their chest forward and hips back, with only a slight bend in the knees.  Often though the athlete will do this, but bypass this position and go slightly lower, increasing the bend in their knees.  If this is the case, slow down their pre-jumping routine to illustrate the actual position you want them to find.  The emphasis here is on the Hip Hinge being the primary movers as opposed to a knee bend. 


young athletes

Starting Position

Just a Little too Low


Stay tuned for Part 2 later this week…


Olympic Lifts are at the core of developing Power and Speed in young athletes.


Become the very best, most knowledgeable and well-known Speed & Agility Coach in your area through the incredible “Youth Speed & Agility Specialist – Level 1” certification.

Click Here for all the Details —-> http://YouthSpeedSpecialist.com


Kettlebell Training for Youth Athletes


[wpfblike]


Youth Athletes With Kettlebells

by Pamela MacElree of www.KettlebellAthletics.com


Kettlebell training for kids and youth athletes

There really are hundreds of ways to train youth athletes, all the way from traditional weight lifting to strongman training, and everywhere in between.  Some programs focus strictly on gaining mass, some focus entirely on sport specific practice, some can’t get enough speed and agility, and others have no real basis at all.  Implementing kettlebell training into a youth training program has a variety of complimentary benefits to existing programs.


(more…)

Drills for Young Athletes

Drills.


Drills for young athletes.


How do you create them?


Now that’s a question I get asked virtually everyday.


Here are three great ones to use with your young
athletes – especially if you work with kids between the
ages of 6 – 12.


(1) Line Jumps


Have your athlete(s) stand directly in front of a line
either painted or taped on the ground.


They should be only a few feet away from the line.


On your cue, they will jump and try to land with their
toes as close to the line as possible without actually
touching it.


The purpose of this drill is not ‘maximum power’ but
rather a fine touch or precise execution of power.


Have them walk back to the starting point and repeat.


Purpose –


:: Kinesthetic Differentiation (coordination)

:: Bodily Control

:: Jump/Land Technique


(2) Red/Green/Yellow Light


With this drill, you can use any action you want such
as lunge walking, hopping, 1-leg jumping or crawling.


Have your young athletes move (using one of the actions
listed above) in a straight line across a gym, floor or
field.


When you call out ‘Red Light’, they must stop and hold
in place exactly where they are.


‘Green Light’ requires them to resume at normal speed.


‘Yellow Light’ is a command that asks them to continue
the action, but at a slow pace – as slow as possible
in fact.


Purpose –


:: Movement Adequacy (coordination)

:: Systemic Strength

:: Reaction (coordination)


(3) Monkey Tag


There are several variations of tag that are absolutely
wonderful for young athletes…. and this is one of them!


Have your young athletes start in a ‘catchers’ position
with their hands also on the floor/ground.


When they move to avoid being ‘tagged’ they must do
so by crawling/jumping like a monkey.


Purpose –


:: Hip Flexibility & Strength

:: Spatial Awareness (coordination)

:: Reaction (coordination)


Three great drills based entirely on fun and what
young athletes in the 6 – 12 year old range need in
terms of athletic development.


And here’s the thing…..


Within the Level 1 – Youth Fitness Specialist certification,
we show you exactly what those drills look like as well
as many others.


In fact, we have our entire audience playing and
participating in tons of drills so that they could get
a feel for them and you could see what they looked like.


"How do you create drills for young athletes, Brian?"


Easy…..


You become certified through the IYCA.


Become certified now and get started on a brand new
career that is guaranteed to be both rewarding and
lucrative.


Here’s an exclusive link to a deal I’ve put together
for you –


http://www.iyca.org/fitspecialist1


And this is a perfect time for you.


All IYCA Members are invited to the Ryan Lee Boot Camp
in two weeks to enjoy a live IYCA Young Athletes Seminar hosted by
myself and Pat Rigsby for absolutely no charge.


Here’s that link again –


http://www.iyca.org/fitspecialist1


I hope to see you soon!


Brian