[wpfblike]
by Wil Fleming – www.beforcefit.com
Young Athletes Snatch Lesson
On my first day with one of the dozens of high school athletic programs I work with, I rarely walk in and see a bunch of athletes snatching incorrectly. I also don’t have many athletes who come in to my facility for the first time and show technical issues with the snatch.
"Great," you say. "A bunch of kids doing a highly technical lift really well."
Well… this isn’t exactly the case. I rarely see issues with the snatch on Day 1 because most athletes don’t have any experience at all doing it since many coaches just don’t teach their athletes to snatch.
This will not be an article imploring you to teach your young athletes to perform a snatch or one of its variations. Despite being one of the single best indicators of an athlete’s power output and a great indicator of future performance in power sports, even I keep it out of the programs of some athletes.
I am not here to be the pied piper of the snatch. In this article I am simply going to teach you an effective and simple way to teach the snatch to your athletes so that you will never have to exclude it because you aren’t comfortable teaching it.
The Cursory Stuff
The grip on the bar during the snatch can vary to a tremendous degree between individual athletes. A helpful rule of thumb is to have the athlete put their arms in a reverse scarecrow position: upper arms straight out from the shoulder, parallel to the ground, and the forearms straight down. I think that it is important to have the athletes grip the bar using a hook grip (with their thumbs inside of their fist around the bar).
With that out of the way let’s get on to the meat of teaching the snatch to young athletes.
A Starting Point
To begin with, we will need to select a starting point for the snatch. Floor? Hang? To a further extent, above the knee, or below the knee? Well I think all are great at certain times in training, but for a starting point lets choose the above the knee, hang position. I select that position for starting our teaching progression because it is highly applicable to nearly all sports. It is a position that most athletes can find fairly quickly and it also puts the athletes in a position to succeed quickly at this sometimes difficult lift.
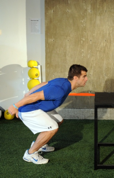
So let’s get the athlete to this position! First, take the bar out of the athlete’s hands and just ask them to prepare themselves to jump as high as possible from a parallel, two-foot stance. Starting with the bar in hand the athletes will many times discover themselves in an unnatural position with their knees forward and their chest behind the bar. Without the bar in hand, I would be willing to bet that the athlete assumes a stance that is about shoulder width apart, or narrower, and automatically their head is up. This is contrary to the stance many athletes will take when you put the bar in their hand prior to this exercise.
As the athlete makes their counter-movement, they will most likely take their chest forward and hips back, with only a slight bend in the knees. Often though the athlete will do this, but bypass this position and go slightly lower, increasing the bend in their knees. If this is the case, slow down their pre-jumping routine to illustrate the actual position you want them to find. The emphasis here is on the Hip Hinge being the primary movers as opposed to a knee bend.
|

|

|
|
|
Just a Little too Low
|
Stay tuned for Part 2 later this week…
Olympic Lifts are at the core of developing Power and Speed in young athletes.
Become the very best, most knowledgeable and well-known Speed & Agility Coach in your area through the incredible “Youth Speed & Agility Specialist – Level 1” certification.
Click Here for all the Details —-> http://YouthSpeedSpecialist.com


