(Note: we apologize for the background noise on this video, but please enjoy the content).
There are many responsibilities of the High School Strength & Conditioning Coach. However, when the end-goal is to have a positive impact on your athletes, teaching the “keys” to unlocking their potential is close to #1!
In this video blog, Jim Kielbaso gives you the keys to being a great athlete, and you may be surprised to know that they have nothing to do with talent!
Sure, talent matters. However, when it comes down to it, if a kid has all the talent in the world but lacks these “keys”, then they won’t live up to their potential. Watch the video above now!
Want to Help Your Athletes with the Mental Side of Their Game?
Posted on: September 28th, 2016 by IYCA No Comments
LTAD Complements the HS S&C Coach
In this video, Jim Kielbaso gives you some insight into how the LTAD Model complements the goals of the High School Strength & Conditioning Coach.
Start with the young kids coming to the weight room. Enjoy your time with the super strong and older kids, but find those kids that aren’t doing a great job, and help them become better at it!
He gives a great example of just how a HS S&C coach can make a HUGE impact on a young athlete, taking that awkward kid and turning him/her into a confident collegiate athlete!
Pro Tips:
1. Work with kids when they first get into the weight room.
2. Focus on the Freshman.
3. The long-term success of your program hinges on early-on instruction and programming.
4. LOVE THEM UP!
Watch the video for more!!
Want to Become a High School Strength & Conditioning Specialist?
Posted on: September 23rd, 2016 by IYCA No Comments
Using Bands to Conveniently Impact a Strength & Conditioning Program
Resistance bands are easily the most convenient and effective way to work on first step speed mechanics as it relates to acceleration and deceleration.
Not only are bands easy to attach to the body but their ascending resistance allows athletes to load both acceleration and deceleration phases of running.
7. First Step Acceleration
It’s a well known fact that if an athlete can win the first 3 steps during a play in a game, they are probably going to experience good success continually throughout the game and probably win the event.
Resistance bands make it very easy to train large groups of athletes to increase first step speed and reaction. As a coach, partner-based first step speed training requires minimal setup or space to implement and is relatively easy for athletes to quickly learn.
As for the athlete, they are able to instantly feel the difference it makes on their quickness and agility within only a couple of training sessions. These two factors alone instantly make it successful.
These drills are typically done in a partner attached setup with athletes alternating while performing 3 or 4 sets of 5 reps. Because these drills will emphasize acceleration, the athlete only has to focus on getting out quickly against the band resistance.
Once learned, coaches can build in reaction starts through the use of whistle start hand signals.
Shuffle Acceleration Drill
8. First Step Deceleration
Once acceleration training is mastered, athletes can begin to work on deceleration by training under what is called a pre-loaded band setup. Performing the same drills, athletes now focus on learning how to decelerate under band-driven momentum.
Just like applying weight to increase strength, the band applies a resistance that the body has to overcome in order to become stronger at decelerating or slowing down momentum.
Shuffle Deceleration Drill
9. Partner Resisted Running
Once first step acceleration and deceleration speed drills are mastered, longer amplitude linear speed training can be implemented using a training approach called partner resisted running.
With partner resisted running, partners work together to challenge each other to run under a controlled resistance for 15 to 20 yards.
Partner resisted running allows athletes to now take their first step speed training through longer amplitudes of movement.
Here Is An Example of Partner-Based Forward Running
10. Implementing Non-Traditional Strength Training
The final way that resistance bands can be implemented into an off-season strength program is by using them to simulate non-traditional strength training drills like resisted crawling, towing, pushing or lunging.
In many cases these types of drills are used with specially designed equipment that increases cost and the need for greater training space. With a flat band’s ability to attach onto the body in multiple ways, it allows them to provide resistance to non-traditional movements that, in turn, challenges total body strength and coordination.
Non-Traditional Speed-Strength Training
Flat continuously looped layered bands, like the Quantum Band, provides coaches and their athletes with the ability to train all aspects of performance. They also allow them to simulate specific exercises and unique training approaches that historically required specialized equipment and additional resources.
Resistance band versatility makes it very easy and convenient to implement key aspects of an off-season training program without the need for added equipment, space or resources.
Dave Schmitz – The Band Man
About the Author: Dave Schmitz
Dave Schmitz (aka…The Band Man) is the Co-Owner of Resistance Band Training Systems, LLC and the creator of https://resistancebandtraining.com, the only website exclusively devoted to training with large continuously looped resistance bands.
Dave has a unique professional background and vast experience as an orthopedic physical therapist, performance enhancement specialist, certified strength and conditioning specialist along with 27 plus years of living fitness and performance training.
All of this has allowed him to turn a simple 41-inch resistance band into an incredibly multi-faceted total training experience for 1000’s of athletes and fitness enthusiasts around the world—while helping 100’s of fitness professionals and coaches get their clients or athletes BETTER with BANDS.
Posted on: September 21st, 2016 by IYCA No Comments
Using Bands for Versatility in Your Strength & Conditioning Program
The ability to combine bands with free weights, create efficient metabolic circuits and safely be used to introduce strength training to younger middle school athletes adds to their off-season versatility.
4. Contrast Free Weight Band Training
Most off–season strength training programs are built around 6 or 8 week cycles that are designed to gradually improve absolute strength. In many cases after a cycle of this nature is completed the body needs what is called a de-load week.
This is a week where an athlete is allowed to let their body recover, heal and re-energize after performing a multi-week cycle of heavy gravity-based free weight strength training. It is during this de-load week that resistance bands play a significant role in allowing the body to continue strength training while still allowing muscles and joints to recover.
During this phase, barbell–band contrast training or band only exercises are implemented. This change of pace training allows the body to experience a completely different strength training stimulus while continuing to improve on common strength training patterns of movement.
Here are a few examples of easy to implement contrast band training exercises using bands in conjunction with frequently used barbell exercises.
Barbell-Band Bench
Barbell-Band Squat
Barbell-Band Dead-lift
Barbell-Band Push Press
5. Circuit-Based Metabolic Training
As the off-season progresses, metabolic conditioning becomes increasingly more important in preparing the high school athlete for their upcoming pre-season.
Resistance band’s ability to simulate any strength exercise while providing unlimited resistance and lightweight portability allows easy station circuit-based workouts to be set up and implemented anywhere.
Posterior Chain Metabolic Circuit
6. Middle School Strength Training
One of the safest ways to implement a middle school strength training program is through the use of body weight exercises. It teaches body awareness as well as core stability while still working against gravity.
Unfortunately not all young middle school athletes can effectively perform simple body weight exercises like squats, push-ups, pull-ups or single leg squat variations.
Resistance bands can supplement a body weight strength training program in 4 ways.
First, they can be used to assist body weight exercises to allow athletes to learn how to properly perform basic body weight exercises through full ranges of motion.
Second, bands can be used to apply added resistance to body weight exercises by quickly attaching the band onto the body.
Third, bands can be used to create unique exercises besides body weight movements that can increase exercise variety while influencing movements body weight exercises can’t.
Last, since most middle schools are not able to properly outfit a strength training room, resistance bands provide a highly cost effective way to introduce young middle school athletes to a simple strength training program.
Part 3 will turn the focus towards using bands as a speed development training tool to enhance both acceleration and deceleration while training both linear and lateral planes of movement.
Dave Schmitz – The Band Man
About the Author: Dave Schmitz
Dave Schmitz (aka…The Band Man) is the Co-Owner of Resistance Band Training Systems, LLC and the creator of https://resistancebandtraining.com, the only website exclusively devoted to training with large continuously looped resistance bands.
Dave has a unique professional background and vast experience as an orthopedic physical therapist, performance enhancement specialist, certified strength and conditioning specialist along with 27 plus years of living fitness and performance training.
All of this has allowed him to turn a simple 41-inch resistance band into an incredibly multi-faceted total training experience for 1000’s of athletes and fitness enthusiasts around the world—while helping 100’s of fitness professionals and coaches get their clients or athletes BETTER with BANDS.
Posted on: September 19th, 2016 by IYCA No Comments
Impacting a HS Year Round Strength & Conditioning Program with Bands
As a strength and conditioning coach of a local high school where I have over 80 young high school athletes training in our weight room 4 days per week, I am constantly evaluating our efficiency and results.
Resistance bands have easily been our most versatile and cost effective training tool to date. Not only do the kids find bands to be extremely challenging to train with, but they also enjoy the ability to improve their free weight training results.
Anytime we can provide a training tool that motivates high school athletes to work harder, train more frequently and enjoy doing it, only good things happen.
I would like to share 10 ways, as a coach, you can implement continuously looped resistance bands into a high school strength and conditioning program.
1. Dynamic Flexibility Training
No question the greatest impact on keeping young athletes healthy, besides strength training, is making sure their joints and muscles are able to move freely through a full range of motion on demand.
A majority of youth injuries are directly associated with flexibility deficits due to frequent growth spurts. Unfortunately athletes do not like to stretch and if they do stretch, it’s often using simple body-weight movements performed poorly.
Band stretching allows athletes to use the band to passively and actively lengthen out key muscles of the hip and shoulder. Using a tool, in this case the band, to stretch seems to provide athletes with an added motivation to routinely perform a dynamic stretching routine.
This series of band stretches performed before every lift or running workout allows athletes to follow a routine program. Over time it creates permanent soft tissue length changes that athletes quickly recognize.
What’s even more interesting is the longer athletes perform the band stretching routine, the more they begin to appreciate the importance of flexibility and how it directly impacts improvement in strength, speed and power. These are not often recognized as flexibility benefits.
Dynamic Band Stretching with Young Athletes
2. Trunk and Hip Activation
The importance of establishing good activation of the trunk and hip stabilizers pre-workout is pretty well documented.
Using the same single band that was incorporated in the band stretching routine, athletes can quickly perform a series of resisted planks or hip stabilization exercises that will optimally prepare them for any running or lifting workout.
This series of band stabilization drills makes it convenient and easy to flow directly from stretching into a muscle activation series of exercises.
Simple Core Activation Exercises
3. Auxiliary Training
Free weight training should be a key part of any high school athletic-based strength program. However, regardless if that type of program emphasizes the use of kettlebells, dumbbells, barbells or sandbags, the type of resistance remains the same in that it is a gravity dependent constant resistance.
Resistance bands provide an ascending resistance that is not reliant on gravity. As a result, continuously looped bands can be used to create auxiliary exercises following different planes of motion or movement patterns while impacting muscles significantly different than free weights.
Combining straight plane free weight movements with multi-plane, multi-resistance vector band strength training allows the body to eliminate weak links in what is a total kinetic chain, tri-plane structure.
5 Best Lower Body Band Exercises for Youth Strength Training
5 Best Upper Body Band Exercises for Youth Strength Training
Stay tuned for Part 2 which will cover how to use resistance bands to improve barbell strength and sport specific conditioning as well as using them to develop a safe and effective middle school strength development program.
Dave Schmitz – The Band Man
About the Author: Dave Schmitz
Dave Schmitz (aka…The Band Man) is the Co-Owner of Resistance Band Training Systems, LLC and the creator of https://resistancebandtraining.com, the only website exclusively devoted to training with large continuously looped resistance bands.
Dave has a unique professional background and vast experience as an orthopedic physical therapist, performance enhancement specialist, certified strength and conditioning specialist along with 27 plus years of living fitness and performance training.
All of this has allowed him to turn a simple 41-inch resistance band into an incredibly multi-faceted total training experience for 1000’s of athletes and fitness enthusiasts around the world—while helping 100’s of fitness professionals and coaches get their clients or athletes BETTER with BANDS.
In this video, IYCA Ambassador and Expert Phil Hueston gives you 3 tips to help educate the parents that you work with.
Pro Tips:
1. Be crystal clear about what THEY want.
2. Relate directly to the developmental sequence in life.
3. Use simple phrases to translate the science behind the training.
Watch this video for the details on each of these tips!
Want to Learn More About These Tips?
Access that and more by becoming an IYCA Insider today!
The season is upon us. Yes, ladies and gentlemen, it’s football season. The time of year where you can lose more friends than in an election year. So with that said, 2016 may be an interesting year. Let’s call 2017 the year of reconciliations.
If you are an athlete, football season can be grueling and can wear you down. If you are a coach, it can do the same thing. If you are a parent…well, parents have it easy. All you have to do is print out this article, tape it to the fridge, and your young athlete will follow all 5 tips, right?
The goal of this quick article is to give the athletes 5 tips to a healthy football season and give coaches some things to harp on with your athletes. In a loving way, of course.
5 Tips to Having a Healthy Football Season
Tip #1: Nutrition
Eating “properly” for performance is a year long struggle for the young athlete and can get even more difficult during football season. One of the hardest goals to meet is getting the calories an athlete needs to perform. With lunch around noon and practice after school, kids can go 6-7 hours without eating in the afternoon.
Pro Tip: Bringing snacks to school is important to fill those huge gaps in the day. But don’t forget, breakfast is the most important meal of the day. Don’t skip it.
Tip #2: Strength Train
If we work hard in the off-season, why lose all those “GAINS” during the season? Yea, I know, “I don’t have any time” or “we gotta spend that time watching film” is a common reason for skipping strength training. Time can be of the essence, but 2 days a week minimum is a must! Get into the weight room.
Pro Tip: The main goal in-season is to combat muscular imbalances that are caused by the season which CAN help prevent injuries. Oh yea, athletes CAN get stronger in-season! Don’t skip out on strength training during the season. Your off-season will thank you!
Tip #3: Sleep
You know what? I love video games too! I think it’s important to have fun with friends but don’t let it affect the season. Athletes need 8-9+ hours of sleep each night so the body can repair itself. Period.
Tip #4: Injuries
This is a big one for highly motivated athletes. Nobody likes to be hurt and miss games. But that slightly rolled ankle can quickly turn into a season ending injury if not treated correctly. There is a big difference between some bumps and bruises and an injury that can lead to something more serious.
Pro Tip: Maintain a good working relationship with ATC’s and make sure injuries are discussed.
Tip #5: Academics
Poor academics can lead to ZERO play time. Make school work a priority. Time management is one of the skills athletes will need to learn as a student athlete.
Pro Tip: Take advantage of free time. Use study hall for studying and homework (obviously), and use bus rides for the same thing. Being an athlete is work!
Have a Productive Football Season
Parents, I hope this is “fridge worthy”. Coaches, keep these tips in the front of your mind when it comes to your athletes. I hope that your football athletes will use these 5 tips to have a healthy and productive football season.
Josh Ortegon
About the Author: Josh Ortegon
Joshua Ortegon is co-founder and the Director of Sports Performance Enhancement at Athlete’s Arena in Irmo, SC. Joshua earned his Bachelor of Science degree in Exercise Science from Western Michigan University in 2000.
As an IYCA-certified High School Strength and Conditioning Specialist, speaker, and writer, Joshua has helped establish Athlete’s Arena as the premier high-performance center in South Carolina since 2005.
Joshua has worked with a wide range of athletes from youth to professionals specializing in the areas of injury prevention, return to play and performance enhancement.
Are Your Athletes Prepared to Perform this Season?
Team training can be challenging. There are a variety of factors that have to be taken into account when working with large groups and sometimes it can be a bit overwhelming.
When programming for a diverse population, it is important to account for the various needs of the group in order to ensure success. Injury history, physiological age and ability level are just a few of the factors that need to be considered when developing your training programs.
These factors become even more important when you will be working with the same group for an extended amount of time. This will be a 2-part blog series that will explain this process.
This blog post will focus primarily on what must initially be considered in order to program for the long-term effectively. The second post will focus on specific examples of progressions and regressions and how to utilize those in LTAD programming.
#1 Backward Design
It is important to begin with the end in mind. As the coach, you must determine what your top tier exercises will look like in your program. A top tier exercise should be the most advanced exercise your athlete will reach while training.
After determining what your top tier exercises are, you will work backward to determine what exercises you need to help your athletes reach the top tier of your program.
Pro Tip: Begin with your most advanced exercise and work backward.
#2 Developing Multiple Training Blocks
Developing multiple training blocks is necessary to implement regressions and progressions effectively in team training LTAD models.
A 9th grade 14-year-old athlete is much different from an 18-year-old athlete physically, psychologically and emotionally. You must also account for the junior in high school who has never lifted weights.
Differentiated training blocks will allow you to do this effectively. You must develop training blocks that set them up for long-term success. One of the most effective ways to do this is to implement a model that utilizes progressions and regressions of the same type of exercise.
Developing this type of program will allow you to differentiate for large groups of athletes while keeping your athletes on a similar plan.
Pro Tip: This is an example of a lower body squat emphasis day for these athletes.
Developmental Level
Exercise
Blue (Seniors – 17-18 years old)
Back Squat
Gold (Juniors – 16-17-years old)
Front Squat
Gray (Sophomores – 15-16 years old)
Overhead Squat
White (Freshmen – 14-15 years old)
Kettlebell Goblet Squat
#3 Developing a Deep Toolbox
Developing a deep exercise toolbox is a must if you want to meet the individual needs of your athletes, while at the same time setting them up for long-term success.
It is important to evaluate your athletes in order to determine the correct exercise for each individual athlete. An athletic profile should be developed from the assessment process, which will aid in exercise selection for your athletes.
Use a method which determines a baseline exercise every athlete should be able to complete before progressing forward. Look for a couple of progressions forward and several regressions backward.
There should be a reason and defense for all of your progressions and regressions in your programming. Develop a deep toolbox, but do not get too far out there in your programming for developmental athletes. Master the basics with this age group.
Pro Tip: Here is an example of progressions and regressions on a lower body squat day.
Progression & Regression Levels
Exercise
P2
Barbell Back Squat
P1
Barbell Front Squat
Baseline Exercise
Barbell Overhead Squat
R1
Kettlebell Overhead Squat
R2
Kettlebell Front Squat
R3
Kettlebell Goblet Squat
R4
Bodyweight Squat
Conclusion
This is the process to use to begin plugging progressions and regressions into your developmental blocks in an LTAD plan. Part 2 of this blog will get very specific with real life examples of what this looks like at Battle Ground Academy.
About the Author: Fred Eaves
Fred Eaves
– Ed.S, M.Ed, CSCS, RSCC, IYCA, USAW, USATF
– BIOFORCE Conditioning Coach Certified
– 2015 NSCA H.S. Strength Coach of the Year
– 2013 Samson Equipment & AFM H.S. Strength Coach of The Year
Prepare Your Athletes To Perform
Learn how to leverage the Long-Term Athletic Development Model to ensure your athletes are prepared to perform. In expert Wil Fleming’s free 7-minute video and PDF checklist, he covers how to create a training system that prepares young athletes to move better, get stronger, and enhance their performance.
Programming for the high school athlete during the summer has its challenges. Does it seem like the summer is getting shorter and shorter?
Here are 6 hurdles you will see if you work with high school athletes. More importantly, check out the Pro Tips for ways to overcome them!
Hurdle #1: Vacations
Families want to use the summer for vacations and let’s face it, they can’t always plan it around a strength and conditioning program.
Often they are planned around work schedules and other siblings. As a performance coach, it is challenging to adjust for every athlete when there are 30, 40 and up to 100 kids involved in summer programming.
Pro Tip: Set the expectations at the beginning of the program. For example, expect athletes to make a certain percentage of the summer workouts.
You can also give athletes a supplemental workout for vacations, so they are still getting the benefits of your program, even if they can’t attend.
Hurdle #2: Sports Camps
It’s summer camp season, which is not a bad thing. However, it can have its challenges for the performance coach. Consulting with parents and players about which camps the athlete attends is very important.
Too many sports camps can have a negative outcome, not because they are a “bad camp”, but because it can be too much in combination with a summer strength & conditioning program. There is a balance, which will reduce the risk of over-training and burnout.
Pro Tip: Work with the athlete and parents to find the balance, be flexible and do your research on opportunities that are appropriate for your individual athletes. Be sure to know when the athlete will be gone and adjust for that in their programming.
Hurdle #3: Lifestyle
Summer days often take kids out of any sort of routine. Sleeping habits, eating habits, etc. can all change. Let’s face it, it can get pretty sloppy.
Pro Tip: Provide morning workouts! Athletes that train in the morning will start their day off on the “right foot”. This “Get Up and Train” mentality will ultimately provide athletes with a structured morning routine that will also prep them for their respective sports.
Hurdle #4: Summer Teams
Summer travel teams are full-force right now. It is necessary that it is acknowledged. This will be a challenge in respective athletes’ programming, but don’t fight it…look at it as an opportunity to educate parents and players!
Pro Tip: EDUCATION! This is the most important thing you can provide your athletes in their programming. They will play on travel and club teams, but do they understand how to balance practices, games, skill and their strength & conditioning? This is where you provide valuable insight and knowledge.
Don’t be a “my way or the highway” coach. Communicate and educate athletes, parents and even other coaches on the value of athletic development as they progress through their high school careers.
Hurdle #5: Summer Jobs
Summer jobs are something to encourage. This is a great time for athletes to get a glimpse of the real world. They will learn to balance their time and set priorities.
Pro Tip: Help athletes find the balance between work and training. This may mean they need to leave early or come late. Don’t discourage this opportunity, they can do both.
Hurdle #6: Transportation
Lastly, some will have transportation issues. If they can’t drive themselves, they have to rely on someone else.
Pro Tip: Suggest car-pooling and have flexibility.
Summary
There are many challenges that performance coaches can face during the summer months. These 6 show the possible hurdles in participation, and ways that they can be overcome.
About the Author: Joshua Ortegon
Joshua Ortegon
Joshua currently consults and programs for athletes of all levels. He operated Athlete’s Arena for 10 years—a sports performance and fitness center in Irmo, SC and sold that business in 2015. Josh is currently Director of Performance at Dual Threat Training Group in Albany, GA.
His career highlights include training over 100 athletes who moved from high school to college and 15 professional baseball athletes. He also developed 36 return to sport programs to help bridge the gap between rehab and performance for the athlete. He can be reached at JoshuaLOrtegon@gmail.com.
Need Help With Your Summer Programming?
Help athletes Prepare to Perform with these FREE key components of program design.
Why You Should be Implementing Plyometrics: Part 1
Before we get into why you should be implementing plyometrics into your training programs, let’s first define plyometrics.
The Merriam-Webster dictionary defines plyometrics as an exercise involving repeated, rapid stretching and contracting of muscles (by jumping and rebounding) to increase muscle power.
Pro Tip: Plyometric exercises are a great tool to use to put power behind the muscle.
Plyometrics can be used with many athletes or non-athletes at varying levels. However, as a wrestling coach, it’s a tool I use to help and even simulate explosive drive through their opponents while on the mat.
In Part 1 of this blog, you will receive 3 reasons why you should be implementing plyometrics in your training programs and Free Access to the Top 4 Plyo Exercises.
3 Reasons to Implement Plyometrics
Reason #1: Putting the Power Behind Muscles
One of the main reasons to implement plyometric exercises into a training program is to give athletes the power they need to throw faster, jump higher, or hit the ball harder and farther.
For example, plyometric exercises give wrestlers the power they need to drive through their double leg take downs, a basketball athlete the powerful vertical for a rebound, a swimmer the ability to “push” off the block and the list goes on.
Pro Tip: Application of power is a key component in successful athletes. What’s the point if your athlete is lifting a ton of weight and they can’t apply it?
Reason #2: Progressions
Plyometrics can be a great tool for progressions. Do you have an athlete or athletes who have mastered a certain exercise, or have reached a glass ceiling with a certain exercise, but you’re not sure how you can progress those athletes?
Give plyometrics a try! A good example is a basic body weight squat progressing into squat jumps. Great push-ups need a challenge? Challenge them with plyometric push-ups (one of my personal favorites).
Pro Tip: Progressions are very important in developing an athlete’s long-term capabilities. Be sure that athletes are proficient in all mechanics before moving them on to more complex moves and adding plyometrics.
Reason #3: Performance Development
Through regular and adequate use of plyometric exercises your athletes will be able to jump higher or farther (depending on their reasoning for jumping), run faster and longer (plyometrics has been shown to improve distance runner’s conditioning), throw harder, and at the end of the day develop the necessary tools to reach their goals!
There are many reasons to add plyometrics to your training, and in my next blog, I will expose 3 more. For now, it is important to remember that plyometrics are a tool, and should be used within your existing long-term athlete development programming.
About the Author: DeCoreus Leavell
DeCoreus Leavell
– IYCA High School Strength and Conditioning Specialist Certified
– Assistant Coach at Christian County High School
– In the span of 3 years coached 3 state champions and 15 state placers at the middle and high school level
Top 4 Plyo Exercises
Every successful athlete needs the ability to exert a maximal amount of force in the shortest possible time interval (i.e. power). In Coach Wil Fleming’s short 4-video series, he outlines how plyo exercises improve a variety of movement patterns that increase strength, speed, power and much more.
Do you work with HS or Collegiate Athletes? The pro-agility test is something you have probably heard of. In this short video, Coach Jim Kielbaso gives you a few tricks to help your athletes improve.
Thank you Coach Kielbaso for giving us permission to use this video!
Want to Become a Speed Specialist?
Check out the Certified Speed & Agility Specialist Certification today!
Top Two Ways Monitoring Can Make a Positive Impact
In part 1 and part 2 of this blog, I discussed three things: why we monitor, considerations for monitoring and how we monitor at the high school level.
In this blog, I am going to outline the top 2 ways in which monitoring can be applied to make a positive impact in your program.
#1: Relationships
Relationships are paramount at any level, but especially at the high school level. High school age athletes are very impressionable, and it is a great time to have a major impact on their lives.
Different monitoring methods present the opportunity to ask questions and develop deeper relationships with your athletes.
Here are some example question scenarios:
I see you slept 4 hours? Is there something going on I can help with?
Your academic stress was rated high yesterday? Is school pretty tough right now?
I see you rated practice hard yesterday. Are you feeling sore?
Simple questions like this give great insight into where your athletes are physically, mentally and emotionally.
Pro Tip: Using these techniques have always allowed me to get to know my athletes on a deeper level, and help meet them where they are from a training standpoint.
These interactions with your athletes should be a daily ritual for you as a coach.
#2: Training Adjustments (Off the Script)
Monitoring allows the coach to make educated decisions on what the training day should look like.
There is a time and a place to push through adversity, but it is not every time you train. There must be an ebb and flow to your training.
Volume, intensity and exercise manipulation can also be used to help reduce stress in a session.
Pro Tip: Here is an example on how we adjust training volume that would be used to account for the fatigue of the athlete.
Original Workout
Power Clean
6×3
Front Squat
5×5
DB Bench Press
5×10
Adjustment (Off the Script) Workout
Clean Pull
4×3
Front Squat
3×5
DB Bench Press
3×10
Pro Tip: Here is an example on how we adjust training intensity that would be used to account for the fatigue of the athlete.
Lift
Volume
Original %
Adjusted %
Power Clean
6×3
60, 65, 75, 80, 85, 90
60, 65, 75, 75, 80, 80
Front Squat
5×5
60, 65, 70, 75, 80
50, 55, 60, 65, 70
Conclusion
Monitoring is only valuable if you apply the information that is collected to benefit your athletes in a useful manner.
The takeaway for monitoring is to make the data you collect work for you in order to make a positive impact on your athletes on a personal as well as physiological level.
I have outlined two ways in which monitoring is extremely beneficial in a fast-paced high school environment. Frequent personal interactions with your athletes will yield large results in the long run, and monitoring presents regular opportunities to make these interactions happen.
Training adjustments that were outlined can be applied to any facet of training including the weight room, speed development or your conditioning program to meet your athletes where they are on any given training day.
About the Author: Fred Eaves
Fred Eaves
– Ed.S, M.Ed, CSCS, RSCC, IYCA, USAW, USATF
– BIOFORCE Conditioning Coach Certified
– 2015 NSCA H.S. Strength Coach of the Year
– 2013 Samson Equipment & AFM H.S. Strength Coach of The Year
In Part 1 of this blog I discussed why we monitor and considerations for monitoring your athletes. Part 2 is going to deal with how we monitor at the high school level.
Monitoring can be an expensive venture, but there are also less expensive ways that can be implemented by virtually anyone at any level.
This blog will detail two practical and inexpensive ways in which, monitoring can be implemented to help you make decisions, allowing you to meet your athletes where they are at on any given day.
#1 Surveys
Having your athletes take quick daily surveys can help create awareness regarding their habits. These surveys can be simple and ask as few or as many questions as you would like. Keeping it simple is best. Here is an example of some of the questions to ask:
How many hours did you sleep?
Did you eat breakfast?
How many bottles of water did you drink?
How tough was practice yesterday on a 1-5 scale with 5 being the hardest?
How tough was your workout yesterday on a 1-5 scale with 5 being the hardest?
How do you feel overall 1-5 scale with 5 being the hardest?
You could make a survey through excel pretty quickly and log your information there to keep track of long term trends with your athletes. There are a couple of ways in which this can be beneficial for you.
Make educated adjustments to your plan dependent upon feedback from the athlete
Identify, where you feel they are at from a readiness standpoint that day.
Look at long-term trends both individually and globally to make better decisions in programming for your athletes.
Individually, you may find that your athletes do not get enough sleep on Monday nights due to practice and academic obligations. Globally, you may find that the football team’s toughest day is on Tuesday every week. Knowing that your athletes average 6 hours of sleep on Monday nights and also have their toughest day on Tuesday allows you to adjust and make the best decision for your athletes that day.
It is very important that you use the data that you collect!
Pro Tip: Collecting data for the sake of collecting data is counter-productive. The adjustments you make off of the data collections is what is of real significance.
You can also up the ante and implement technology to take surveys. There are programs that exist where athletes can enter survey information into their phones, and it collects and organizes the data. This is a real time saver for busy trainers.
Here is an example of a survey:
#2 Autoregulation (APRE-RPE Scales)
A second cost-effective way to monitor your athletes is by using an APRE/RPE scale in their strength training programming. APRE is defined by Dr. Bryan Mann as Autoregulatory Progressive Resistance Exercise. APRE is a method that takes the daily readiness of the athlete into account through adjustment protocols that dictate working sets.
There are two warm up sets, and then the third set is a set to failure at a prescribed rep max (RM). The results of the third set dictate the weight used on the fourth and final set.
As a coach, this can be used to help the athlete train to the highest level possible for that specific training session according to the physical state of the athlete.
We do not use strict percentages in our program but rather we use them as a guide.
Use this auto-regulation method to dictate our training loads for the day.
Pro Example:
I always use the example of the athlete who slept 3 hours the night before a hard training session that is under tremendous personal and academic stress when describing the need for this type of training. This athlete may have a prescription to hit 2 reps at 95% that day, but due to his physiological state that 95% is really more like 105% that day. This is why autoregulation can play such a key factor in the development of your athletes.
Dr. Mann from the University of Missouri has done a tremendous amount of work in this area, and has written an E-book specifically on APRE methods. 1
Mann’s Example:
Here is what typical APRE protocol according would look like:
SET 4 ADJUSTMENTS- REFER to this chart after set 3
An RPE scale in conjunction with APRE methods is another effective manner in which to implement RPE. RPE stand for rate of perceived exertion. Athletes use this rating scale to rank the difficulty of a set in training.
Pro Example: Sample RPE rating scale
Pro Example:
An example would be an athlete does 155lbs. for 10 reps. When he finishes this set on set three, he rates whether or not he had one rep, two reps, or multiple reps left in the tank. Then picks an appropriate weight to finish his fourth set, using the adjustment chart below.
Here is an example of what this looks like:
SET 4 ADJUSTMENTS- REFER To This Chart after set 3
Look at long term trends when recording their numbers to make sure there is consistent progress. Do not worry about disp as this is common due to the variable nature of the high school athlete.
Conclusion
Two simple and cost-effective measures in which to monitor and adjust for your athletes have been outlined. Use these tools to tremendously impact your athletes in way that is both feasible and practical.
The best youth coaches are always looking for ideas, tips and tricks to improve their program development. Maybe it’s because they are the “never settle for anything less than perfection” type personalities, or just because they are getting bored with their current programming.
Either way, we have found some great techniques for how to approach program development, that will help you improve your programming, mix up the mundane, and continue to get great results with your athletes.
Pro Tip: When developing a program or improving an existing program, think of the acronym P.L.A.C.E. to make sure that you are delivering an extraordinary experience.
Plan & Prepare
Every program needs a good amount of planning and preparing. It is no secret that the best performance coaches in the industry have a tried & true system when it comes to planning and prepping their sessions.
What is your plan? How do you prepare?
Quality planning and preparation will take your training to the next level
Learn how to prepare your athletes to perform and to design programs that fit within a model of long term athlete development.
You have an amazing opportunity to simulate and help athletes overcome many barriers and obstacles. Find ways to relate training back to life and make it a part of each program.
Overcoming barriers, fears, weakness and obstacles can easily be brought into a training program in a non-threatening, manageable way. It is a great moment for you to impact that athlete for life.
On a similar note, when you program from the long term athlete development model and principles, not only do you get to spend many years with a single athlete, you also get to implement a rock-solid foundation in movement that will change their life.
Never lose site of the bigger picture: lifelong health & happiness.
Application to sport
It is an unfortunate reality that many athletes are defined by the sports that they play. Educating them on the need to be well-rounded, foundationally sound and the concepts of long term athlete development is essential.
But the reality is still there. That is why “application to sport” is still an important part of your program. Don’t over-emphasize this topic, but give your sport-athletes as much as they they need when it comes to relating components of your program to their sport.
Confidence Building
Confidence building should be an integral part of each and every session when working with athletes. Providing a platform for confidence building will allow your athletes to achieve goals and perform at a higher level.
How will you help your athlete(s) mentally? Whether it’s in the confidence that you have in them, or the way that you play to their strengths and build their weaknesses.
There are many ways to instill confidence as a coach, so make it a priority.
Evaluate
There are two pieces to the evaluation part of your program:
Evaluate the athletes
Evaluated by the athletes
Every time you see an athlete, there should be a constant evaluation process that takes place. How are they feeling, how is school, how busy are they, how do they look when they move?
Much of this evaluation should occur in your warm ups and before they start working.
Secondly, they evaluate you. At the end of each session, you can ask for feedback. How did they rank the session? How did they rank their performance? (I use a # system, 1-10)
Summary:
The good news is that the acronym PLACE is easy to remember, and will help you think through the basics of what to include in your program design.
What others tips, tricks and recommendations do you use? We’d love to hear!
Want to help make sure your athletes are prepared to perform for the long-run and not just for next week’s big game?
Download our FREE Prepared to Perform Video to hear youth coaching expert Wil Fleming break down critical aspects of the long-term athlete model.
Author: Julie Hatfield
Julie is the Executive Director of the International Youth Conditioning Association (IYCA). She grew up as an athlete and played collegiate softball at Juniata College. She currently owns and operates her own youth fitness business pouring into young athletes. Her areas of expertise are youth sport performance, youth fitness business and softball training/instruction. Julie grew up on a dairy farm and can challenge the best of the best in a cow-milking contest. 😉
When it comes to developing the ability to push someone around, a skill necessary for almost every team-based sport, there isn’t a better training tool than the push up.
I’m sure there are plenty of 5/3/1, Bigger Stronger Faster, or other weight room guys that will argue a big bench trumps someone who can crank out a bunch of push ups any day.
That’s when I refer to the great Earl Campbell and Herschel Walker, two incredibly successful and punishing running backs in the NFL, who reportedly were body weight training guys. They swore by push ups and body weight exercises and clearly had no problem pushing around the best in the world over and over.
Additionally, you have to look at the population of athletes in front of you. We have mostly late middle school or high school age kids who have a low training age and lack the ability to activate their entire body. The push up and its progressions give us an opportunity to teach that skill to our athletes.
More importantly, a girl that can crank out 10 full push ups and a boy that can knock out 25, in our experience, has a body well-prepared for sport and the contact typical of most team sports.
Finally, from a biomechanical standpoint, I look at the push up and see the direct correlation to pushing necessary for sport. The body stabilizes on the ground with four contact points, but the majority of the body MUST be active when pushing away from the ground. Otherwise, we might as well be doing the worm.
That pattern very closely resembles an athlete pushing someone on a field or court, with two legs on the ground and the entire body activated.
Conversely, when assessing the mechanics of a bench press, the back, glutes, and (sometimes) thighs are in contact with a stable surface. I don’t know of a situation in team sports where that much of the body comes in contact with a surface while pushing. The exception, of course, is being on the bottom of a pile of players after a tackle and pushing someone off you, which is not ideal for high performing athletes.
So let’s take a look at our progressions to get a young athlete crushing push ups on a regular basis!
Progressions:
Plank on elbows/hands
When doing a plank on the elbows or hands we are looking for rigidity of the entire body and will use various cues to teach each body part how to activate optimally:
Active legs (straight as an arrow)
Glutes (squeeze a quarter between the cheeks)
Trunk (brace like someone is going to punch your gut)
Shoulders (envision a towel between the elbows or hands and try to rip it apart)
The plank requires a lot of focus and should be difficult to hold for a long time. Therefore, we find it much more beneficial to teach athletes a plank by having them fire everything for brief periods (10-20 seconds) rather than hanging out in a plank for a minute with just enough activation to make it look good.
Mountain Climbers
Mountain Climbers, in our world, don’t differ greatly from a plank. The only difference here is that the athlete now must learn to stabilize in a dynamic setting.
By only moving one leg at a time, they get the chance to maintain full body bracing, like the plank, while actively driving the knee towards the trunk. Here, the athlete must be on his or her hands. Thus we implement a new cue, “push the ground away.”
By using that cue, the athlete now aggressively pushes his or her body away from the ground, giving the leg more room to move and activate the scapular stabilizers that are generally very weak and assist in poor posture with young athletes.
We also ask athletes to “torque the ground” with the intent of turning the hands away from each other. The hands shouldn’t move, but when torquing occurs, the arms become more active and better prepared for a push up later on in the progressions.
Once an athlete shows quality movement with the mountain climber, we will have him or her start to move the leg with aggression while stopping it at 90 degrees to the body. The exercise then turns into an excellent front leg drive drill for acceleration training.
Assisted Push Ups
We use two main variations of the standard push up to help young athletes progress towards completing a push up that is repeatable and consistent through fatigue.
Our first and most common assisted push up is completed via the use of a resistance band attached to the athlete’s body and a point well above the athlete’s body (typically 7-9 feet high on a rig or hook).
There are some significant benefits to this variation. First, the movement is quite similar to an unassisted push up from the ground. Second, the athlete can torque the ground with his or her hands and arms like we cue during an actual push up.
Once an athlete has developed sufficient assisted pushup strength and can perform the movement without the band, there is almost no adjustment necessary for a body weight push up.
There are, of course, limitations to any assisted pattern.
First, the core is supported during the assisted pushup and for many of our athletes who are stuck in anterior tilt, core strength is the limiting factor and sometimes allows them to continue doing the worm instead of a push up once the band is removed.
Second, we often miss full range of motion (ROM) with our younger athletes, particularly boys. They want to crank out 20 push ups because, “that’s what I did when I tested for football!” However, the only way their chest would touch the ground with their “testing push ups” would be if they had a 60-inch chest. And I have yet to see a 16-year-old that looks like Lou Ferrigno.
**We started using bean bags (like the ones used for bean bag toss) to force full ROM. Our athletes need to touch their chest to two bean bags stacked on top of each other and then progress to one bag before we take the band away and have them train the full push up. **
The other variation we use is an elevated barbell on a rack.
Again, there are both positives and negatives to this assisted push up variation.
First, it is great for younger female athletes who truly lack upper body strength. They can see gradual improvements in strength since the holes on our rack are 1-inch apart. They can make small gains, sometimes within a singular training session, and certainly over a 6-week training program.
Second, because of the height, those athletes who lack upper body strength can start to make significant gains in chest, shoulder, and arm strength since they don’t have to struggle through the pattern and can truly focus on form, positioning, and muscle tension.
But this variation also leads to some potential issues of which coaches need to be aware.
First, due to the angle the athlete is at, the shoulders tend to elevate once the chest and arms have fatigued. So you either need to stop the set before that point or cue the athlete’s “shoulders away from their ears.”
Second, since the hands are on the bar, not on the ground, torquing is nearly impossible. I am not going to lie to you and say I haven’t seen it done, but generally those just learning a push up can’t start pulling apart a bar plus do all the other things they need to do correctly.
Remember, this isn’t our end all, be all. Instead, it is a stepping stone from a mountain climber to a full push up from the floor.
Push Ups
The push up is our end all, be all. I fully believe an athlete does not need to train bench press unless they are required to test for their sport. For the sports required to test the bench, like football, there is enough contact and pushing involved in practice and play that it justifies working the bench press into programming.
However, no matter how advanced our athlete is starting out, I want to PERSONALLY see them do ten perfect push ups before they put their face under a bar and start benching. All too often we have athletes come in who bench and are stuck at a certain weight.
When they show me their push up, it’s evident they lack the full body activation necessary to do a push-up. Once we train the push up correctly, they go back to the bench and magically set a new personal best.
The things we coach in a quality push up stay consistent with everything taught in the previous movements, but we add additional cues to maximize pushing power.
Create rigidity through the body (body is one long piece of solid oak)
Torque the ground through the hands (rotate the hands away from one another)
Pull the body to the floor (rip the ground apart to give the chest space)
Push down as your body comes up (push the ground away)
Once an athlete shows the ability to accomplish this and get his or her chest to the ground for a reasonable amount of push ups, we may add resistance in the form of plates on the athletes back. We had some strong male athletes rep out ten push ups with 90+ pounds on their back, so if you don’t think you can overload the push up, you’re wrong!
By taking the proper steps in progressing a young athlete through the push up, you will create a powerful, stable athlete capable of pushing around anyone he or she chooses.
And when the athlete returns to his or her team and can crush all teammates in push ups, they walk a little taller. When we as coaches can create confidence like that, we win!
ADAPT and Conquer,
Coach Jared
About the Author: Jared Markiewicz
Jared is founder of Functional Integrated Training (F.I.T.). F.I.T. is a performance-based training facility located in Madison, WI. They specialize in training athletes of all levels: everyday adults, competitive adults and youth ages 5-20+.
The long-term vision for F.I.T. is recognition as the training facility for those desiring to compete at the collegiate level in the state of Wisconsin. Alongside that, to also develop a platform to educate those in our industry looking to make strides towards improving the future for our young athletes.
Find out more about Jared’s gym by visiting F.I.T.
Career Highlights
2014 Fitness Entrepreneur of the Year – Fitness Business Insiders
2014 IYCA Coach of the Year Finalist
Volunteer Strength Coach for West Madison Boys Hockey and Westside Boys Lacrosse
Helped develop dozens of scholarship athletes in 3 years of business
Instructed Kinesiology Lab at UW-Madison
Houses an internship program at F.I.T. that started in 2013
Member of Elite Mastermind Group of Nationwide Fitness Business Owners
Posted on: November 24th, 2015 by IYCA No Comments
5 Myths of LTAD
By Wil Fleming
Long-term athletic development (LTAD) is one of the founding principles of the IYCA. As an organization, we want to promote sustainable training to create athletes who are not only more successful on the field and court in the short term but also happy and fulfilled in the long term. We want to create coaches who can help athletes succeed now but also can be the coaches of the future.
As an organization, this means that promoting a model of LTAD is more important than promoting ideas of “get faster in 6 weeks” or “throw a baseball harder in 12 weeks.” LTAD can achieve those goals, so I thought it might be useful to dispel some of the most commonly held myths about long-term athletic development.
Myth #1: LTAD is not for elite athletes.
The thinking goes that to be elite, you have to start at a young age and continue on in a linear path to reach the highest levels. Something along the lines of if you are the best at 10 years old, 12 years old, and so on, you will also be the best at 25 years old. This is simply not true.
The correctly applied model of LTAD provides athletes with growth at every stage: Birth-6, 6-9, 10-13, 14-18, 19+.
At each of these stages, the fundamentals must be mastered, and then the athlete can be progressed; it is through this model of continuous, small improvements that an athlete can potentially become an elite athlete.
Myth #2: LTAD only works in “Eastern-European” countries.
I have heard this one a lot: “Well, that only works in countries like the former Soviet Union or China, where you can choose athletes at a young age and develop them until they reach a world-class level.” This, too, is a myth.
The model of LTAD that the IYCA believes in has been shown to work even in the United States. In a poll of 300 Olympians, the USOC found that these athletes had played an average of 2 or more sports until the age of 18, and it was only after that age that they chose to specialize.
A properly applied model of LTAD can and does work in the Western Hemisphere on a daily basis.
Myth #3: LTAD says sport specialization is bad.
Specialization will happen; the age at which it happens is the part that we must be concerned with. Even classic models of LTAD recognize that sport specialization must occur and even in some cases at an early age (figure skating and gymnastics are the best examples) for an athlete to reach an elite or world-class level.
In most sports, however, the best case is for late specialization with an early introduction. This means athletes are first introduced to the rules and concepts then to the skills used to participate at an early age. Later in life, they choose to specialize only after participating in other sports and in general physical preparation-type training.
Myth #4: Playing multiple sports is what LTAD is.
Much of the data that we have regarding LTAD refers solely to the number of sports that athletes play during their development. While this is a large part of a properly implemented LTAD program, it is not the only part. In fact, year-round sport participation can actually lead to a higher chance of burnout.
I think we could agree that 10-year-olds playing on travel teams year-round in basketball, baseball, hockey, soccer, etc., would create the conditions that lead to burnout.
A properly designed LTAD program must also include general physical preparation that focuses on the development of physical literacy in all aspects (run, jump, throw, skip, catch, swim, balance, and more). We cannot only rely on multiple sport participation.
Myth #5: Athlete X didn’t do LTAD, so mine shouldn’t either.
This is a classic one: A great athlete someplace recounts how they started playing sport X when they were 8 years old, and only played that sport along the way. He or she never played anything else, trained with extreme specialization all along the way, or never hit a weight room ever, and now he or she is the greatest player on earth. Logically, the young athlete you are working with could follow the same path.
Wrong. These athletes are outliers. They truly are the best in the world and have the genetics to prove it. A better argument might be, “Can you imagine how good he or she would have been if he or she had been a part of an LTAD model?”
Now that’s a scary thought!
LTAD is the only true model that we can follow if we want to train our athletes the right way. Don’t fall prey to the outliers, misconceptions, and myths that surround proper training.
Need more insight into LTAD Program Design?
Download our FREE PDF and Overview video on how to prepare your athletes to perform in the long run— not just for next week’s big game.
Posted on: September 28th, 2015 by IYCA No Comments
Strength training program design can get very complicated, but it doesn’t have to be. The bottom line is that you need to develop a well-rounded, comprehensive program that encourages hard work and progressive overload of the musculature. If those components are in place, you are well on your way to helping your athletes reap the benefits of a strength training program for young athletes.
Strength Training Program for Young Athletes Component #1: Comprehensive
A strength training program for young athletes should address every major muscle group in the body: chest, upper back, shoulders, biceps, triceps, neck (for collision sports), abdominals, lower back, hips & glutes, quadriceps, hamstrings and calves. Certain sports will focus more on a particular body part or require specialized work on smaller muscle groups (i.e. baseball pitchers will train the rotator cuff extensively), but all major muscle groups should be addressed. In general, an equal amount of work should be done on each side of a joint.
Deficiencies can be overcome through a strength training program, but it generally takes specialized assessment to determine which muscles are deficient.
Strength Training Program for Young Athletes Component #2: Progressive
In order for any program to be effective, there must be a systematic and progressive overload of the musculature. In other words, athletes should systematically attempt to perform more work on a given exercise. For example, an athlete who can perform a maximum of 10 push-ups today should attempt to perform 11 repetitions at some point. When 11 can be performed, 12 should be attempted and so on.
Progress can be made through any of the following: increasing the number of repetitions, increasing the amount of weight, increasing the number of sets, increasing the number of training days per week, decreasing the amount of rest time between sets, or a combination of any of these.
One of the easiest approaches is called “double progression”. To use this method, start by determining a range of repetitions you are going to use, for example 6-10 reps.If the athlete is unable to perform at least 6 reps, the weight is too heavy. If more than 10 reps can be performed, the weight is too light. During each workout, one more rep should be attempted until the top of the range (10 reps in this case) can be performed. When the top of the range is achieved, the weight will be increased at the next workout by the smallest amount possible.
Strength Training Program for Young Athletes Component #3: How many sets?
The number of sets used on an exercise or within a complete workout can vary greatly, but the following guidelines can be used.In most cases, 1-3 sets will be performed for each exercise and 10-20 sets will be performed in the entire workout.
If fewer sets are used, each set should be performed with maximum intensity. In other words, the set should be taken to the point of momentary muscular fatigue, or no more reps can be performed. If the athletes are unable to perform with maximal intensity, it is generally a good idea to complete multiple sets of an exercise.
Strength Training Program for Young Athletes Component #4: How many reps?
While there is great debate of the number of repetitions that should be used in a set, it really should not be confusing.In general, it is recommended that 6-20 reps be performed on each set. While this is a large range, it offers a guideline in which to create smaller rep ranges from. It is best to choose ranges of 4-6 reps, such as 6-10, 8-12, 10-15, or 15-20.
As long as your program continually challenges the athlete to perform a greater amount of work, strength gains will be made. Any rep range will work. There are, however, some subtle differences between the benefits of each rep range.
Lower rep ranges (i.e. under 6 reps) will stimulate the nervous system to a greater extent, but actual tissue changes may be limited. Very heavy weight (relative to the athlete’s strength) must be used which can be potentially dangerous because athlete may have a tendency to use improper technique to lift the weight.
In general, it is unnecessary for any high school athlete to use weights that cannot be lifted at least 6 times with good form. Prepubescent athletes should generally use weights that allow for at least 10 reps.
Medium rep ranges (i.e. 6-10, 8-12, 10-15) offer the benefits of increasing strength, eliciting positive tissue changes, and allow for greater safety than very heavy weights. These rep ranges are recommended for most sets on most exercises.
Higher rep ranges (i.e. 15-20) offer the greatest results when muscular endurance is the goal. Endurance athletes may want to consider higher rep ranges. Young athletes or beginners may also consider higher rep ranges because it offers the opportunity to practice good technique. Strength will still be gained with higher rep ranges.
Strength Training Program for Young Athletes Component #5: How much weight?
Once a rep range is determined (for example 8-12 reps) selecting a weight is fairly easy. Have the athlete perform a set of as many reps as possible. If the athlete cannot perform at least 8 reps, the weight is too heavy and should be decreased at the next workout. If the athlete can perform more than 12 reps, the weight is too light and should be increased at the next workout.
Within 2-4 workouts, the optimal weight will be selected. This selection process gives the athletes the opportunity to practice technique and experiment with different resistances.
Strength Training for Young Athletes Component #6: How often should you train?
Selecting the number of training sessions per week is dependent upon many outside factors such as practice time, game schedule, outside activities, facility availability, etc. Generally, there will be more time available for strength training during the off-season than during a competitive season.
The following are some guidelines for the number of training days per week during different phases of the competitive cycle, with routine ideas in parenthesis:
Off-season: 2-4 days/week (2 or 3 total-body workouts per week T & Th, 2 upper & 2 lower body workouts/week M-T-Th-F or 3 days/week alternating upper & lower body routines M-W-F)
Pre-season: 2-3 days/week (2 or 3 total-body workouts per week, or 3 days/week alternating upper & lower body routines M-W-F)
In-season: 1-3 days/week (1- 3 total-body workouts per week, or 2-3 days/week alternating upper & lower body routines)
Strength Training for Young Athletes Component #7: How long should the workout take?
Each strength training session should last 20-60 minutes. There is no reason for any high school strength workout to last more than 60 minutes.
Rest between sets should last about 1-2 minutes. This allows time for a partner to complete his/her set and the next exercise to be set up.
Work large muscles first
In general, the order of exercises should begin with the largest muscle groups and move to smaller muscle groups.
Large muscle groups include the chest, upper back, and hips & quads. Smaller muscle groups include the shoulders, arms, hamstrings, calves and abdominals.
An example of a total body routine would be:
Hips & Quads
Chest
Upper back
Shoulders
Hamstrings
Arms
Calves
Abdominals
Neck
Strength Training Program for Young Athletes Component #8: Variation
A workout routine should be changed every 6-12 weeks to offer new stressors to the body. A change can be very small such as changing the rep range, changing the number of sets per exercise, adding a new exercise or two, or changing the order of exercises. Change can also consist of a completely new routine. Small changes are all the body needs to continually make progress so don’t feel that it is necessary to create brand new programs.
The process of changing the workout routine is called periodization. This can get very complicated, and there are entire books written on the subject. To get started on a strength training program, it is absolutely not necessary to understand the intricacies of periodization. For now, all that is important is to modify the workout every 6-12 weeks.
Changing the routine too often does not allow the muscular tissue time to gradually adapt to the stress. If the routine is changed too quickly, it is difficult to determine whether or not the routine is working. Building strength requires a great deal of patience and persistence, so encourage athletes to be diligent.
Variety, however, can often keep athletes engaged, so it is encouraged to offer something slightly different every couple of weeks. All this means is that every 2-3 weeks, you change one or two things about the program for that day. You can increase or decrease the number of reps on an exercise, add additional sets of an exercise, add 1-2 exercises, or give an unexpected day off. Anything to make the workout a little different for the day in an effort to keep the athletes engaged.
Strength Training Program for Young Athletes Component #9: Off-season vs. Pre-season vs. In-season
The time of the year is going to create more differences in your strength training program for young athletes design than just about anything else. While this can get very complicated, once again you are encouraged to keep it simple. The major differences between the programs you will design for each “season” are as follows:
Off-season: The off-season is the best time to make strength gains because fewer physical demands are placed on the body at this time. Overall training volume will generally be increased during the off-season. This means that more days per week may be used, more sets of each exercise and more energy overall will be spent on strength than any other time of the year. In general young athletes will train 2-4 days per week and use 14-20 total sets per workout.
Aerobic and anaerobic conditioning is generally de-emphasized during the off-season to allow more energy to be spent on gaining strength or the improvement of other deficiencies.
Pre-season: Strength training will continue through the pre-season, but the overall volume will gradually decrease as more time and energy are spent on conditioning or fitness. In general, strength training will consist of 2-3 days per week and 12-15 total sets per workout. The intensity of each set may be increased as the volume of work is decreased.
In-season: It is absolutely imperative that strength training be continued through the competitive season. The total volume of work will be reduced, so the relative intensity can be increased. The workouts will be less frequent and shorter in duration.Athletes should strength train at least one day per week, and no more than three days. Workouts will take 20-40 minutes with a total of 10-14 sets per workout.
The number of training days per week and volume of each workout will depend upon the competitive schedule and physical demands of the sport.
Decide what time of year it is, think about the facilities available, and consider which exercises you feel are most appropriate for you to teach and for your young athletes to perform.
Quads & Hips: Pick 1-4 Exercises
Squat Deadlift Leg Press
Lunges DB/Trap Bar Deadlift 3-D Lunges
Leg Extension Glute/Ham Raise Step Ups
Machine Squat Airball Squat Hip Flexion
Hip Extension Hip Abduction Hip Adduction
MR Squat MR Hip Flex/Ext/Ab/Ad/Leg Ext
Hamstrings: Pick 1-2 Exercises
Leg Curl Airball Leg Curl RDL/Stiff-leg Deadlift
Glute/Ham Raise Hyperextension
Chest: Pick 1-3 Exercises
Bench Press Incline Bench Press Decline Bench Press
DB Bench Press Incline DB Bench Press Decline DB Bench Press
Machine Press Dips Push Ups
DB Flys Machine Flys Tubing Press/Flys
MR Flys
Upper Back: Pick 1-3 Exercises
Chin Ups Pull Ups Pulldown
DB Row Cable/Machine Row Close Grip Pulldown
DB Pullover Machine Pullover Straight-Arm Pulldown
MR Row Shrugs
Shoulders: Pick 1-3 Exercises
Lateral Raise Bent Over Raise Military Press, Seated/Standing
DB Military Press Machine Military Press Front Raise
MR Lateral Raise/Front Raise/Bent Over Raise Tube Raises
Internal Rotation External Rotation Empty Can/Thumbs Up Raise
Biceps: Pick 0-1 Exercise
Barbell Curl DB Curl Hammer Curl
Triceps: Pick 0-1 Exercise
Dips Close Grip Press Skullcrushers
Pushdowns DB Overhead Extensions MR Tri Extension
Learn One Lift that will Improve Power, Sports Performance and Strength in Athletes
By Wil Fleming, IYCA Director of Sport Performance
*(NOTE: In an effort to provide the highest quality information, this post was updated on May 13th, 2013. I have learned a lot in the last 11 months and found it necessary to update this post to reflect my current understanding of how to power clean correctly.
On some points my thinking changed just slightly, but enough that it should be noted, and in other cases I was dead wrong. The good thing is that in my application of some of these new concepts and ideas my lifts have never been better.)
Training for power is undoubtedly one of the most important aspects of becoming a better athlete. Athletes that want to get faster, get stronger, and get bigger need to train to improve their power. Fortunately many programs include the power clean for just that purpose. Unfortunately though, a lot of people do it incorrectly, get injured, or don’t get any good at the lift and don’t get to reap the benefits.
So whether you are an athlete or a coach of an athlete this post is for you. I have taken everything that I know about the power clean and put it to paper (or cyberspace) for your enjoyment and education.
This is a step by step guide to help your athletes get better, stop missing lifts, and see all the benefits of one of my favorite lifts. Before I get to all the technical stuff, why should athletes do the power clean in the first place?
Power Clean Benefits
Gain power
In terms of pure power output very little athletes can do in the weightroom compares to the power clean. The power output of a power clean dwarfs movements like the bench press, squat and deadlift by three fold.
Improve sports performance
Increasing speed and strength are the fastest ways to get better on the field. By training with loads at high velocities the clean is the best tool to simultaneously train both qualities. Many of the most important tasks in sports rely on well-timed sequential movements. The timing of the power clean mimics many of those movements, and shares movement qualities like explosive hip extension. This improved timing is great to improve sports performance.
Get stronger
I haven’t run into many people that are legitimately strong in the power clean that aren’t also strong squatters, deadlifters, and many times, even bench pressers. The power clean is a great total body movement that develops type II muscle fibers unlike much of the rest of the weightroom. If an athlete has the strength to get in positions for the power clean they will have the strength to move serious weight around in the rest of the weightroom.
How to power clean—The start position
Cover the shoe laces
Establishing the right distance between your body and the bar is essential to completing the power clean correctly. Too close and the bar will need to move forward off the floor, creating a bad pulling position, too far and the bar will need to move back, and once again the athlete will be in the wrong position. Setting up with the bar covering the the last shoelace as the athlete sees it from above, establishes a great position to begin with. The bar should be placed over the forefoot. This position allows the athlete to get in a quad dominant position at the ground level, where the knees will be shifted forward
For athletes that are taller this may need to be adjusted slightly forward and shorter athletes may adjust slightly closer to the bar, but at least we have a frame of reference from which to start. From the coaches point of view this looks like a bar position that is in the midfoot of the athlete.
Flat Feet (but weight at the ball of the foot)
The athletes balance of weight will mirror the position of the bar over the foot. This is the case for the entire lift. While the bar is on the floor it will be centered over the base of the big toe (and the athletes own weight will be towards the ball of the foot). As the lift progresses the bar should move into the body (more on that later) during that portion of the lift the weight will dynamically move back towards the heel.
Remember this is a dynamic system, and the athlete’s weight will reflect this dynamic system.
Jump width feet
The vertical jump is used as the indicator of lower body power when we are testing athletes. The foot position that athletes naturally use when jumping is likely going to be the one that they will want to begin the power clean. With the feet around hip width apart athletes will be able to direct force into the ground in the most efficient way possible. Setting up too wide directs much of the force outward and not into the ground. Athletes that have hip mobility restrictions may need to adjust their stance wider than jump width to achieve a safe position from the ground.
Seriously Brace the core
A strong core is necessary to maintain the torso position from the ground up through the first and second pull. The only way to ensure that this happens is to pre-brace the core before the lift begins. Once oriented to the bar establish the brace position while standing which will be much easier to do than trying to establish the brace while in the starting position. It is important to have this feeling established before having your hands on the bar.
RDL to the Knees
Finally we can begin moving towards the bar! Right now from the standing position athletes have 3 choices that they can make to get your hands to the bar and only 1 of them is correct.
1)Athletes could choose to bend their knees to move their hands lower to the ground, but eventually they will run out of ankle mobility.
2) Athletes could also choose to bend their back to make their way to the bar, but in this case athletes will be putting some crazy stress on their lumbar spine once loaded.
3)Lastly athletes can hip hinge, their way towards the bar. (BINGO! This is what we want)
The first movement that needs to be made is an RDL or hip hinge movement. By completing this movement athletes will be creating a hip loaded pattern that allows for a powerful hip extension later in the movement. Only hinge until the hands are at the kneecaps, and remember if the athlete’s hips quit moving back in space while making this movement they are no longer in a hip hinge.
Squat to the bar
To finish the descent to the bar athletes will need to cease moving their hips back in space. Athletes will need to move towards the bar by squatting or moving their hips down in space. The athlete will be able to maintain the same relationship to the bar on the X axis, but will gain the knee bend necessary to start the bar off the ground. The deeper the squat to the bar the better. Hopefully we can establish a position where their is little space between the hamstrings and the calves, remember off the floor we are looking to be very quad dominant.
Using the cue “squat to the bar” is a great way to relate this “foreign” position to something that most athletes are very familiar.
Eyes Forward Neck Straight
Once the hands meet the bar a neutral spine posture must be assumed. Cervical hyperextension, which will likely contribute to greater lumbar hyperextension. With greater lumbar hyperextension the athlete will put more shearing force on their lower back.
That all being said, there is much contention to the idea that a neutral neck be used. Many elite weightlifters use a head position that would be considered cervical hyperextension, and there is even literature suggesting that in this position, the greater tension that is found in the lower back actually aids the lifters.
We are not likely coaching elite weightlifters destined for Olympic greatness, in the interest of lumbar spines everywhere, positioning the neck in a neutral position is the right call for most athletes (don’t fret too much over this)
Lock the lats down, and core tight
On the neutral spine idea, we have to think of ways to brace the core. Typical bracing will do well, but including the cue to lock down the lats will aid in the stiffening of the core, and will also allow the athlete to keep the bar close to the body at the moment of lift-off. Keeping the bar close to the body will assist the athlete in maintaining a tight lifter-barbell system.
Arms straight Down
In an effort to maintain a tight lifter-barbell system and the bar close to the body a “knuckles down” cue will lead to a the shoulders being directly over the bar. The arms will be straight while the bar is on the ground. For some athletes it is easy to keep the arms straight through thinking of relaxation at the elbows, while for others it is important to teach that the elbows remain “locked” when on the floor.
Knees Out
Knees out is a new cue for me, but one that is helping my athletes tremendously. Externally rotating the thighs in the start position creates a higher level or torque and sets athletes for the transition of the bar around the knee. Push the knees into the elbows, create torque, make more power later.
Knees Forward
Once more thing on the knees. To ensure the right torso position make sure that the knees are forward of the elbows. This creates the right angle we are looking for when the bar breaks the ground.
The Hook Grip
The reason
There are two ways to grasp the bar in the power clean. The first is the simple grip in which the athlete grabs the bar with an overhand grip and thumbs wrapped around the bar. This grip will not be sufficient to lift heavier weights. It is necessary then to use the hook grip to pick up some serious weight. The only reasons a simple grip should be employed is in the case of a thumb injury or some other lack of mobility in the thumb.
The way
The hook grip is actually pretty simple to complete. The athlete should grasp the bar overhand like normal and before wrapping their fingers closed, should place their thumb inside of their grip. Simple.
There will be some discomfort in maintaining this grip for novice athletes but this will subside over time. (Note: Don’t trim your thumbnails too short before using the hook grip, pain will ensue).
The width
The width of the grip in the power clean will be shoulder width or slightly wider. While many people employ certain lines on the bar to determine where to place the hands, not all athletes are able to use high end bars to do the movements. It is necessary to have a way to make sure athletes are able to grasp any bar with the correct grip no matter the markings.
From a standing position the athlete should be able to grip the bar in a position that allows for their thumbs to be extended straight and be in contact with their hips/upper thigh. This width is sufficiently wide enough to achieve a strong racked position, allow for the possibility of a jerk later on, and is not dependent on the markings of a bar.
How to Power Clean- The Start
Static Start
The static start looks just as you would expect it to look, motionless. Once the athlete has achieved the start position described above they remain motionless for up to several seconds and then begin their initial lift off. This method is great for beginners because there is no variation to the start position once it is initially achieved. The downside to using a static start position is a reduction in power from the floor and many athletes find the start position to be relatively uncomfortable to maintain for long periods of time.
Dynamic Start
There are actually several ways to complete a dynamic start but each of them aims to develop acceleration of the torso before lifting the barbell from the ground.
Rocking Start
Rocking can be thought of as a “less dynamic, dynamic start” The athlete will start with the pelvis higher than the bar and begin movement of the torso to the appropriate angle to begin the lift off. This movement is smooth and the torso will shift from a horizontal relationship to the platform to a more vertical relationship. Once in the vertical torso position the athlete will begin a transition to their lift off position, once that position is achieved the lift off will begin
Pumping Start
The pumping start can begin with 1 or 2 pumps but is the “more dynamic, dynamic start”. The athlete will start with hips higher than the bar, quickly drop the hips to the appropriate start position, and execute the lift off. A second pump can occur by bringing the hips up 1 more time and then down again to the bar. (down-up, down-up). Be careful in this very dynamic start to not let the athlete’s weight shift forward to the toes.
How to power clean—the performance
The First Pull
The first pull is the initial movement from the ground and until the bar passes the knees. This pull is usually slower and more controlled than the second pull. The primary goal is to maintain good position while gaining momentum through the early part of the lift
“Push The Floor”
My old thinking in the power clean was more along the lines of pushing through the heels. This works, I promise, but I have found a better way to get from the ground to the knee level. If you establish a good quad dominant position with the bar over the ball of your foot, all you will need to do is “push against the floor,” or “push with the legs.” With a strong torso your knees will move back and the bar will get on the elevator to awesome.
Knees Back, Translate the torso
The initial lift off from the floor should be done by extension of the knees. Driving the knees back while lifting the torso is what we are aiming for. The torso should remain in the same relationship to the ground (30 degrees above horizontal) throughout the first pull. In this way we are looking to translate the position of the torso vertically through space. This will maintain the powerful hips loaded position above the knee. The knees should continue driving back until almost reaching extension as the bar begins to pass the knee.
Bar sweeps back
Up to this point we have spoken much about the position and movement of the body in the power clean. The bar however does make a slight movement off the floor back toward the body to maintain the tight lifter-barbell system. This occurs due to the activation of the lats, we are not looking for a straight line pull, but rather one that resembles a very flat S.
Slow off the floor (if you’re a beginner)
A beginner that rockets the bar off the ground will miss positions the entire way up the lift, for this reason we incorporate lifts with pauses throughout the learning process.
Once an athlete knows the positions and can consistently hit them, they are likely able to pull much more weight. When an athlete can pull some significant weight the intent will become pulling the bar from the ground as fast and hard as possible.
Looking at the best lifters in the world, you will likely see them pulling in what looks like a slow manner, but I can guarantee that they are pulling as hard as possible they just have to overcome inertia, and that can be a hard task.
At the knees
Once the bar is at the knees several things should be occurring. This is a difficult place to coach the athlete, because the system is already in motion but changes may need to be made after reviewing the lifts on video.
The feet should be flat so the athlete can transition correctly for the second pull. The hips should still be higher than the knees, and very little hip extension has occurred. The torso should still be roughly 30 degrees above the horizontal. The arms should also remain straight at this point, athletes that have bent their arms by this point will have difficulty with completing the second pull.
The second pull
The second pull is more aggressive in nature and the point at which the athlete will accelerate the bar to its highest speeds, this pull lasts from above the knee (after the transition period) and until the athlete reaches full hip extension.
Creating the triangle
A really important concept that I like to teach my athletes is that once in the above knee position they have created a “power triangle”. This triangle consists of their entire arm, their torso, and the angle of their hips. From this point on the only goal, and the only way to make a successful second pull is to flatten, or close the triangle. This is a vivid image that can help athletes hit the correct positions.
Knees Forward (Scoop/Double Knee Bend)
A lot is made about the knee bend during the second pull. Articles have been written about the double knee bend, that would make this post look like small potatoes.
The fact is, in a good power clean the knee bend will occur to align the body in a position to create vertical movement, pure hip extension from the above knee position will create too much horizontal projection and the athlete will jump forward.
Here are the facts:
When the bar is at the knee level, the knees are nearly extended.
When the bar is in the final pulling position the knees need to be under, or even in front of, the bar to create vertical movement and pull from the strongest position.
It is necessary to perform the double knee bend (or scoop, or transition) for vertical projection.
To get a picture of the right final pulling position think about how you would lift a washing machine. Would you stick your butt out and get your chest over it to lift it? Or would you try to get a pretty vertical torso, dig your heels in the ground and push down with your feet?
I would suppose it would be the second option, and by no coincidence this position is the exact position we want to reach to finish our pull.
Finish the hips and knees
Once the bar has reached a high thigh position, and the torso has come to vertical, the hips and knees will both be nearly extended. At this point the athlete should finish driving the hips and knees to extension. Athletes will drive up through the toes in this phase and will achieve FULL extension. This is the highest speed portion of the entire lift.
What about the elbows and the shrug?
Don’t worry about the elbows yet. There is no need for a high pull. Once the hips and knees have extended, yanking upwards with the hands is unnecessary, and will not make the bar go any faster.
In both the case of a shrug and the elbows we often think about frame by frame shots of elite weightlifters seemingly pulling the elbows up and shrugging the shoulders. The fact is very few of these lifters are thinking of doing those things.
Instead this position is a result of an effort to move UNDER the bar, not in an effort to move the bar any higher.
Punch the elbows (still no high pull)
The arms have stayed relaxed to a great degree up to this point, but once the athlete has started to move under the bar it is time to use the arms forcefully. The action of the arms at this phase is best described as punching the elbows up.
The elbow punch will result in a receiving position that is high on the shoulders, meaning that the weight will not be resting on the wrists (generally a weak point) but instead will be in line with their center of gravity. An effort to flip the wrists will usually lead to a low catch on the chest and a need for the athlete to “roll” the bar up the chest.
Instead think of getting the hands to the shoulders quickly and punching the elbows up.
Jumping?
On the internet, where people get mad about everything and start internet fights. This is one topic where they will start a lot of fights. Should the athlete jump?
While the lift will definitely improve jumping performance it is not exactly like a jump, but still that does not answer the question.
Here’s where I stand. For most athletes jumping actually improves the catch position and here’s why: When an athlete leaves the ground, their ability to pull up on the bar is done. Any effort put into the bar will make the athlete move under the bar when the feet are off the ground.
This doesn’t mean pull the feet up really high and stomp the ground and this doesn’t mean you should mimic a jump and leap from the ground. It just means a short impulse of power to leave the ground.
Hips Back, Feet Flat
This step will occur simultaneously to punching the elbows. Athletes should aim to receive in an athletic position just as they would land from a jump (only on their heels first in this instance).
The athlete will widen their feet slightly, from a hip width/jump width stance to a shoulder width/squat width stance to receive the bar. The athlete should also have very little forward or backward travel at the time they receive the bar.
Power Clean Variations
Variations in the power clean are made by changing up the start position and the receiving position. Different variations can train different qualities and are very valuable to any athletes.
Variations in starting position
Hang Power Clean
The power clean from the hang position is a great teaching tool to use with athletes and can even be used as your primary way to train athletes with the clean. The clean from the hang position will help athletes develop better ability to use the stretch shortening cycle.
We have two positions in which we do hang cleans most of the time.
Hang power clean from hip
This movement is to mimic the final pulling position. The one where the knees are re-positioned under the bar, and the torso is vertical. This position has become the first position in which we teach athletes to clean.
Establishing that this foreign position is the ultimate goal, is important to making your athletes successful with the lifts.
Hang power clean from knees
Our second position from which we do the hang power clean is at the knee level. We use 2 primary variations of this variation (all very confusing).
Above Knee: This position is the one from which our athletes complete most of their power clean reps. It is an athletic and familiar, and athletes have plenty of success with it.
Below knee: Our Olympic lifters do many of their reps from this position. Typically the transition around the knee is difficult for lifters and making them lift from below the knee means we make better lifters.
Clean from Blocks
The clean from the blocks is a great way to teach athletes to learn the lifts. This position allows you the ability to physically put your athletes in the right alignment for starting from any position (hip, above knee, below knee). This is a great teaching tool for beginners as well as a great way to learn different portions of the lift that athletes may struggle with (transition around knee).
Variations in receiving position
Split Clean
The split clean is a blast from the past, it was employed by many athletes as the primary way to complete the movement in competition for a number of years. For athletes the split clean should be used as a way to provide variation to the program and to accustom athletes to absorbing force in a “single leg” stance. After full extension is reached the athlete should punch the lead knee up and drive the rear foot back and to the ground. Ideally the athlete will land with a vertical shin on the front leg, similar to the 90-90 position employed in split squats
Squat Clean
It takes a special athlete to be able to complete a good looking full (squat) clean, many athletes will lack the mobility to get in the correct positions to receive the bar. The world’s most explosive athletes use this technique to complete the clean in competition, so the upside in terms of potential weight used is great. The full clean is an even greater total body exercise because of the need for great leg strength to come up from the full front squat position.
Common Power Clean flaws and Coaching Cues
The bar drifts away at the start
At the moment of lift off the bar and lifter should be closely linked, a bar that drifts away early on the floor is likely an issue that can be fixed by making a modification to the start position. Coach your athletes to keep the bar tight by locking down the lats and locking in the core arms vertical
Check to make sure that the athlete is not forward of the bar at the start position, no horizontal backs around here.
The bar moves around the knees
The bar moving around the knees is a very common problem that can really inhibit the athlete’s ability to make a great second pull, with two likely causes.
The most likely cause of this problem is the weight of the athlete not shifting from the forefoot towards the heel as the bar makes its way up the body. Push the ground and sweep the bar, the knees will get out of the way.
The athlete racks the bar with elbows down
This is a very common issue and can be caused by several things.
1) The athlete is pulling with arms flexed. When pulling with the elbows flexed the athlete will slow down their ability to punch their elbows around the bar.
2) The athlete is not completing their second pull. If the athlete does not complete the second pull their chest will likely remain over the bar and this will not allow for enough time to punch the elbows through and necessitate that they receive the bar with their elbows down
3) The athlete lacks lat mobility to receive the bar correctly. Athletes that lack the requisite mobility to receive the bar will not be physically able to rotate their around to the correct receiving position. Including more lat mobility work, and thoracic extension training in the warm-up period will be a good long term fix for this sort of problem.
The athlete jumps forward when catching the bar
Jumping forward when receiving the bar is a classic sign that there was incomplete extension of the hips during the second pull. When the hips don’t fully extend the bar will begin to drift forward and the only way that the athlete can complete the lift is to jump forward to the bar.
A second likely cause not re-positioning the knees under the bar as the bar moves up the thigh. If the hips come from too far a horizontal distance to reach hip extension the bar will be “bumped” forward and the athlete will need to jump forward to catch the bar.
The athlete jumps back when catching the bar
Lets first say that some coaches do teach a movement backwards at the catch, while their reasons may vary it is likely that they feel this promotes a full hip extension. Traveling back to receive the bar is likely caused by directing their momentum back rather than vertical in the completion of the second pull. Cue the athlete to move their head vertically toward the ceiling and not throw it back while completing the pull.
The athlete jumps feet out when catching the bar
Ahhh the starfish. I am not a fan. Athletes that jump their feet out are looking to get to the finish position the fastest way that their body knows how. This problem can lead to really awkward and dangerous receiving positions and needs to be eliminated quickly. The easiest way to do so is to create a visual stimulus that will reinforce the correct technique. A murray cross will do well to give athletes immediate feedback as to whether they received the bar in the appropriate position or not.
The cause of the starfish is mind blowing to some people, but I am going to lay it on you straight. Athletes that overpull the bar, meaning they pull too long with their arms will ALWAYS catch in a starfish.
Once the hips and knees are extended, just get under the dang bar. Sit, don’t sprawl.
Accessory lifts to fix your power clean
Clean Pull
The clean pull is a partial lift that will have the athlete finish in complete hip extension and arms straight but not rack the bar. The clean pull can be done from any of the start positions (floor, hang, blocks) and is a great tool to develop positional power for the power clean. For increasing power as it pertains to the power clean only, the clean pull should be done at 110% of the (X)RM where X is the number of reps the athlete is doing in that particular set.
So…
If an athlete can clean 100 kg for 3 reps they should clean pull 110 kg for 3 reps.
If an athlete can clean 120 kg for 5 reps they should clean pull 132 kg for 5 reps.
The starting position that is used in the clean pull should be determined by what it is that the athlete needs to work on the most. If their pull off the floor is jacked up then they should pull from the floor, if they have issues in the second pull then use clean pulls from a hang or block.
Some awesome work has been done recently to show that the clean pull (sometimes called a jump shrug) can actually produce higher levels of power output than the traditional Olympic lifts, because of this and the lack of impact on the body (no receiving position) the clean pull is a great lift to use for in-season training.
The execution of a clean pull is debated, but for my athletes I do not want them to finish with a violent shrug of the shoulders or over-emphasize finishing on their toes.
Last thing on clean pulls, in Olympic lifting, heavy clean grip deadlifts, and snatch grip deadlifts are pulls too.
Front Squat
Even though we are talking about the power clean and not the full clean the front squat is an absolute must to improve power clean ability. At the moment of impact (the catch) there is great force that is being exerted downward, being able to stand up with it and not get buried requires a strong front squat. Athletes that seemingly are able to pull the bar to heights that would allow for a good rack position but still miss the lift at the rack can benefit from front squats and even front squats against bands to get super strong in the top position of the power clean.
RDL
If the front squat helps the ability to receive a power clean the RDL assists the athlete’s ability to make an efficient pull on the bar. Greater hamstring and glute strength is an awesome thing to have when the going gets tough around the knee and before the second pull kicks off.
I used to use the RDL as a big time teaching tool, but instead we use a modified version of the RDL to teach the transition from the knee level to the hip level. (I learned this awesome drill after Coach Glenn Pendlay made me do it for about 20 minutes straight!)
Clean lift off
For athletes that struggle off the floor but not many other places the clean lift off is a great tool to use. Have athletes set up in their start position at the floor level and begin to extend the knees until the bar rises to knee height. Pause for a moment and bring the bar back to the ground under control. This movement will groove the pattern off the floor like no other.
Power clean accessories
Straps
My opinion on straps in the clean has changed dramatically, but it comes down to one singular “rule”
If the use of straps inhibits the athlete’s ability to catch the bar in the rack position, do not use straps. If it doesn’t inhibit that position, feel free to use straps.
Personally, I never use straps in the clean, but always use straps in the snatch.
Weightlifting Belt
Using a weightlifting belt in the power clean is a mixed bag to me. I would never recommend a belt to someone that already has poor technique because the belt will magically grant confidence (like it always does) to go heavier than the athlete should. If an athlete has great technique and can pull with a neutral spine off the floor, a belt is unnecessary even at higher weights.
Again, personally, I love using a belt in the clean, but not in the snatch. I like the ability to breathe into the belt to create an even stiffer core position.
Shoes for power cleans
Running Shoes
Running shoes would be one of my least favorite choices for footwear during a power clean. These shoes typically have a pretty thick soft-rubber sole that can allow power to leach out during the pull. The high sole will also lead to less stability while lifting and at the receiving position.
Minimalist Shoes
Minimalist shoes have definitely gained popularity recently and some are even being marketed as “training” shoes. You definitely need to take a look at some of these as they are not all created equal. Some are great and provide a solid base of support, and some are just well marketed running shoes with the same pitfalls.
Weightlifting shoes
There really is no better shoe than a weightlifting shoe for performing the power clean. The solid wood sole and wider base helps keep the athlete on balance throughout the lift. There are several brands for sale on the market today (adidas, Nike, Reebok) and some lesser known brands. I have purchased every single kind that you can (seriously I have 6 pairs) and go to my adidas over others.
Power Clean Programs
Get Right Power Clean Program
For many athletes technical proficiency is the limiting factor, even advanced athletes can benefit from increased repetition of the lifts. To add the get right program to an existing program (one that includes strength work in the rest of the week) and improve the athlete’s technical abilities try this out 1-2 days per week.
Loading should be 60% of Bodyweight +/- 10-15 kg
Begin with Imitation movements with the bar for up to 20 reps.
So we are finally to the end, nearly everything I know about one of my favorite lifts, the power clean has been put out into the interwebz. This post was awesome to write and I really hope that it will help improve your athlete’s power clean. If it does in fact help you or your athletes, please do me a favor…
Wil Fleming Gives you the 5 Factors that your High School Athletes NEED to Dominate to Succeed
What You Will Find Inside:
Secrets to Successful High School Athletes
The Pillars of Athletic Development
How YOU can develop great athletes through great coaching
Effective Model for an 8-Week High School Summer Conditioning Program
It’s that time of year when most high schools are out of school and spring sports, club or otherwise, have finished.
For most of our high school athletes, this is the one time of year where they can focus most of their training time on getting stronger, faster, and more powerful. It gives us an opportunity to really make an impact and change how they function and perform during their next athletic year.
However, we are a private sector training facility, meaning we work around other coaches, their summer strength and conditioning (S&C) programs, and any other events an athlete might have during the summer.
So what needs to be taken into account for a high school summer conditioning program, and how do we design high-performance training plans for our summer athletes?
External Factors
Consideration 1: How far out is the next season?
When developing a training plan for our athletes, one of the first questions we ask is, “When is your next athletic season?” This information gives us a timeline. We know what we want to accomplish with them, and once we know how long we have, we can condense our training plan to fit the timetable.
Consideration 2: How does their sport coach approach early season practices?
This is a common issue and one we address if we know the coach and their methodology. If we don’t yet know the coaching staff, we ask our players to describe early season training. Typically, there are one or multiple cuts for a team involving extremely taxing practices.
For those who don’t need to cut, they still take athletes through “weed-out” early season conditioning. In the S&C community, we would call this lactic or alactic threshold training. If you have ever seen this kind of conditioning or experienced it yourself, it will quickly make you hate your coach (maybe dislike; hate is such a strong term :)).
We as S&C coaches need to prepare our athletes to handle the grind with effectiveness and ease to stand out among their peers. We promise our athletes and their parents that they will be in mid-season condition at the start of a season. If we don’t take into account the sport coach’s style of conditioning, we will never make good on our promise.
Consideration 3: Other summer training programs
Our gym is located nearby to a number of large schools, most of which have a well-equipped weight room. Thus, these schools have summer strength programs, usually facilitated by the football coaches, where regular attendance is mandatory.
No matter how productive our training has proven to be, a football coach will never concede that our S&C program holds priority over their program.
So, if an athlete’s coach requires that they attend the summer strength program, we must work to supplement our training philosophy and high school summer conditioning program around the school’s.
Condition 4: Summer Vacations/Camps/etc.
Summer is one of the few times when families can get away for a vacation. Also, the majority of athletic development camps occur over the summer months.
As a S&C coach, you must have these dates laid out in advance to better plan your training around them. We will overreach with our athletes prior to a vacation, where they will get needed recovery time. We will also build basic conditioning programs for athletes if they will be somewhere with access to training equipment.
Writing the High School Summer Conditioning Program
Once we have taken into account all external factors related to training our athletes, we have to write them a program!
Below is an 8-week, twice-weekly high school summer conditioning program. This is the most common frequency and timeframe we get from our high school athletes during the summer, and it gives us the best results with 16 sessions.
Weeks 1-4
Tempo Work
This is something we use frequently with young training age athletes. Our multi-joint movements like squatting, hip hinging, split squatting, pushing, and pulling can be done in this manner. We often use 202 and 301 tempos (ecc/iso/con) for these movements, generally trying to slow the deceleration portion of the movement.
Supersets
Our training sessions are 75 minutes. When we have 6-8 exercises to go through plus a warm up and conditioning, supersets are the only way to go. This also keeps the athlete moving and under slight fatigue during all max/sub-max strength movements. This type of conditioning is consistent with our athlete’s experiences in their sports.
Aerobic Capacity Training
Our goal here is to make sure the athlete’s aerobic capacity is back to where it should be and make sure their aerobic base is solid so we can build performance on top without a breakdown. We use cardiac output methods most often but any quality aerobic training works well. Reference Joel Jamieson’s Ultimate MMA Conditioning book or his website 8weeksout.com for aerobic conditioning ideas.
Alactic Conditioning
The alactic system has been shown to have minimal potential for improvement compared to the aerobic system. However, our objective with training the alactic system is getting our athletes to learn and obtain maximum effort levels repeatedly. Often young athletes don’t know what max effort really is and they consistently leave performance potential on the table. Alactic conditioning coaxes that out of them.
Weeks 5-8
Explosive/Power training
During weeks 5-8, our objective changes. We work to turn strength that our athlete gained to usable power. Depending on the athlete’s training age, we will use tools like med balls, kettlebells, sandbags or Olympic lift variations to expose their power potential.
Strength/Speed and Speed/Strength Characteristics
Our athletes mostly train at our gym to get better in their court or field sports. Thus, we aren’t training weight room athletes (i.e., power lifters or bodybuilders). So we take strength exercises in the first month and turn them into strength/speed and speed/strength exercises in the second.
There is a lot of varied research as to the percentages needed to elicit these characteristics from squatting, deadlifting or bench pressing. For our high school age athletes, percentages no higher than 80% (strength/speed) and 70% (speed/strength) of 1RM work great along with a 20X tempo (X meaning moving as explosively as possible during concentric contraction).
Aerobic Capacity Training
We want to constantly build the aerobic base for our athletes because it is the most trainable and has the greatest potential for improvement. If you can develop a large aerobic foundation, the necessity for the lactic and alactic systems decreases and an athlete can work harder for longer without reaching anaerobic threshold.
Lactic Training or Early-season oriented conditioning
Your athlete may mutter the, “I hate you but I know it’s good for me,” phrase during this portion of their conditioning. This is the time where we briefly push our athletes into an uncomfortable but tolerable lactic phase of training. The main reason we do so is that most coaches will condition this way early in the season and we want complete preparation for our athletes.
If we know the style of conditioning a coach presents his or her athletes, we will incorporate that here as well. I don’t believe in sport-specific training but I do believe there is a specificity of sport, which also applies to conditioning. If we make our athlete appear better to the coaches early, they will have a better chance to show off improved physical conditioning on their court/field throughout the season.
Wrap Up
This summer training approach works very well for us. I imagine the duration and frequency of sessions I listed is a scenario that occurs throughout the country. However, we have different training tools and methods than you might. So take these concepts and apply it to your athletes with your tools. If you do so, you will have a high school summer conditioning program that rivals the best strength programs in your state!
ADAPT and Conquer,
Coach Jared
About the Author: Jared Markiewicz
Jared is founder of Functional Integrated Training (F.I.T.). F.I.T. is a performance-based training facility located in Madison, WI. They specialize in training athletes of all levels: everyday adults, competitive adults and youth ages 5-20+.
The long-term vision for F.I.T. is recognition as the training facility for those desiring to compete at the collegiate level in the state of Wisconsin. Alongside that, to also develop a platform to educate those in our industry looking to make strides towards improving the future for our young athletes.
Find out more about Jared’s gym by visiting F.I.T.
Career Highlights
2014 Fitness Entrepreneur of the Year – Fitness Business Insiders
2014 IYCA Coach of the Year Finalist
Volunteer Strength Coach for West Madison Boys Hockey and Westside Boys Lacrosse
Helped develop dozens of scholarship athletes in 3 years of business
Instructed Kinesiology Lab at UW-Madison
Houses an internship program at F.I.T. that started in 2013
Member of Elite Mastermind Group of Nationwide Fitness Business Owners
The Debate Over Conditioning Vs. Speed Training Continues
Much confusion abounds as to the differences between conditioning vs. speed training.
Track and field coaches generally classify speed training as many short, repetitive bouts of sprinting followed by ample periods of rest to allow for full recovery.
Repeated high-intensity efforts may, in fact, be the purest form of linear speed training.
On the other hand, football or soccer coaches often believe training for speed involves performing as many high-intensity repetitions as possible in a given amount of time.
So which type of coach is truly training athletes for speed?
Recently, I had the pleasure of attending a seminar featuring one of the premiere strength coaches in the country, Joe Kenn.
As head strength and conditioning coach for the Carolina Panthers of the National Football League, Kenn routinely takes his players through 66 work sets in only 90 to 120 minutes.
That’s a lot of work in a short period of time.
Kenn has a strong case to apply this method. Because football players must operate under a fatigued state during a game, they will highly benefit from practicing with little rest between sets. While performing a high volume of repetitions in a relatively short period of time isn’t ideal for building speed, football players never perform in ideal conditions.
Nearly all athletes must learn to perform when their bodies are worn.
At my facility in Madison, WI, we train our high school athletes with a similar philosophy, although we often have access to them only once or twice per week. So, it’s important we incorporate both speed training and conditioning into each workout.
Because we deal with a wide range of athletic abilities and developmental ranges with high school athletes, we approach each individual’s plan a bit differently. We integrate speed training following a thorough warm-up and dynamic movement.
For the developmentally younger athletes, we focus on technique and practice deceleration patterns, sprint mechanics and footwork. Our developmentally older athletes work on sprinting, cutting, changing directions and building top-end speed.
Our highly developed athletes focus on reactive speed and potentially combine-based drills to prepare for a camp or tryout. All of these athletes work diligently to master the basics and fix any flaws in their movement patterns to help them remain injury-free and avoid plateaus.
Following the speed training portion of the workout, our athletes begin their strength exercises such as a squat, deadlift and Turkish get-up. Each compound movement is paired with another exercise even if it’s just low-level core work to reset an athlete’s autonomic nervous system.
If you look at time-motion studies for field- and court-sport athletes, they work intensely for brief periods of time and recover actively with low-level activity.
In a game, an athlete must always be mentally active, so the job of a strength and conditioning coach is to prepare athletes in a way that makes a game easier than a training session. Athletes must remain active through an entire workout. After our athletes complete the strength portion of the workout, they begin their focused conditioning. Here’s where we have the most fun.
Thanks to advancements in research of the anaerobic and aerobic energy systems, we are able to be much more efficient and systematic with how we condition our athletes. Athletes play different sports and have different schedules, so we must have a broad array of conditioning sequences to address each situation.
Ultimately, we are looking to provide a bigger aerobic base for our athletes.
While we don’t want to run them into the ground all year long, we must systematically build a bigger aerobic base to develop greater potential for performance. Then, athletes are able to tap into that potential during the most important part of a season. They’ll peak while athletes from other teams feel fatigued.
So, should we run our athletes through many short, repetitive bouts with ample rest to allow for full recovery or perform repeated high-intensity efforts without much rest for best results? In short, both have a place in a strength and conditioning program. The debate will continue, though—and that’s a great thing.
If more great coaches publicize their philosophies, we will continue to advance our methods and improve the performance of our athletes. If we continue to look out for the best interests of our athletes, they will perform better than they ever thought possible.
ADAPT and Conquer,
Coach Jared
About the Author: Jared Markiewicz
Jared is founder of Functional Integrated Training (F.I.T.). F.I.T. is a performance-based training facility located in Madison, WI. They specialize in training athletes of all levels: everyday adults, competitive adults and youth ages 5-20+.
The long-term vision for F.I.T. is recognition as the training facility for those desiring to compete at the collegiate level in the state of Wisconsin. Alongside that, to also develop a platform to educate those in our industry looking to make strides towards improving the future for our young athletes.
Find out more about Jared’s gym by visiting F.I.T.
Career Highlights
2014 Fitness Entrepreneur of the Year – Fitness Business Insiders
2014 IYCA Coach of the Year Finalist
Volunteer Strength Coach for West Madison Boys Hockey and Westside Boys Lacrosse
Helped develop dozens of scholarship athletes in 3 years of business
Instructed Kinesiology Lab at UW-Madison
Houses an internship program at F.I.T. that started in 2013
Member of Elite Mastermind Group of Nationwide Fitness Business Owners


 Joshua Ortegon is co-founder and the Director of Sports Performance Enhancement at Athlete’s Arena in Irmo, SC. Joshua earned his Bachelor of Science degree in Exercise Science from Western Michigan University in 2000.


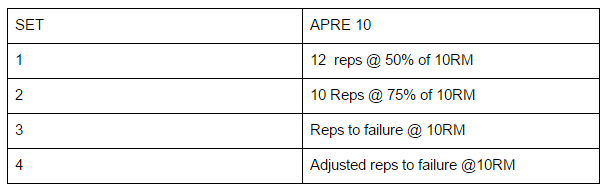


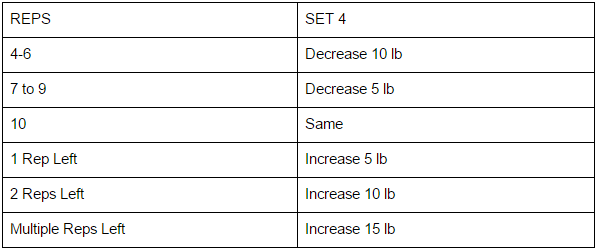
 Julie is the Executive Director of the International Youth Conditioning Association (IYCA). She grew up as an athlete and played collegiate softball at Juniata College. She currently owns and operates her own youth fitness business pouring into young athletes. Her areas of expertise are youth sport performance, youth fitness business and softball training/instruction. Julie grew up on a dairy farm and can challenge the best of the best in a cow-milking contest. 😉


