One of the most misunderstood, and often misused, training methodologies in the strength and conditioning field today is plyometrics. Far too often exercises that simply involve jumping around in some odd manner are being labeled as a “plyo” drill. It seems the most common culprit is when a coach or trainer calls any type of jump in the presence of a box a plyometric exercise. It should be understood that many physiological principles are taking place when performing a true plyometric exercise.
 Plyometrics, by definition, are “an exercise that is a quick, powerful movement using a pre-stretch or countermovement, that involves the stretch shortening cycle.” To elicit this physiological mechanism properly, specific training parameters must be carried out. The end result, when programmed and performed properly, may include improved muscle force and power output.
Even though plyometrics are fairly well researched and can provide immense training benefits, important details regarding the programming and usage remain unknown to coaches and trainers alike. Aspects of plyometrics such as the type, the frequency in which they should be trained, volume of exercises, rest periods, etc. do not receive the heightened awareness that standard anaerobic or aerobic training does. The unfortunate result of this means that many athletes are not reaping the benefits of plyometrics to the greatest extent possible.
Understanding plyometrics correctly requires one to possess an understanding of basic anatomy and exercise physiology. In order to perform a plyometric exercise, the body relies on two physiological models.
The first is known as the mechanical model. It essentially highlights how our muscles and tendons (often referred together as the musculotendinous component) have the ability to store energy created by an eccentric muscle contraction and then use it with a very quick subsequent concentric contraction. This mechanism can be thought of as being similar to a spring. The spring is loaded and has stored energy ready to be used. To utilize the stored energy brought upon by the mechanical model, it’s imperative that the eccentric phase must be immediately followed by a concentric phase. If not, the stored energy is dissipated as heat. Another prerequisite of this model is that the eccentric muscle contraction cannot feature a range of motion that is too large. For example, imagine a basketball player jumping up to block a shot. The player does not completely squat as deep as they possibly can before the jump to reach maximal height. Instead, they perform a quick ¼ to ½ squat and then jump. If the eccentric muscle action is too great, and the range of motion is too large for that movement, the stored energy will also be dissipated off as heat.
The second physiological model is called the neurophysical model. This model is predicated on the  body’s stretch reflex and proprioceptive organs called muscle spindles. When the body experiences a quick stretch of a muscle it results with muscular activity reflexively increasing in the agonist muscle. Plyos rely on the stretch to cause the reflexive response which, in turn, increases the force the muscle produces. Similar to the mechanical model, if there is too long of a period between the eccentric phase and concentric contraction the potential benefit of the stretch reflex will not occur.
Essentially the two models tell us that in order for an exercise to be considered a plyometric it must involve three components:
- A stretch of the agonist muscle (eccentric muscle action)
- A transition phase/Amoritization phase (the transition between eccentric and concentric phases)
- A quick concentric contraction of the agonist muscle.
Together, these three components comprise what is known as the Stretch Shortening Cycle. Understanding at least the basic scientific components of the stretch shortening cycle and its components will be of great assistance for proper programming and utilization of plyometrics.
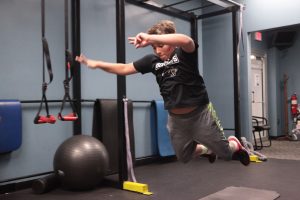
With a basic scientific primer set in place, one can now better visualize what an actual plyometric looks like. Plyometrics can be performed with both lower body and upper body movements, they can be utilized with both bodyweight and various apparatuses commonly found in a weight room, and most importantly they can be regressed, progressed and modified to fit an athlete’s individual skill-set or athletic-based need.
When designing a program around resistance training and/or aerobic training, many parameters must be set in place. Variables like the mode, intensity, placement/order, number of sets, training volume, rest time and frequency are outlined and set forth by a trainer or coach. When programming plyometrics into a training program, the very same considerations must be present. Often overlooked, there can be severe consequences if proper consideration has not taken place. Therefore, when introducing them into your program, safety should always be at the forefront. Factors such as biological age, training experience, body composition, sport/s played, season type, etc. all need to be considered in when using plyometrics.
 The first and most important detail that needs to be recognized by a coach or trainer before taking any athlete through a plyometric drill for the first time is to make sure that they demonstrate proper mechanical form throughout the movement. Since plyos are fast and rapid in nature, the chosen exercise can be performed slowly at first to ensure correct from is in place. If the plyometric exercise chosen involves jumping and leaving the ground, the athlete MUST demonstrate an ability to land safely in a proper and stable position. If athlete safety is compromised during any drill, its potential effectiveness does not outweigh the potential for injury.
Often times, lower body plyometric exercises involve all three major joints of the lower body, and when stressed in a certain way, they can lead to soft tissue injuries. Keeping an eye out for proper alignment of the ankles, hips and especially the knee needs to be at heightened focus on every single repetition. Once an athlete can appropriately show the ability to perform the exercise(s) expected of them, plyometrics can begin to make their way into an athlete’s training program.
To begin designing a plyometric program for your athlete, attention to each of the following program variables needs to take place. It should be noted that certain issues may arise in athletes or clients, and heightened awareness and alterations to training should be made. The list of requirements is meant as a generalized process for programming plyometrics. There will always be certain situations that arise and contradict the detailed factors. Changes can certainly be made, and other programming staples can be added to the list.
Mode: In what manner should plyometrics be done?
To begin utilizing plyometrics with their athletes, strength and conditioning professionals must address a very important question: “What are you trying to accomplish by including plyometrics into a program?” The answer to that question is dependent on several factors.
Certain sports like track and field are quite literally a competition of plyometric exercises. Others like basketball and volleyball require plyometric movements at an all-out intensity to be repeated throughout the course of the game, or an athlete may simply play a sport where they want to increase their speed and become more powerful. Whatever the instance is, a coach should understand how the potential benefits of plyometrics translate to sport and the individual athlete. From there, we can compare it to the other training goals of a strength and conditioning program to begin programming them accordingly. The mode also defines details such as which portion of the body will be receiving plyometric exercises. The strength coach will identify whether training the lower body, upper body, or both with plyometric exercises will be necessary.
Placement/Order: Where should Plyometric exercises appear during a workout?
A thorough warm-up that is structured around the specific muscles, joints and planes of movement that are specific to that day’s training should always take place prior to engaging in plyometric exercises. When choosing the appropriate time to include plyometric exercises during a workout, they should be thought of similarly to the Olympic lifts. The Olympic lifts and plyometrics both require a great deal of technique combined with power, force and speed to complete. Multiple joints are highly stressed and are required to work together or in succession to achieve the desired outcome. Due to all of these factors, it is highly recommended to perform plyometrics, like the Olympic lifts, very early on during the workout. The body should be fresh and the athlete should be able to provide their maximal effort. Plyometric exercises be performed in a non-fatigued state so they should be placed before any resistance training or aerobic conditioning that may take place in the same workout. There are certain circumstances when plyometric exercises can take place concurrently, or after resistance training, or in combination with other types of training like performing speed work. These instances will be directly addressed later in the article.
Intensity: How much stress and force is being placed upon the body?
Plyometric drills are actually intense in nature according to their definition, but just how intense they are can range greatly. Plyometric exercises are classified as low, moderate or high in terms of intensity based on the amount of stress that will be placed on the working joints and musculature associated with the movement. Other factors such as difficulty of the movement, sequence required to perform it, and the presence of external objects will also help define the intensity. Athletes should demonstrate the ability to perform movements starting on the lower end of the intensity spectrum before they gradually move into more moderate and higher intensity exercises.
As mentioned prior, plyometrics may not be for everybody depending on certain factors. Performing high intensity exercises should not be done by certain demographics regardless if they displayed understanding and mechanics on lower intensity plyo drills. Prepubescent children should not partake in high-intensity exercises because their epiphyseal plates still open. Accidents can result in damage to these areas which could lead to growth issues and other long-term problems. Any circumstances of past or current injury should also always be taken into consideration before allowing an athlete to perform more intense plyometric movements on the spectrum. Very large or overweight individuals are also at a higher risk of injury during higher intensity plyos, so be aware of who is performing the drills.
Examples of lower body plyometric drill intensity:
Low: skips (regular, backwards, power skips, A/B/C skips), line hops (bilateral), squat jumps, box squat jumps (low box height), box step-up jumps (low box height), alternating box step-up jumps (low box height)
Moderate: Line hops (unilateral), box squat jumps (mid to high box), box step-up jumps (mid to high box height), alternating box step-up jumps (mid to high box height), bounding for distance (single leg alternating),
High: Weighted squat jumps, depth jumps, Unilateral box jumps, Combo jumps (performing multiple repetitions consecutively, or adding in a second movement to take place after the jump is finished)
Frequency: How often should plyometric exercises be performed in a given week?
In regards to programming, frequency is defined as the number of times something occurs in a week. Many factors that have already been mentioned, like training age and sport, yet again come into play when discussing frequency. However, one of the biggest indicators of the frequency in which plyometrics are performed is the time of the training year. In-season training programs will likely see fewer training days containing plyometrics than the off-season will. As a generalized rule, off-season programs could include plyometric training 2-3 times a week, while only 1-2 times per week is necessary for in-season training. As is the case with resistance training, plyometrics tax the body in such a way that requires ample rest and recovery. Researchers and textbooks are suggesting plyometrics should be programmed by focusing on ample recovery and repair after a previous plyometric training session, instead of just an overall frequency and generalized number of days. The time that seems to be optimal for full recovery and repair is 48-72 hours, or simply 2-3 days.
There are certain exceptions to the rule. For instance, a coach could have their athlete perform lower body plyometrics the day after upper body, or vice versa, and there would not have to be as much recovery time since the plyometric exercises taxed separate body regions.
Training volume: How many sets and repetitions are performed in a given session?
Plyometric training volume is measured in several different ways. Volume depends on the intensity of the exercise, if the exercise is an upper body or lower body plyometric, as well as the goal of plyometric exercise (for example bounding deals with horizontal displacement and can be measured by distance traveled). Plyometric training volume is similar to resistance training volume in that it is expressed by “sets x reps,” but unlike resistance training only certain advanced plyo exercises deal with an athlete overloading the body with an external load. Therefore volume is very rarely measured in terms “sets x reps x weight lifted.”
One of the most standardized ways to measure lower body plyometrics is by how many times an athlete’s foot comes in contact with the ground. This way of measuring volume cannot however, be appropriate for many moderate and most high intensity exercises. Unilateral exercises, depth jumps, high box jumps, and weighted exercises all cause much more stress than a low intensity exercise like line hops. As an athlete progresses through the spectrum of plyometric intensity, note that there should be an inverse relationship between both volume and intensity of the exercise. The classic model for foot contacts is as follows:
- Beginner (little to no experience): 80 to 100 total reps
- Intermediate (some basic experience): 100 to 120 reps
- Advanced (significant experience): 120 to 140 reps.
Plyometric exercises that are overloaded, such as weighted squat jumps, can be measured and programmed just like the Olympic lifts. They should be kept within the Strength and Power repetition threshold (roughly 1 to 6 repetitions) and for 3-4 sets depending on experience and skill level. Upper body exercises that utilize an apparatus like a medicine ball can be expressed by the total number of reps/throws/slams/ tosses and is typically seen with 1-3 sets of 5-10 reps (higher reps are typically okay with these exercises since medicine balls and similar apparatuses are not usually very heavy.)
Rest time: How long between sets should an athlete rest?
Rest times for plyometrics are largely dependent on the type and intensity of the exercise. High intensity exercises like depth jumps and overloaded vertical jumps will require more rest time than lower intensity drills such as line hops and power skips. According to current research trials, common rest times range from 1:5 – 1:10 work:rest ratio. So, if 5 depth jumps takes 20 seconds to finish, the rest period will be close to 3 minutes (1:9 work:rest ratio).
The reasoning behind such long rest periods, even for the low intensity plyo drills, are that plyos require maximal effort in order to improve specific power output that translates to sport. The other major reason is very similar when performing sprinting drills. Both plyometrics and sprint training require powerful movements that rely on proper technique to achieve the best possible results. If there is insufficient rest time between sets or reps, the athlete will most likely still be tired or fatigued, which causes a breakdown in technique and power output. When exercises are performed with poor technique and they are not fully rested, the results are sub-par. The physiological adaptations that coincide with plyometrics just simply won’t occur to the highest possible extent. Over time an athlete may even adapt to the poor technique and can risk that becoming the new standard because it has been practiced and learned.
Alternative ways to Program Plyometric exercises
Once the proper foundation for plyometric programming has been set and they have been properly programmed into an athlete’s training routine, adaptation and advancement will likely take place. For athletes that are advanced enough, there are methods studied by physiologists to enhance the adaptations seen within plyometric training even further.
There is a specific style referred to as “Contrast Training” that achieves these adaptations. Contrast training relies on what is known as post-activation potentiation, or PAP for short. PAP is believed to allow for the working muscle’s overall power output to be greater after being taxed at, or near, maximal effort. Essentially, contrast training calls for the athlete to perform a heavy set of 3-6 repetitions of an exercise followed by a handful of repetitions of a plyometric exercise.
Research shows that this concept of PAP works due to increased motor unit recruitment, enhanced motor unit synchronization and greater input to the motor neuron, among several other mechanisms and theories relating to hormonal and metabolic factors. This style of training is reserved for advanced athletes only. A sample of exercise pairings that could be used in contrast training are as follows:
Snatch → Broad Jump
Squat→ Squat Jump
Bench Press → Plyo Push-up
Deadlift/RDL → Medball Reverse Toss
Loaded Sled Push/Sled Tow → Sprints
As mentioned earlier there are so many factors that should be considered when programming plyometric exercises. A comprehensive needs analysis as well as knowledge of your athlete’s capabilities, injury history and goals will be necessary when utilizing this great exercise mode for everything it’s worth.
This brief review of plymetrics should help coaches make informed decisions about how to best incorporate them into an overall strength & conditioning program.

Joe Powell is an Assistant Strength & Conditioning Coach and Adjunct Faculty Member at Central Michigan University. He teaches classes in the Department of Health and Human Performance and works primarily with the Chippewa football team. Joe is a regular contributor to the IYCA Insiders program and has been a huge part of bringing the Behind the Science series to the IYCA. Get more of Joe’s contributions in the IYCA Insiders membership.

 Add accessory tools, equipment, movements and even alter vectors when mastery of the essential movement pattern has occurred, even under substantial load (where loading is appropriate and beneficial to the movement or its progressions). Avoid “ramping it up” or “taking it up a notch” just for the sake of the “cool factor” or because you want to throw a fresh challenge at your athlete. The lack of mastery and the resulting neural disconnects won’t be a fresh challenge, they’ll create a “fresh hell,” and may set your athlete back without you even recognizing it.
 Bio: Coach Phil Hueston is not just another pretty trainer. With over 18 years of in-the-trenches experience with athletes ages 6 to 60, he brings a unique skill-set to the improvement of his athletes. The author of the Amazon best-seller “Alchemy; Where the Art and Science Collide in Youth Fitness,” his client list includes professional athletes, collegiate athletes as well as thousands of youth athletes. Phil has been the co-owner of All-Star Sports Academy in Toms River, NJ, one of the largest and most successful youth and family fitness centers in New Jersey since 2008. He was named “Coach of the Year” by the IYCA for 2012-2013. A contributor to IYCA.org and coach to other coaches, Phil provides unique insights and ideas that can help other coaches accelerate their clients’ progress and performance. Phil is married to the woman responsible for his entry into the fitness profession, MaryJo. Between them they have 2 grown children, Nate and Andrew, and 99 problems. Phil’s personal website is coachphilhueston.com, and he can be contacted at phil.hueston@hotmail.com
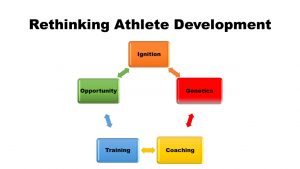 Long term athlete development has been discussed for years, but the concept is still incredibly confusing for practitioners. Part of the reason for this confusion is that the models are missing details and coordination of efforts between coaches, trainers and parents.


 Jordan Tingman – CSCS*, USAW L1, ACE CPT, CFL1 is a graduate of Washington State University with a B.S. in Sports Science with a Minor in Strength and Conditioning. She completed internships with the strength & conditioning programs at both Washington State University and Ohio State University, and is currently a Graduate Assistant S & C Coach at Eastern Washington University.
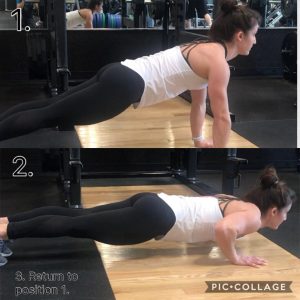
 Ask any strength coach, and they will tell you that most athletes lack strength, control and mobility in many basic bodyweight training exercises. Utilizing bodyweight training, “can result in both physical strength and stamina” (Harrison, 2010). This is why bodyweight training progressions are such an important part of any strength training program.
 Jordan Tingman – CSCS*, USAW L1, ACE CPT, CFL1 is a graduate of Washington State University with a B.S. in Sports Science with a Minor in Strength and Conditioning. She completed internships with the strength & conditioning programs at both Washington State University and Ohio State University. She is now working as a Graduate Assistant S & C Coach at Eastern Washington University.
 More often than not, we see females who have very little training before getting to college. When they arrive, they quickly realize that they are way behind the upperclassmen and it can have a large impact on their confidence and initial success.
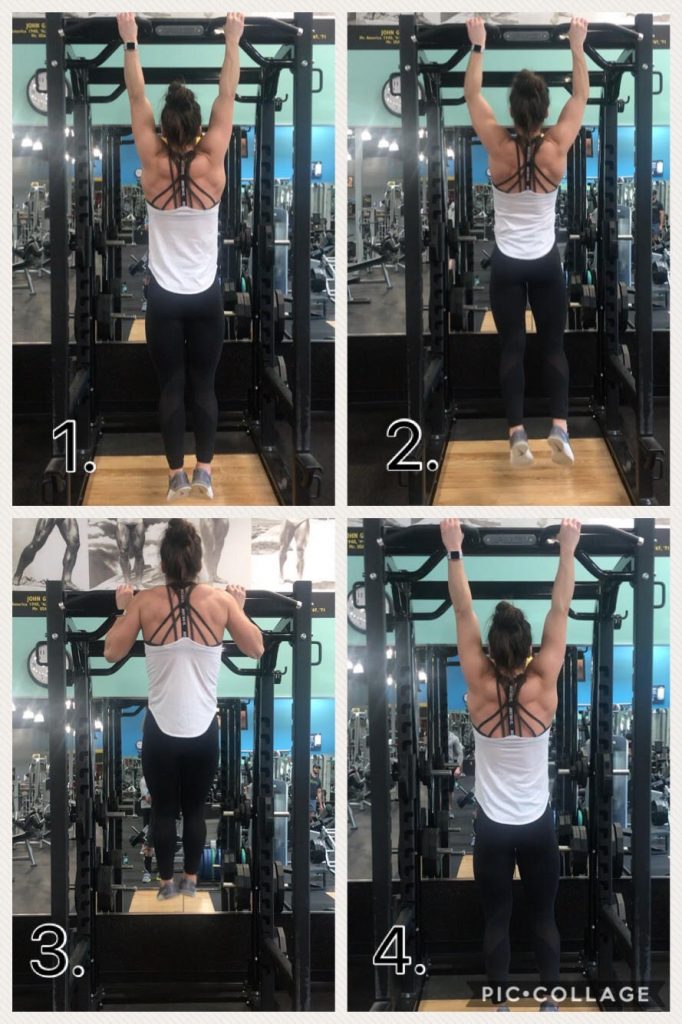

 Another category of imbalances is due to right/left dominance. Recognizing these imbalances and creating programs to correct them can help lead to safer athletes on game day.
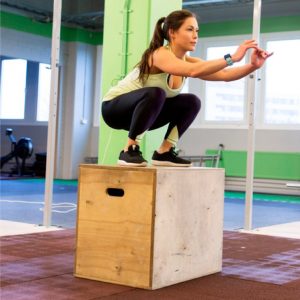
 About the Author: Nick Brattain is the owner of Brattain Sports Performance in New Orleans, LA. Throughout his career as a track athlete at the University of Indianapolis, he accumulated 3 NCAA All-American titles, 6 GLVC Indoor/Outdoor Titles, and numerous indoor and outdoor records. From 2011 to 2014, Nick worked for a private, hospital-based facility in Indianapolis, where he grew exponentially as a coach due to the high caliber of colleagues around him and the opportunities he received to work with some of Indy’s most elite athletes. In 2014, Nick moved to New Orleans where he began Brattain Sports Performance. He is currently working with some of the top NBA and WNBA talent in the league. He also continues to work with high school and colleges athletes of all sports as they aspire to reach the professional levels.
 Pause Bench Press Progression – In the last installment of this article series, we talked about the importance of exercise progressions and the front squat progression we utilize with our middle school and high school athletes. It can be found at

 little out of their wheel-house. This in combination with the sport demands in baseball, athletes can show muscular or movement “weakness” in areas that are crucial to max velocity sprinting.

 momentum than ever. Together, this colorful band of characters has a serious mission and a strong educational background.
 University of Pittsburgh assistant strength & conditioning coach Freddie Walker was a presenter at the 2017 IYCA Summit and is one of 17 authors in the new Principles of Athletic Strength & Conditioning book. Coach Walker has been a college strength coach for several years, but he also has a background working with young athletes. Freddie spent two years working in high schools and with athletes as young as eight years old. In his current position, he has worked with multiple NFL draft picks and some of the finest athletes in the world. All of this experience gives him a unique perspective on athletic development.
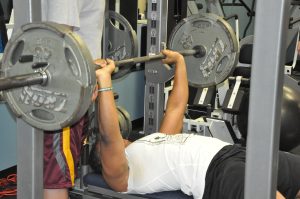
 affected negatively due to the load being too heavy for the athlete to complete a full range of motion. This is where we see half squats, rounded backs on deadlifts, barbells stapling athlete’s chests on the bench press, cleans being pulled in atrociously inefficient manners, etc. The list goes on and on. The implications are numerous and can prove to be quite detrimental for the athlete.
 Smart coaches understand games aren’t won with deceptive bench press numbers, but rather with healthy athletes who are able to play to the best of their ability. At certain levels, the strength coach is around their athletes more often than their position or head coaches. Actions and messages portrayed by the strength coach can often resonate with athletes. Pushing these false standards of success can send out the message that it’s okay to cut corners. Keep the lessons and messages honest. After all, one of the best privileges of being a coach of any kind is seeing an athlete grow to become an honorable human being, not just a standout on the playing field.
 Joe Powell is an Assistant Strength & Conditioning Coach and Adjust Faculty Member at Central Michigan University. He has experience in a variety of settings including Division I Athletics, private sports performance, high school S & C, personal training and teaching college courses.
 passionate about something beyond just monetary gains. As an example, I did a little bit of NBA combine prep towards the end of my U-Conn experience, so I had some time in it. When I got into the baseball world, what basically happens is you’re swamped from the second week in September all the way up until the first week in March. And then you have six weeks to gather your thoughts before you start going with your summer guys. It’s a tough schedule. So I’ve had some agents who represent baseball players as well as basketball players and football guys, and they’ve asked me if I’d be interested in doing NBA combine or NFL combine prep. While it sounds great, that would be walking away from the four weeks of quiet that I get each year. You have to be passionate about it but you have to be passionate about it beyond just monetary gains because if I try to be everything to everybody, it doesn’t work. Our baseball guys appreciate us even more because they don’t see a bunch of 350 pound offensive linemen walking around, and I don’t look like a guy who’s going to play linebacker in the NFL, so you have to be able to want it for more than just money.”
 “It’s hard to really grow a specific niche if you can’t outfit your facility to accommodate it. When you walk in our facility in Massachusetts, we’ve got two big tunnels for pitching and throwing and now doing video, and stuff like that makes a big difference. If we didn’t have that it would be harder to cater to baseball players.”

 Do you have athletes that dream of playing in college?
