 Pause Bench Press Progression – In the last installment of this article series, we talked about the importance of exercise progressions and the front squat progression we utilize with our middle school and high school athletes. It can be found at https://iyca.org/front-squat-progression. In this installment we will be discussing the importance of the Pause Bench Press progression. We will also give you the progression plan we implement with our athletes and our recommendations for athletes in 7th and 8th grade and high school. In the last portion of this article, we will discuss some problems or issues that may occur when prescribing this exercise and the reasoning behind our use of this particular exercise for our program.
When most people talk about strength training, weightlifting, powerlifting, or bodybuilding, the bench press is probably most commonly mentioned exercise, and probably the most commonly performed exercise. Go to any gym, health club, fitness center, box, or whatever the facility is, and there will be a place to bench press there. That can be a good thing and bad thing because many people believe that anyone can do it without a plan for progression when learning the movement. Skipping over the basics in anything is usually detrimental, but in lifting it can cause long term issues that are hard to overcome. Age appropriate progressions are the key, so let’s go through our Pause Bench Press progression one step at a time.
Bench Push-Up
This is our starting point for our pause bench press progression. We begin with both hands on the bench performing a push-up with our chest touching the bench in each repetition. Body posture and proper execution is the focus when performing this exercise. If a kid needs to, they can put their knees on the ground as a regression. We will not progress an athlete if they cannot perform 10 perfect reps of the exercise.
7th Grade 8th Grade High School
WK 1 – 6 x 6 WK 1 – 6 x 8 WK 1 – 6 x 10
WK 2 – 6 x 8 WK 2 – 6 x 12
WK 3 – 6 x 10
Push-Up
For the next exercise in our pause bench press progression, we increase the difficulty and volume of exercise from the previous movement. Just as with the focus of the previous movement, body posture and proper execution of the exercise is critical for maximum benefit to the athlete. When performing this movement, we tell the athletes to squeeze the elbows into the body, not allowing them to flare outward. Just as with the Bench Push-Up, if needed they can have their knees on the ground. We will not progress an athlete if they cannot perform 10 perfect reps of the exercise.
7th Grade 8th Grade High School
WK 4 – 6 x 6 WK 3 – 6 x 8 WK 2 – 6 x 12
WK 5 – 6 x 8 WK 4 – 6 x 12
WK 6 – 6 x 10
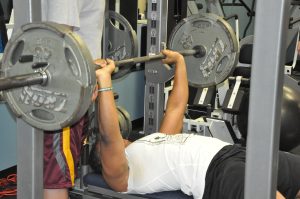
When beginning to use weight while performing a bench pressing variation, whether it is barbell, dumbbell, or kettlebell… safety is important. We use a back spotter, who can provide either a lift off or a spot for safety purposes. We avoid using side spotters due to the possibility of one spotter grabbing the barbell and tipping it when trying to assist. We teach our spotters to have their hands in an over & under grip close to the barbell without touching it. We want to see that space/gap to ensure that the lifter is doing the work, while giving the spotter the ability to assist if needed. When spotting the dumbbells, we have the spotter spot near the lifter’s wrist. This way the spotter can assist the lifter appropriately during the exercise.
The next crucial thing we teach is the proper set-up on the bench. We utilize a consistent barbell to eye relationship by having the athlete lie down directly under the barbell in a straight line upward. The next thing to teach is pulling the shoulder blades together and digging into the bench when laying the back down. We have an advantage for athletes performing this movement because of our specialized type of upholstery designed to allow the lifter to grip into the bench more easily when lifting.
Body position is the next thing we teach our athletes when it comes to our Bench Press progressions. First, we want the shoulder blades in the bench. Second, we want the hips to stay in constant contact with the bench for the entire time throughout the movement. Lastly, we want the feet flat and pressed into the floor. This allows for the lifter to use the lower body by pressing through the floor during the bench pressing exercises.
The grip on the barbell is the next part of the exercise execution. We have tape on our barbells to better assist our athletes in knowing where to put their hands. Our blue tape is on the outer ring of the power barbell, while the red tape is on the smooth part of the power barbell and knurling ends towards the middle of the barbell. We allow for comfort purposes that our athletes go no wider than pinky fingers on the blue tape.
Barbell path is something most people usually don’t pay much attention to, but it’s something we coach about constantly. We teach a straight-line path for the weight to travel. In my opinion, doing this is the safest and most efficient way to press. Straight-line pressing also allows the lifter to better find their groove when pressing. Each of the previous components are coached each time we perform a bench press variation.
Once we begin to utilize weight in our progressions, we use barbell to dumbbell type of progressions. Using the barbell first allows for proper development of a lifting path while using the dumbbells. It adds a stabilization effect and increases the execution difficulty as we advance in our progression plan. Another thing you will notice in our progression plan is the initial use of partial range of motion, followed by full range of motion movements.
Floor Press
This is the first exercise in which we add external resistance in our bench press progression. We begin with a 25lbs barbell and then work up from that point. Have the lifter lie on the ground under the barbell, have them lower the barbell straight down tucking the elbows in at a 45-degree angle. Then they should lower the barbell until the elbows come to rest on the ground. Once the barbell is completely at rest, the lifter should press the barbell upward fully locking out the arms to complete the exercise.
7th Grade 8th Grade High School
WK 7 – 6 x 6 WK 5 – 6 x 12 WK 3 – 6 x 10
WK 8 – 6 x 8 WK 6 – 6 x 10
WK 9 – 6 x 10
DB Floor Press
This is the same movement, but instead of using the barbell, use of dumbbells is introduced. When performing this movement, we have the palms facing towards each other which makes it a little easier to keep the elbows in the proper position.
7th Grade 8th Grade High School
WK 10 – 6 x 8 WK 7 – 6 x 12 WK 4 – 6 x 10
WK 11 – 6 x 10 WK 8 – 6 x 10
WK 12 – 6 x 12
Board Press
This exercise is another “partial range of motion” movement, but with greater motion than the Floor Press. We start by placing a shoulder saver from elitefts on the barbell in the middle of the bar. This lift is begun by having the lifter lower the barbell the same way as in the Floor Press, stopping when the shoulder saver comes to rest on the chest. Once the barbell is on the chest, the lifter presses the barbell upward locking the arms out to complete the exercise.
7th Grade 8th Grade High School
WK 13 – 6 x 12 WK 9 – 6 x 10 WK 5 – 6 x 8
WK 14 – 6 x 10 WK 10 – 6 x 8
WK 15 – 6 x 8
DB Bench Press
This is the first full range of motion exercise we use in our bench press progression. We use the same palms-facing-forward hand position as the DB Floor Press. Have the athlete get set-up on the bench, then extend the dumbbells with the arms to get started performing the exercise. Lower the dumbbells down until they touch the chest, then press them upward until the arms are locked out at the top. Focus must be on paying attention to not bouncing the weight off the chest with momentum. The lifter must control the weight the entire time while performing the exercise.
7th Grade 8th Grade High School
WK 16 – 6 x 12 WK 11 – 6 x 10 WK 6 – 6 x 10
WK 17 – 6 x 10 WK 12 – 6 x 8
WK 18 – 6 x 8
Close Grip Bench Press
This is another full range of motion movement in our bench press progression and is very close to our final movement. The biggest thing with this movement is the lifter’s grip of the barbell. We have our athletes place their middle finger on the red tape on the barbell to start. To initiate the exercise, the lifter lowers the barbell down under control until it touches the chest, then the lifter presses the barbell upward completing the exercise by locking out the arms at the top. Focus must be on paying attention to not bouncing the weight off the chest, as the lifter must control the weight the entire time while performing this exercise.
7th Grade 8th Grade High School
WK 19 – 6 x 12 WK 13 – 6 x 10 WK 7 – 6 x 8
WK 20 – 6 x 10 WK 14 – 6 x 8
WK 21 – 6 x 8
DB Incline Press
This is really the only exception to our rule of barbell first, dumbbell second, in our bench press progression. When performing this movement, which is very similar to the DB Bench Press, the angle of the bench is in an inclined position. Remember that we want to utilize the same hand position as all other dumbbell pressing exercises. Again, attention must be paid to not bouncing the weight off the chest, as the lifter must control the weight the entire time while performing the exercise.
7th Grade 8th Grade High School
WK 22 – 6 x 12 WK 15 – 6 x 10 WK 8 – 6 x 8
WK 23 – 6 x 10 WK 16 – 6 x 8
WK 24 – 6 x 8
Pause Bench Press
This is the final movement in our pause bench press progression and it is the primary upper body pressing exercise in our program. When performing this exercise, the lifter lowers the barbell as before until the barbell rests on the chest. The lifter remains tight and pauses for 3 seconds, then explosively presses the barbell upward, completing the movement by locking the arms at the top of the exercise. Controlling the barbell throughout the entire exercise is vital to the successful performance of the exercise.
7th Grade 8th Grade High School
WK 25 – 6 x 12 WK 17 – 6 x 10 WK 9+ – 6 x 8
WK 26 – 6 x 10 WK 18+ – 6 x 8
WK 27+ – 6 x 8
The most common issue that arises when following a bench press progression is doing things too fast and too soon. As I mentioned earlier, everyone thinks they can bench press, but performing the exercise, and performing the exercise correctly/safely are two different things. One of the reasons we utilize the pause in our bench press movement is to teach proper control of the exercise instead of bouncing the barbell. Another reason we have embraced the pause is that it helps keep the hips on the bench while pressing the barbell. Yes, adding the pause will decrease the total weight a lifter can press. However, we believe this is the most efficient way for an athlete to press with the upper body. Adding the pause reveals a lifter’s true upper body strength levels.
This is the second of three in our series of progression articles. I love the feedback I have already received, and I look forward to the third article, which will cover how we teach the power clean in our program. Not only will we discuss the progression we implement, but we’ll share the reasoning behind why we teach the progression the way we do. I would love to hear what you think, and I can be reached at tjacobi@strong-rock.com

Tobias Jacobi has been a strength & conditioning coach at Strong Rock Christian School for 4 years and spent 15 years as a college S & C coach before that. He spent time at East Carolina University, Charleston Southern University, Kent State University, Western Carolina University, Elon University, UNC-Chapel Hill and Cumberland University. He holds multiple certifications, has worked with thousands of athletes at every level, and has spoken at clinics all over the country.
For more information on how to train high school athletes, check out the IYCA High School Strength and Conditioning Specialist course and certification. The HSSCS is the only certification available that focuses entirely on training high school ages athletes. The HSSCS includes several hours of video instruction and two textbooks with contributions from 20 of the top strength & conditioning coaches from major universities, high schools, private facilities and NFL teams. Click on the image below to learn more about the High School Strength & Conditioning Specialist credential.

 where the barbell will be placed on the deltoids near the upper clavicle. To address this, our teaching progression includes the “free weight squat,” something I stole from Iowa’s Football Strength & Conditioning Coach, Chris Doyle. The free weight squat is basically a front squat with the arms pointed straight ahead instead of gripping the bar. This teaches athletes the proper barbell placement when performing the front squat.
 bell should swing up to shoulder level, while keeping the arms straight. A common mistake is the bending of the elbows which engages the upper body. This is something we want to avoid. The bending of the elbows also takes emphasis away from the hips. We typically use the double arm swing, but you can also utilize a single arm version of the exercise. When performing the single arm exercise the one additional coaching cue is that we turn the thumb backwards when the bell goes in between the legs. The snap of the hips and minimal arm use is the exact same as the double arm version of the KB Swing.